I Tri and Craft

thoughts from a mother of boys, a marathoner, a triathlete, a crafter, a wife, and a scientist


Leave a comment

Birthday Pirate Shirt ~ A Silhouette Cameo how to (Part 1)

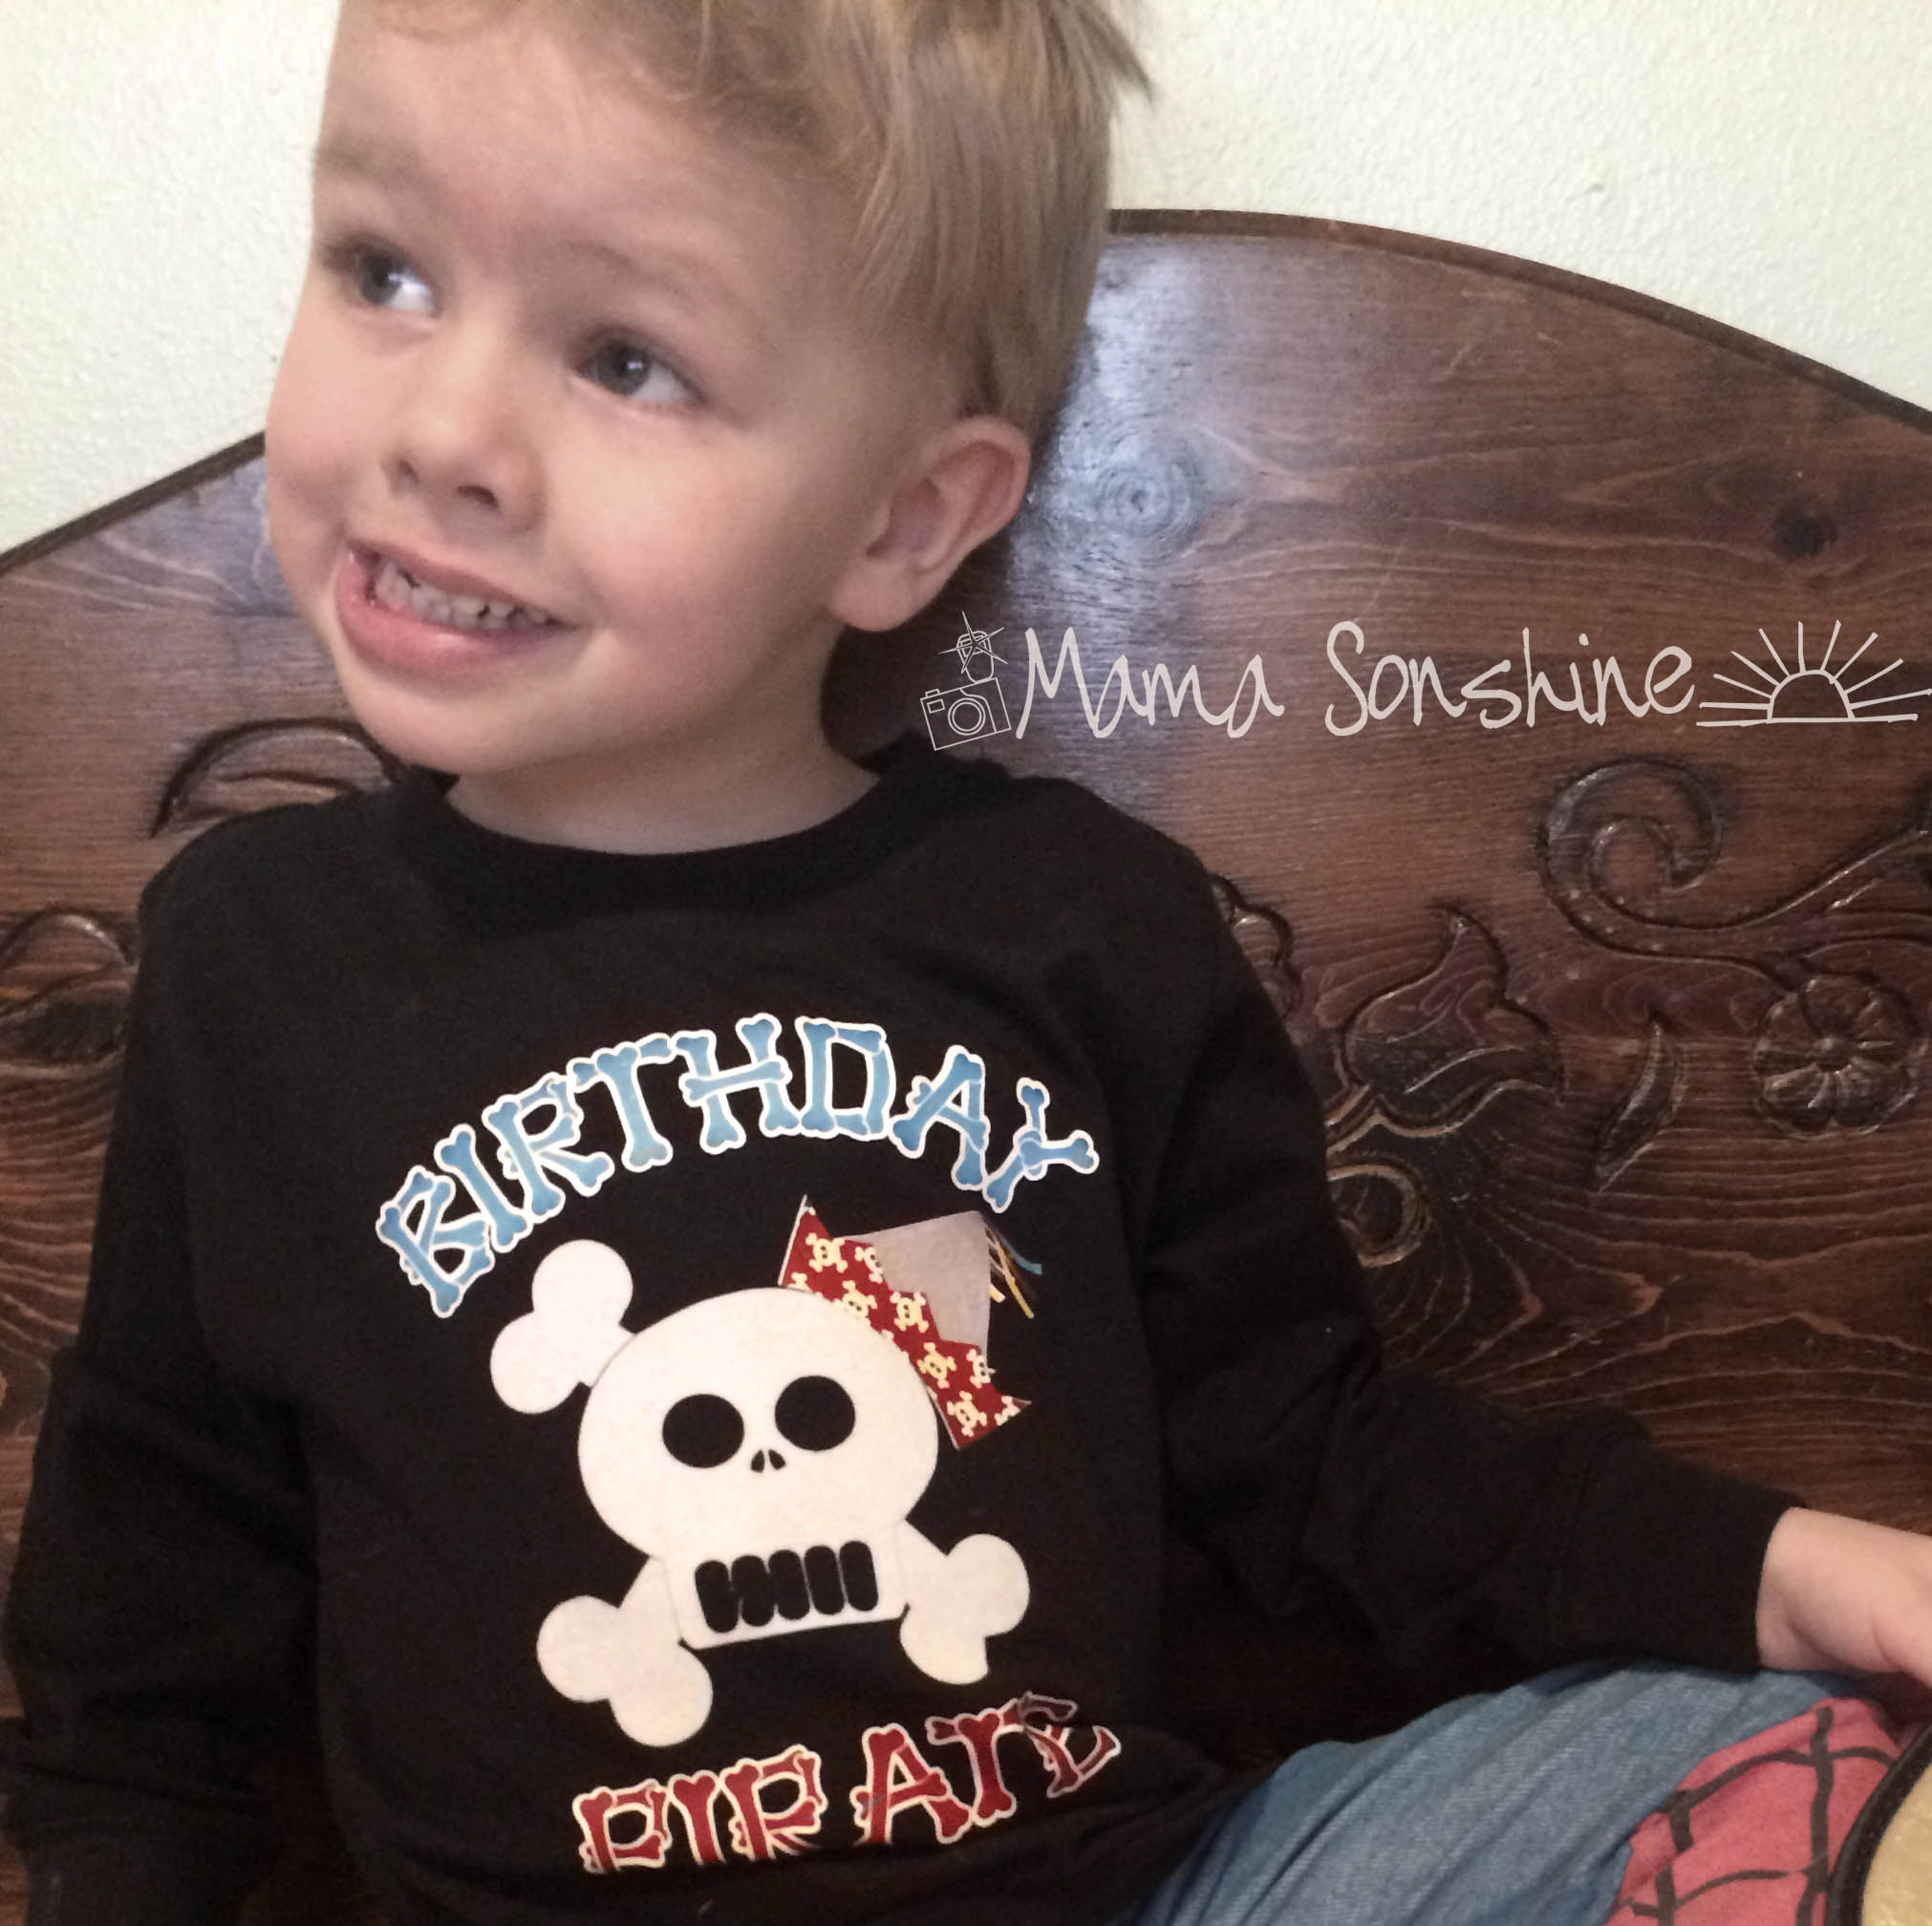
I wanted to share with you the steps I took to make my son’s birthday shirt.

There was a few problems I had that I was able to work through.  Hopefully this will help so others won’t get stuck like I did.

In this tutorial I use my Silhouette Cameo and the Silhouette Studio DE software to make a custom shirt for my son’s birthday party.  I used graphics from Just So Scrappy‘s YoHo YoHo Pirate kit.  I used the Silhouette brand Flocked Heat Transfer Material for the skull, and Avery Dark T-Shirt Transfers for Ink Jet Printers.

Part One will be how to make the Skull & Crossbones

Part Two will be how to do the words & party hat

Part Three will be how to iron everything on with some tips

MSS_BirthdayShirt01

The flocked heat transfer material I had is 9″ wide, I set my paper size to normal Letter 8.5″x11″ since I will also be doing a print ‘n cut portion for his shirt.  Keeping the size the same helped me with proportions.

MSS_PirateShirt_Tutorial01
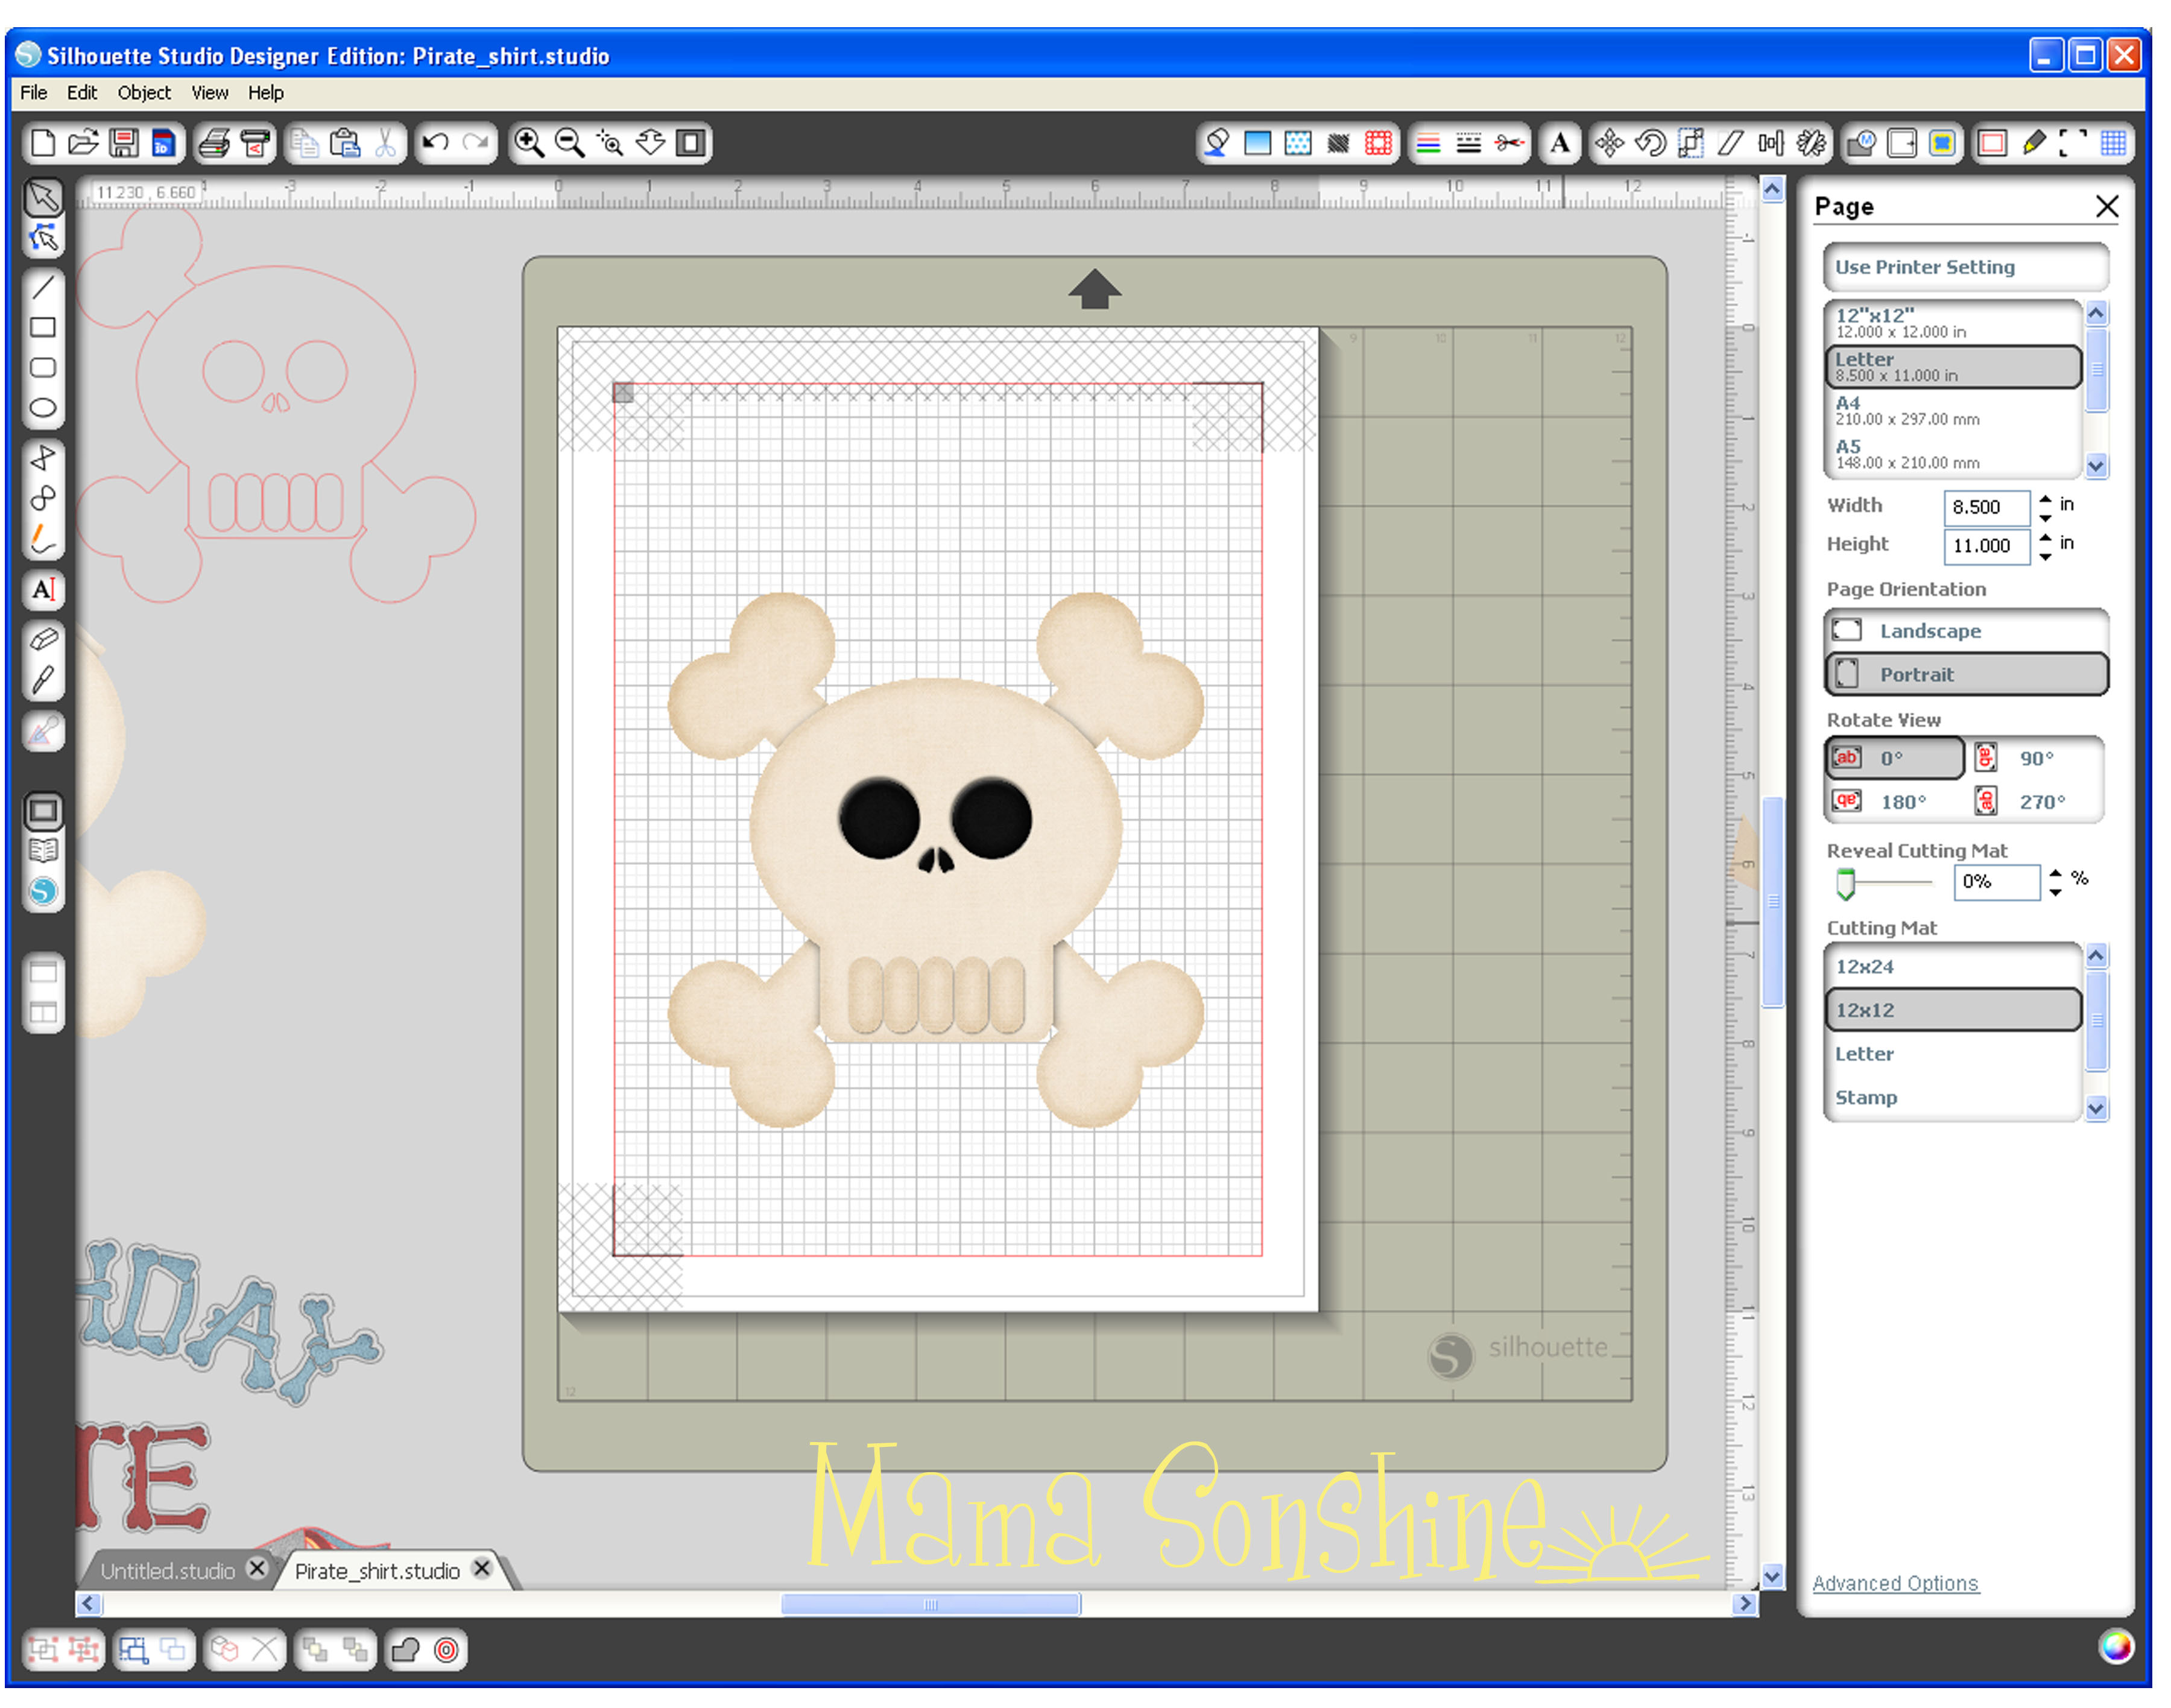
I selected the skull and cross-bones from my library.  Since it is a .png file I had to trace the element.  I planned on cutting the skull out of the flocked heat transfer material, so I won’t need the picture after tracing it.

MSS_PirateShirt_Tutorial02
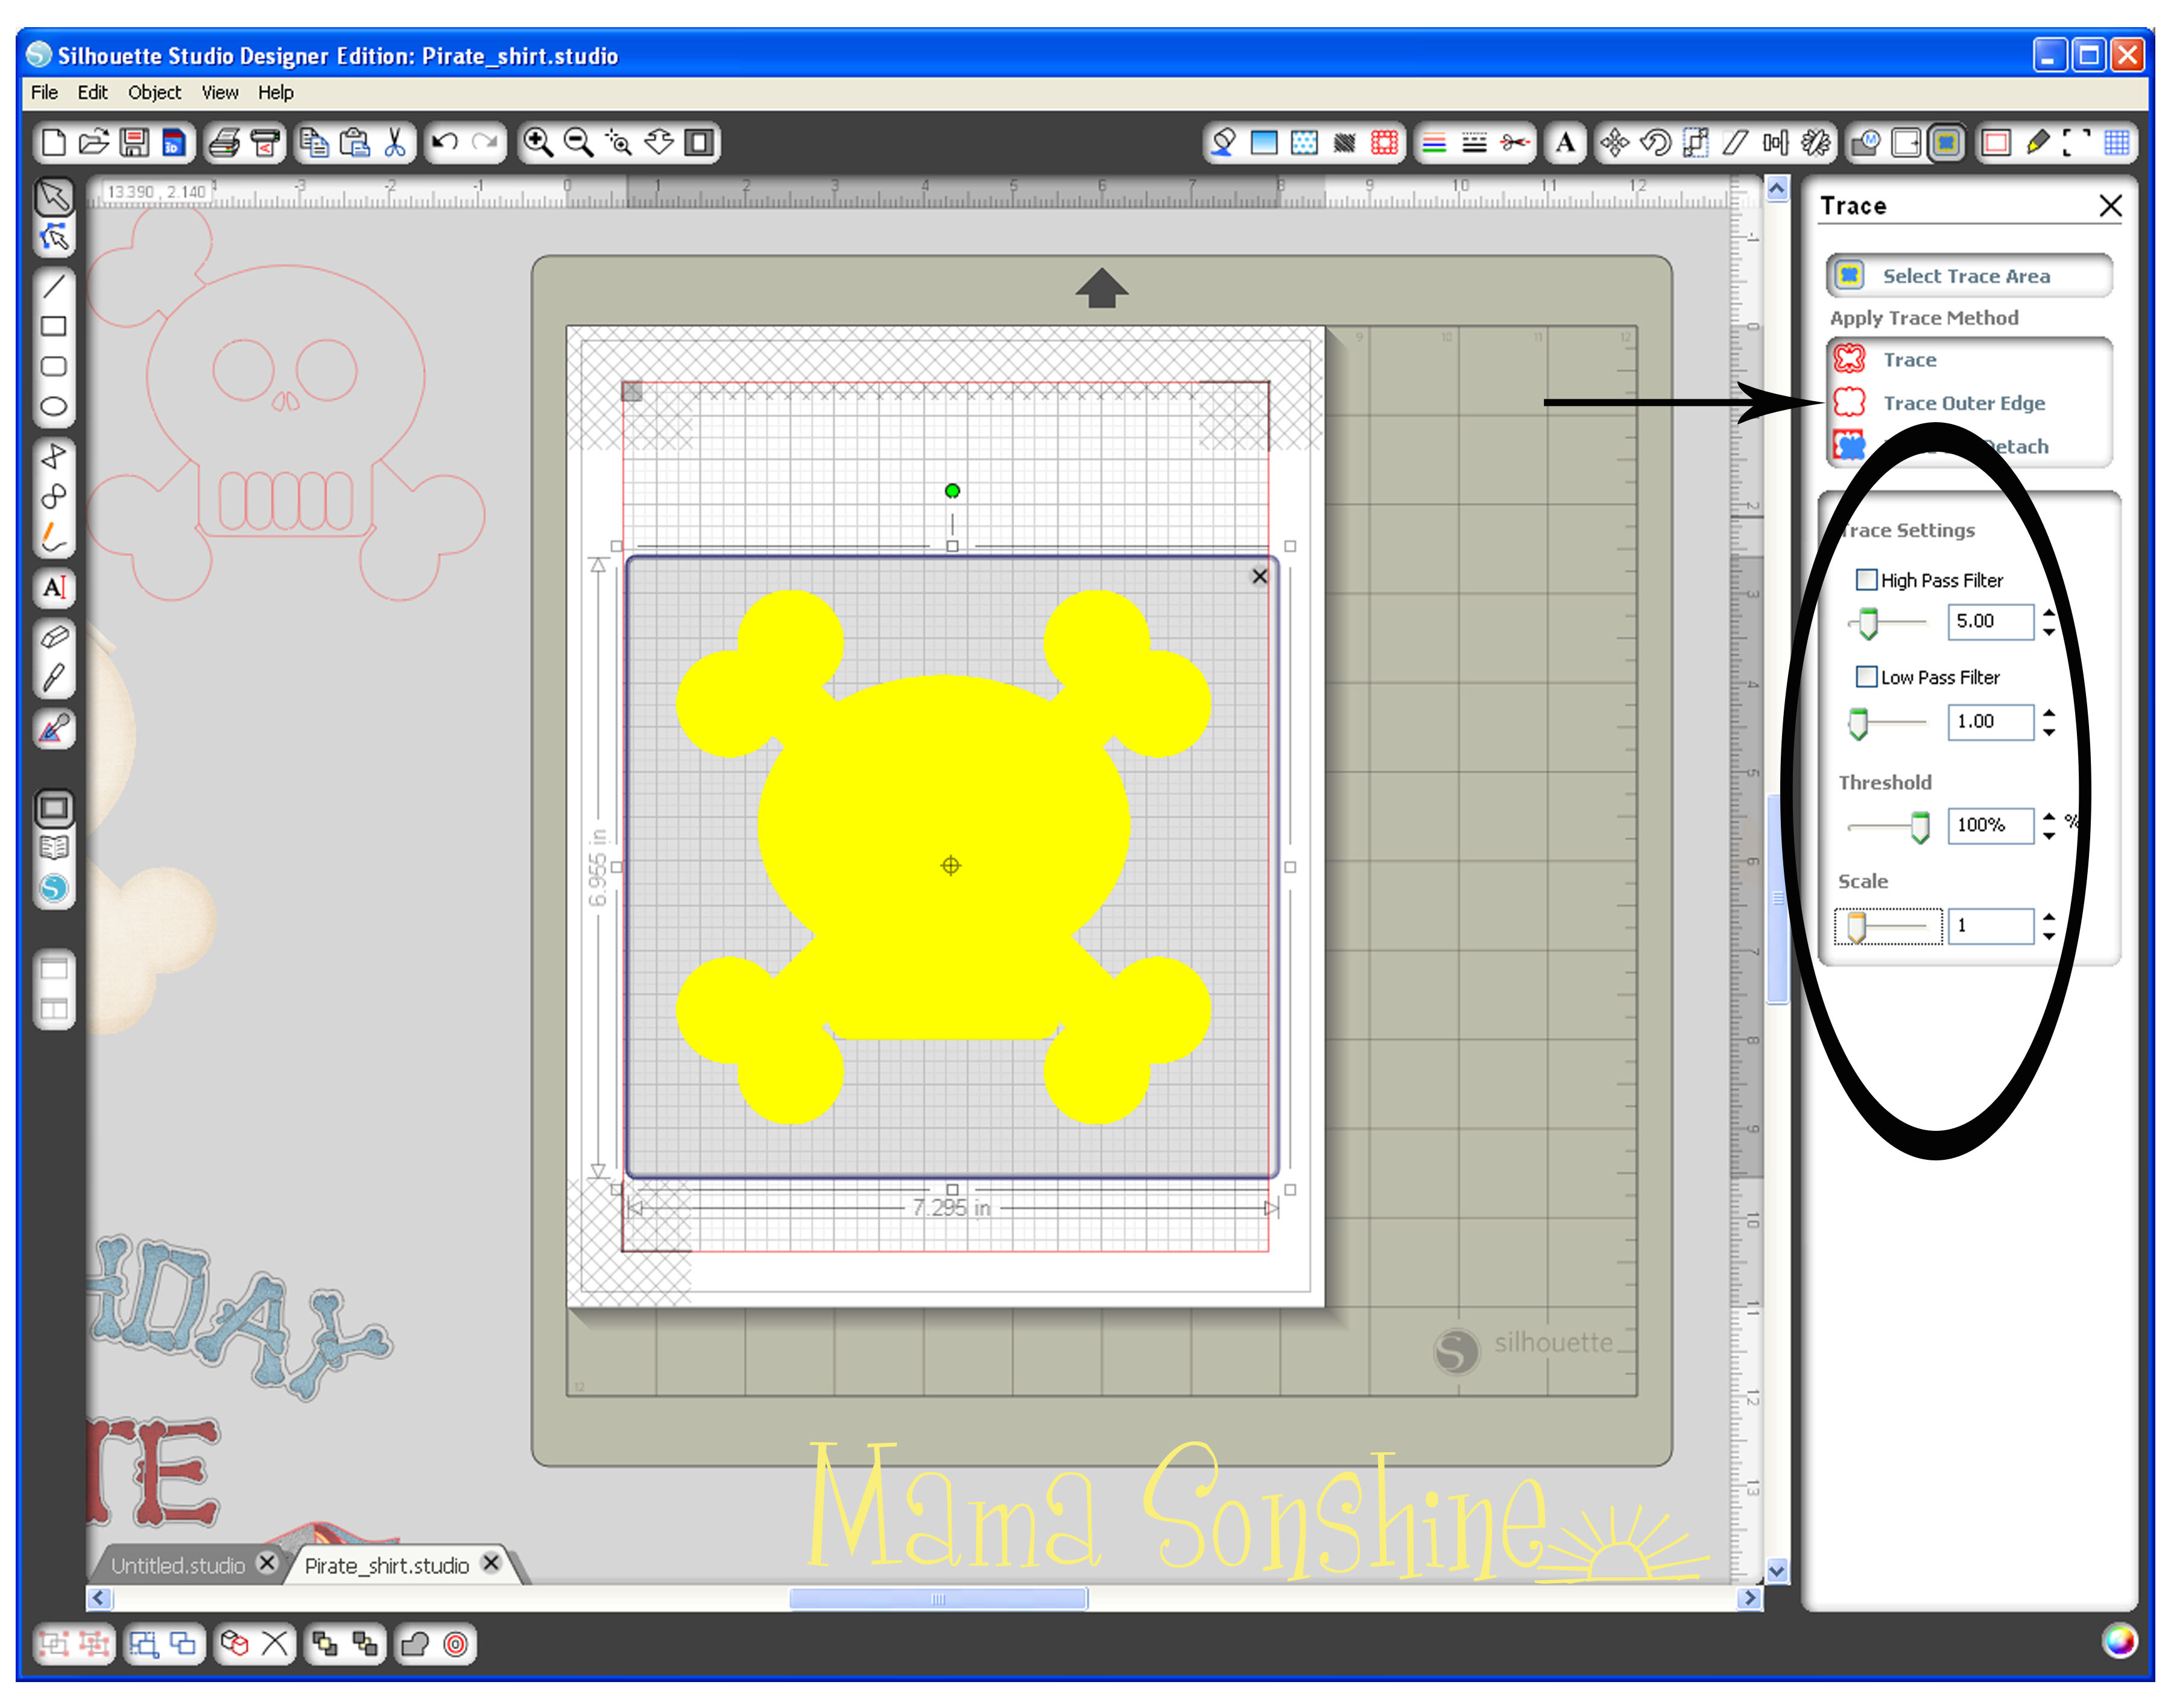
No matter what my settings were, I could not get the eyes, nose and teeth to be traced.  This is because they are colored parts of the png, so the software couldn’t differentiate between them and the skull.  I chose to trace the outline first, then do the inside elements separate.

MSS_PirateShirt_Tutorial03

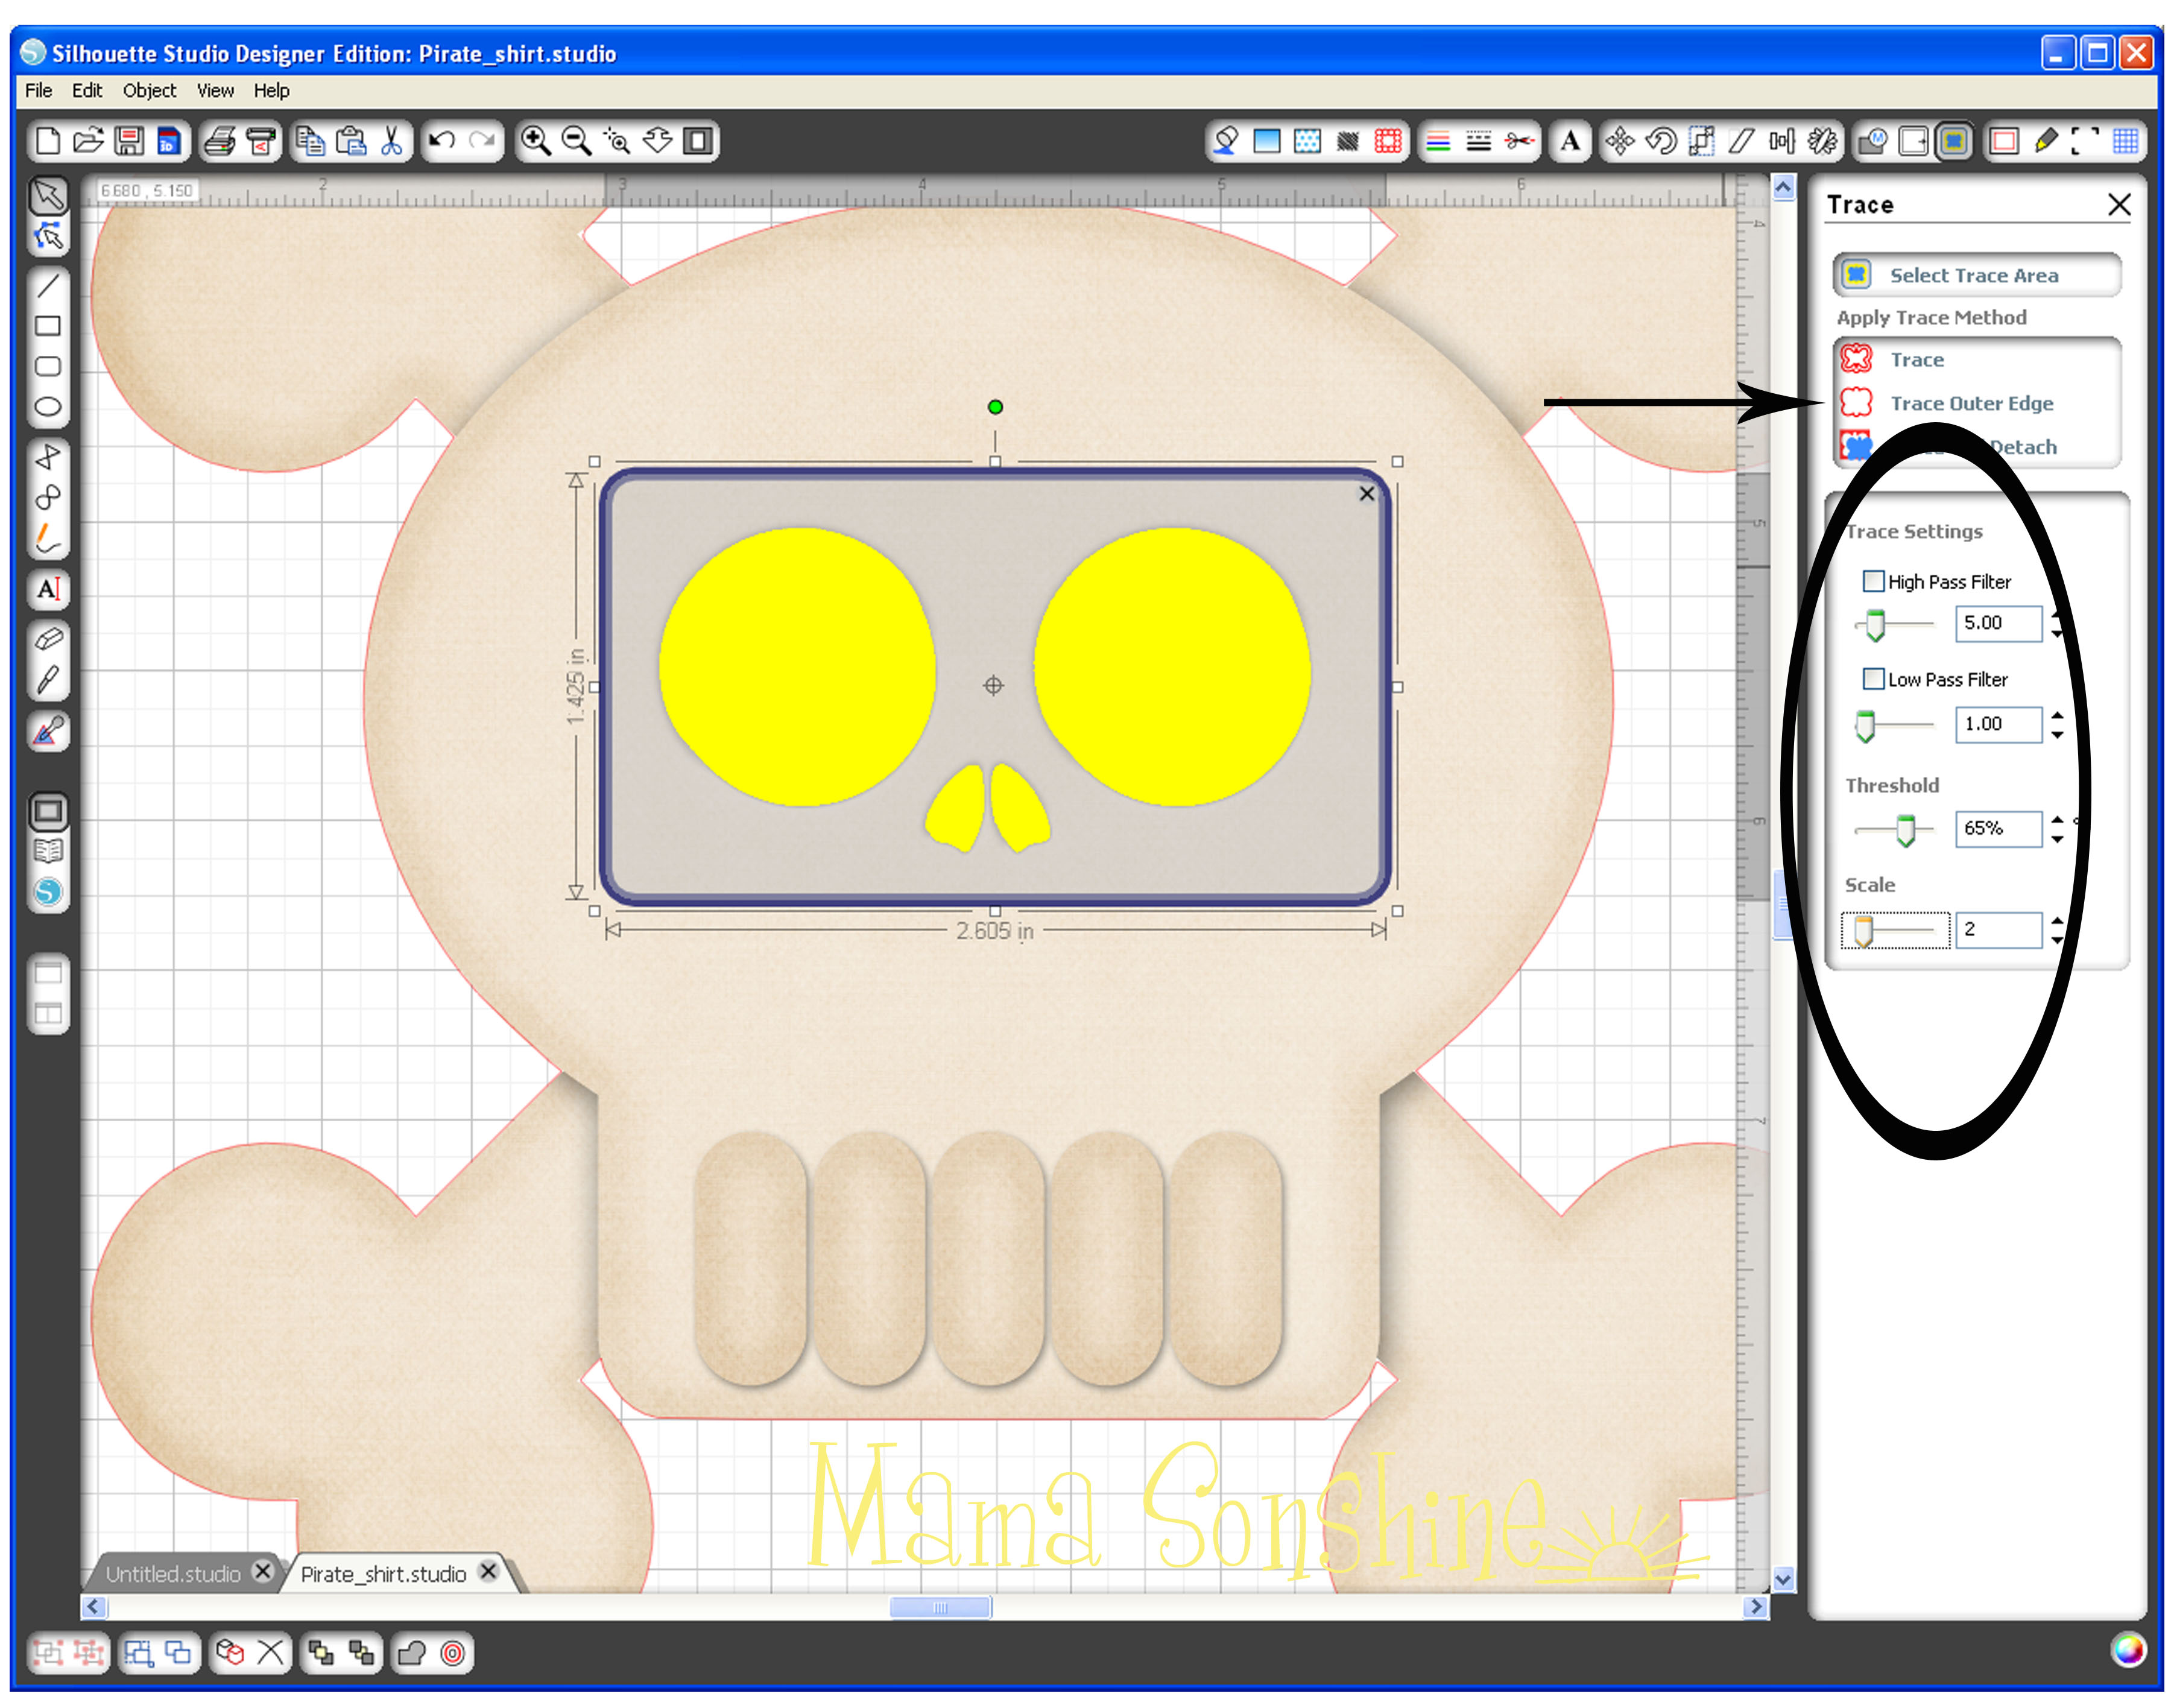
Since the teeth are basically the same color as the skull, I couldn’t get them to trace cleanly.

MSS_PirateShirt_Tutorial04

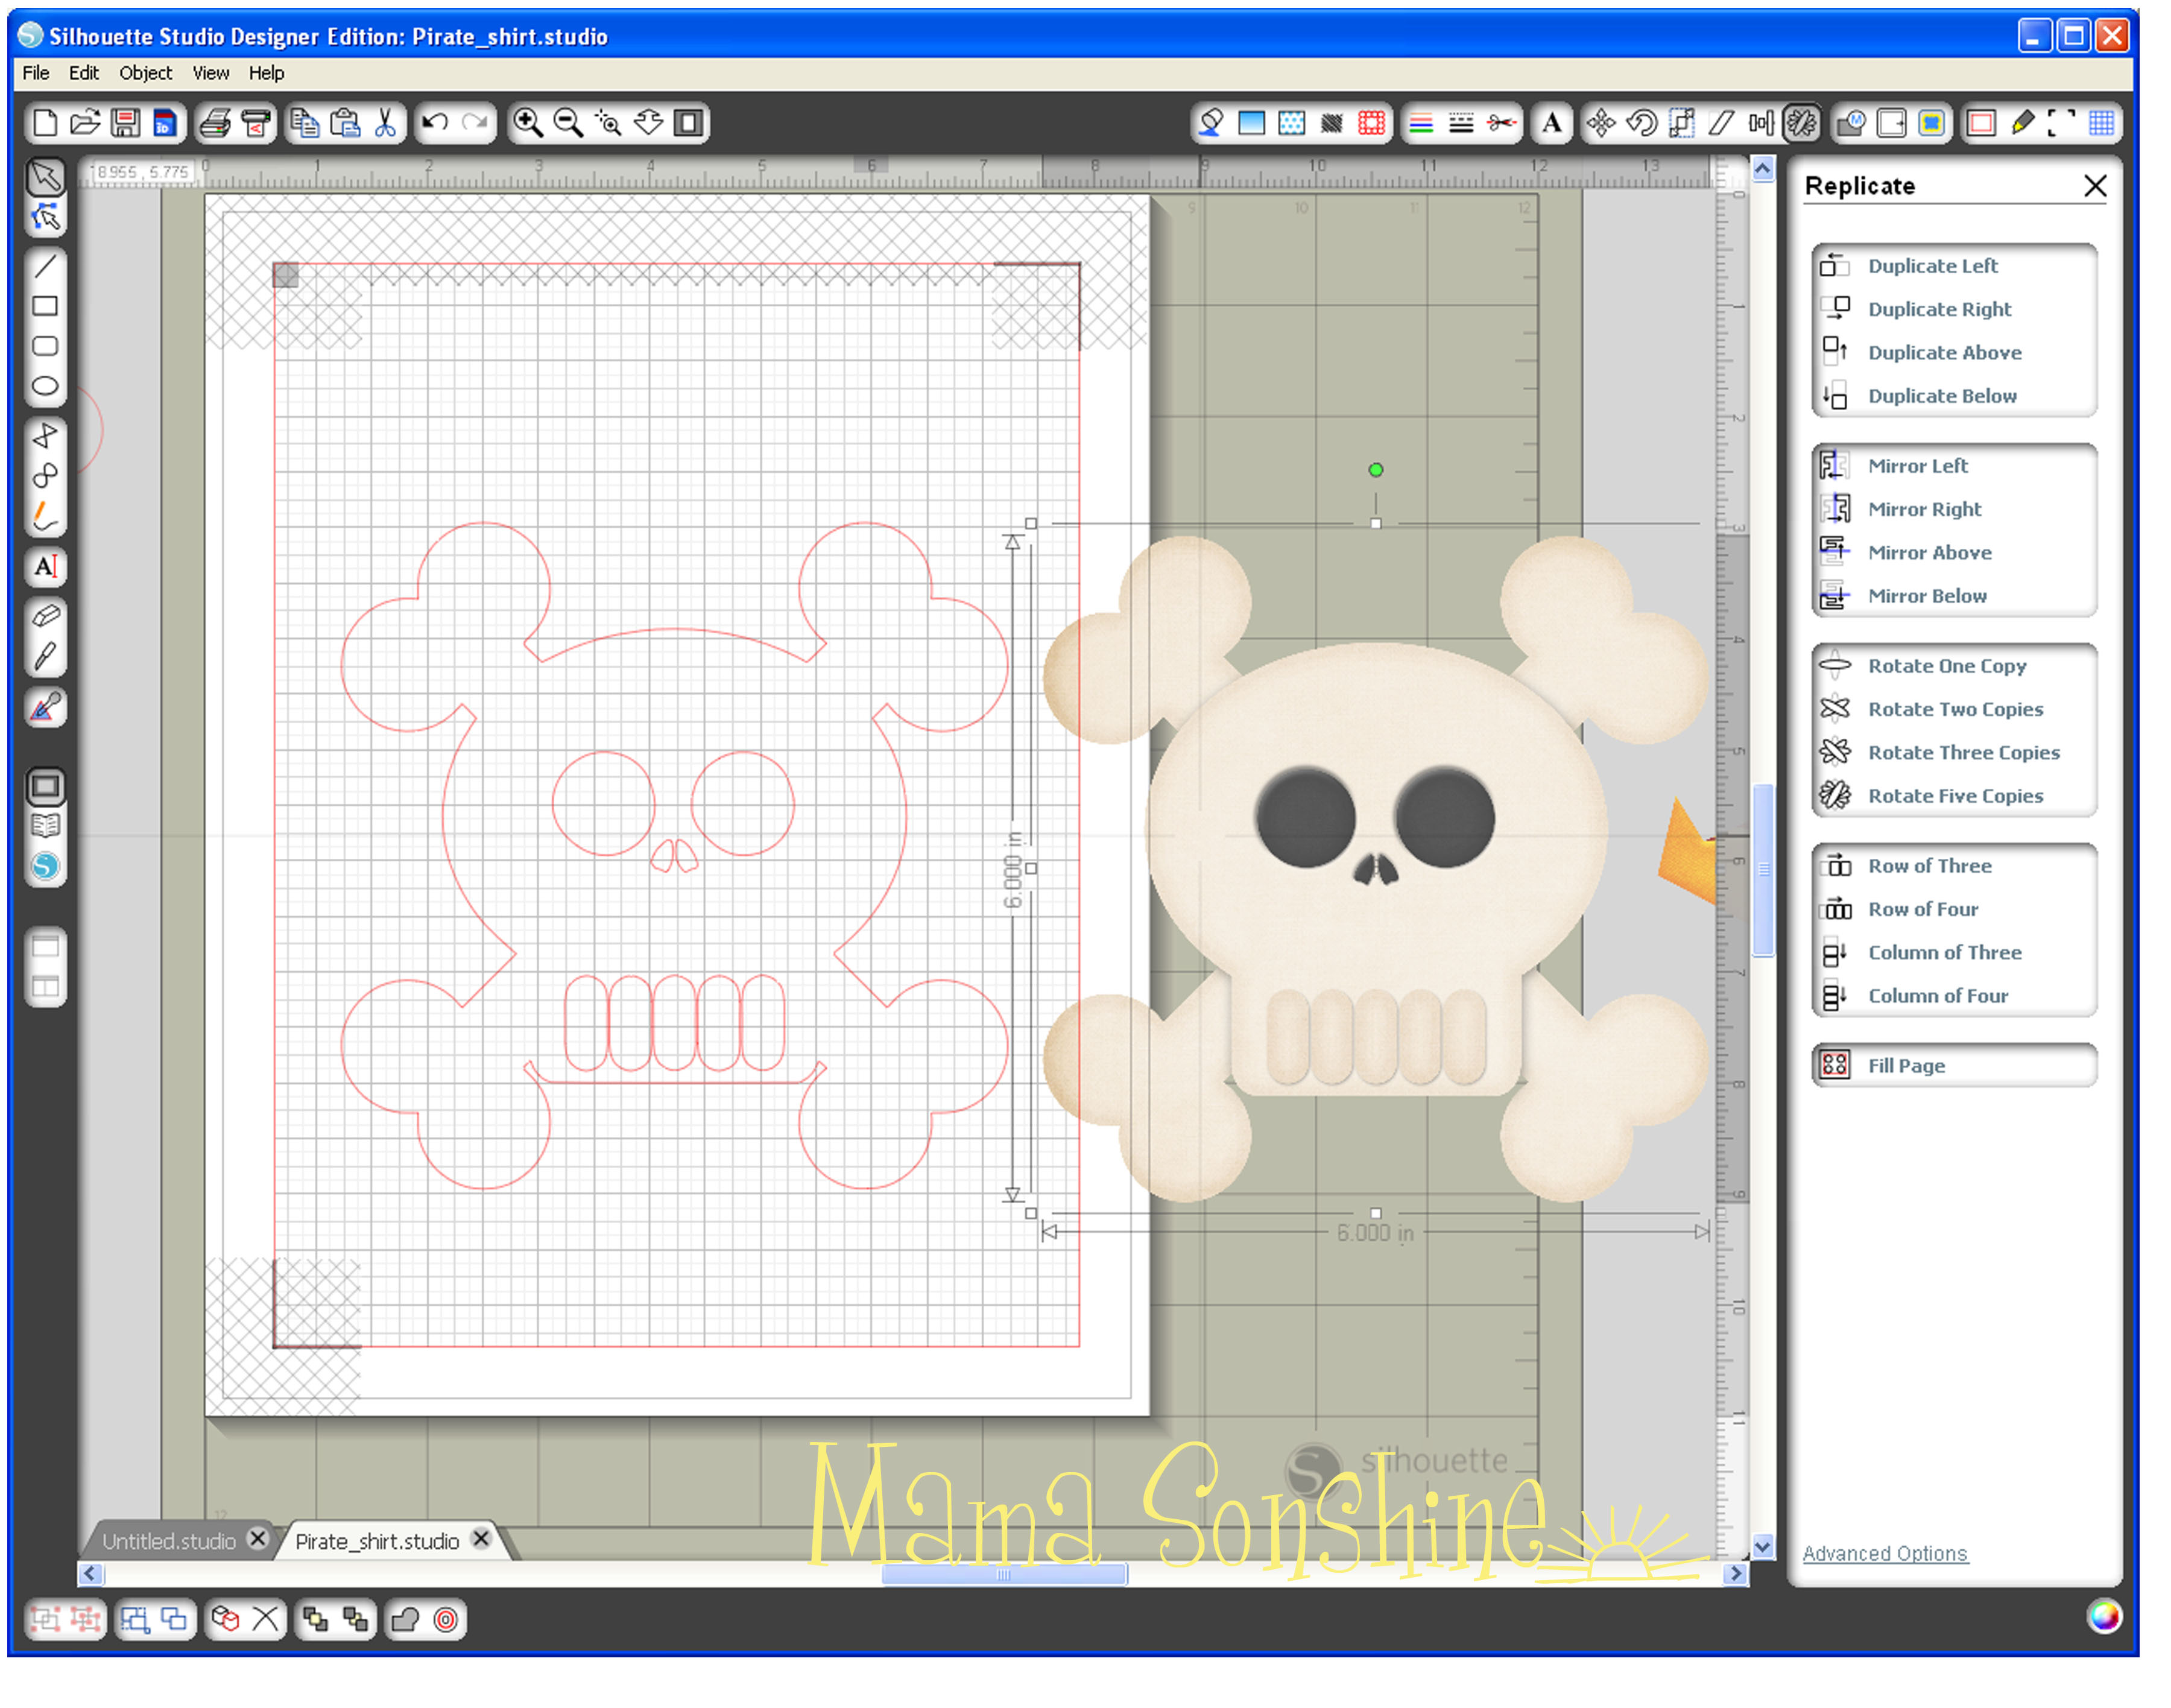
Notice all the yellow dots.  I could have gone back and deleted them all, but it is easier to just use the drawing tools.

MSS_PirateShirt_Tutorial06

I used the circle tool to make an oval about the shape of one tooth, I then used the point editing tool to match the shape of one tooth.  Using the Replicate tool box, I made copies of the teeth and aligned them with the original picture.

MSS_PirateShirt_Tutorial07

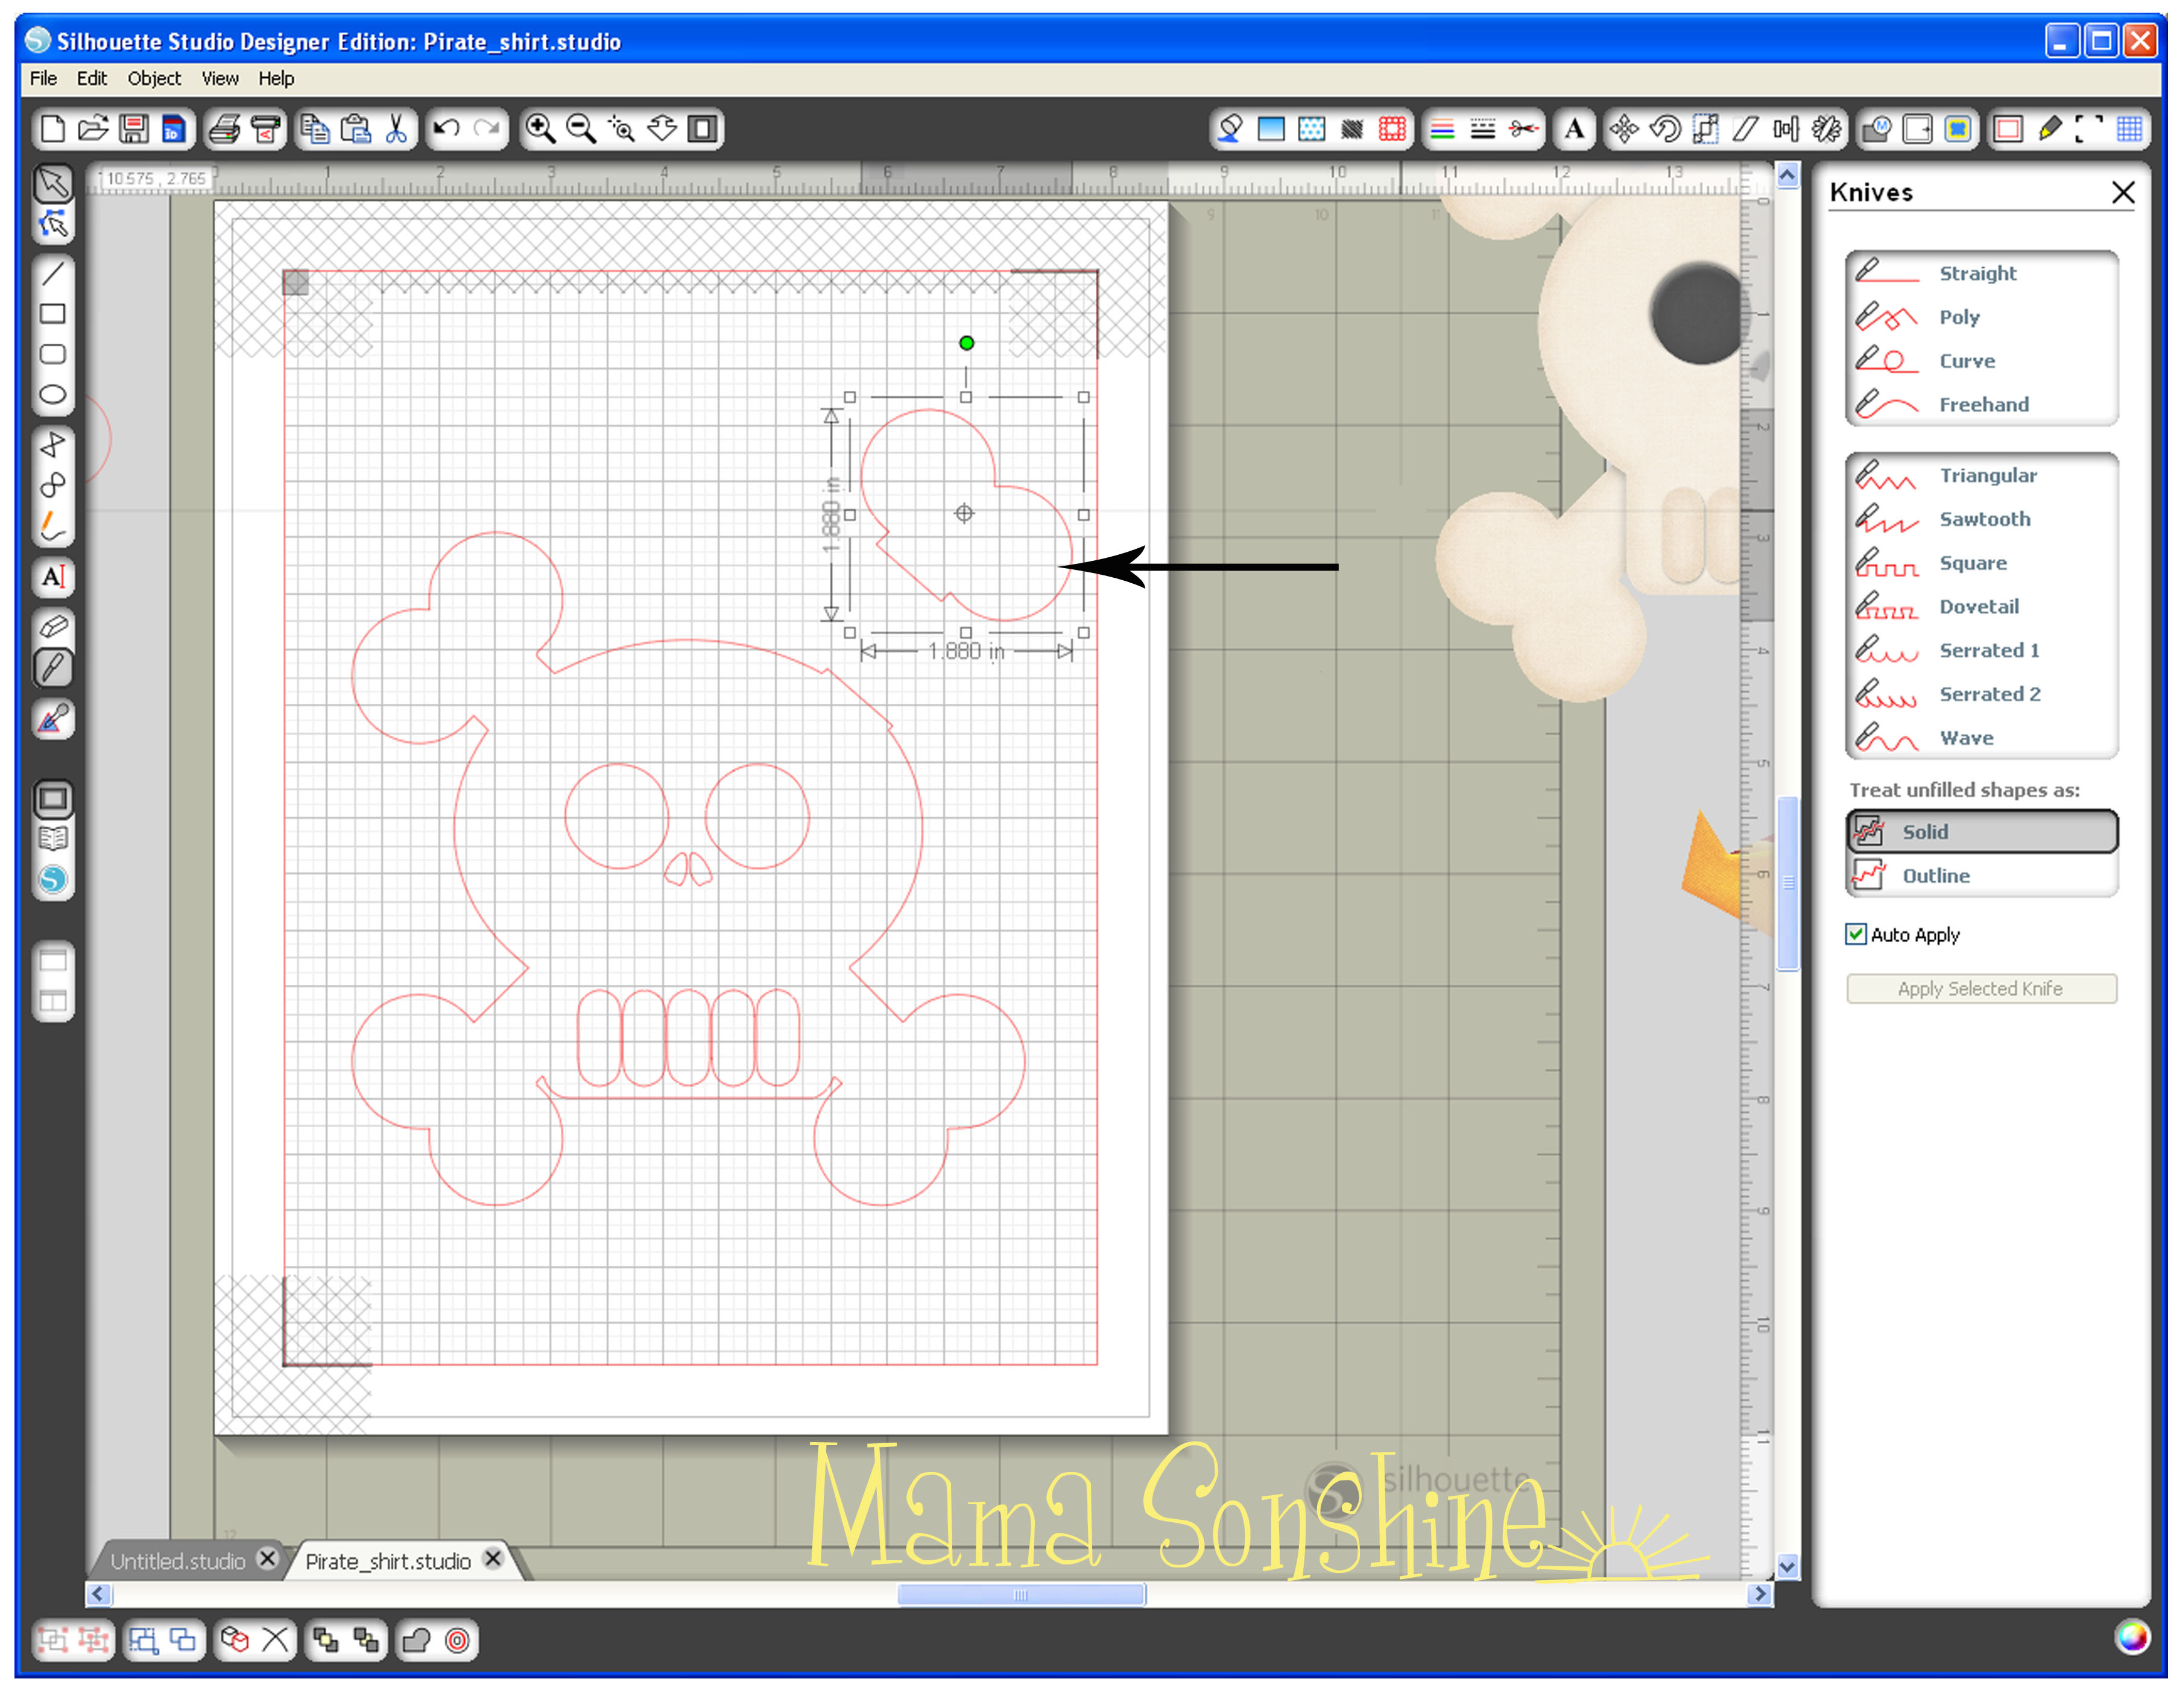
Since I no longer need the picture, I can delete it, or just move it off the mat.  One part of the bones needs to be removed because this is where the party hat will be.

MSS_PirateShirt_Tutorial08
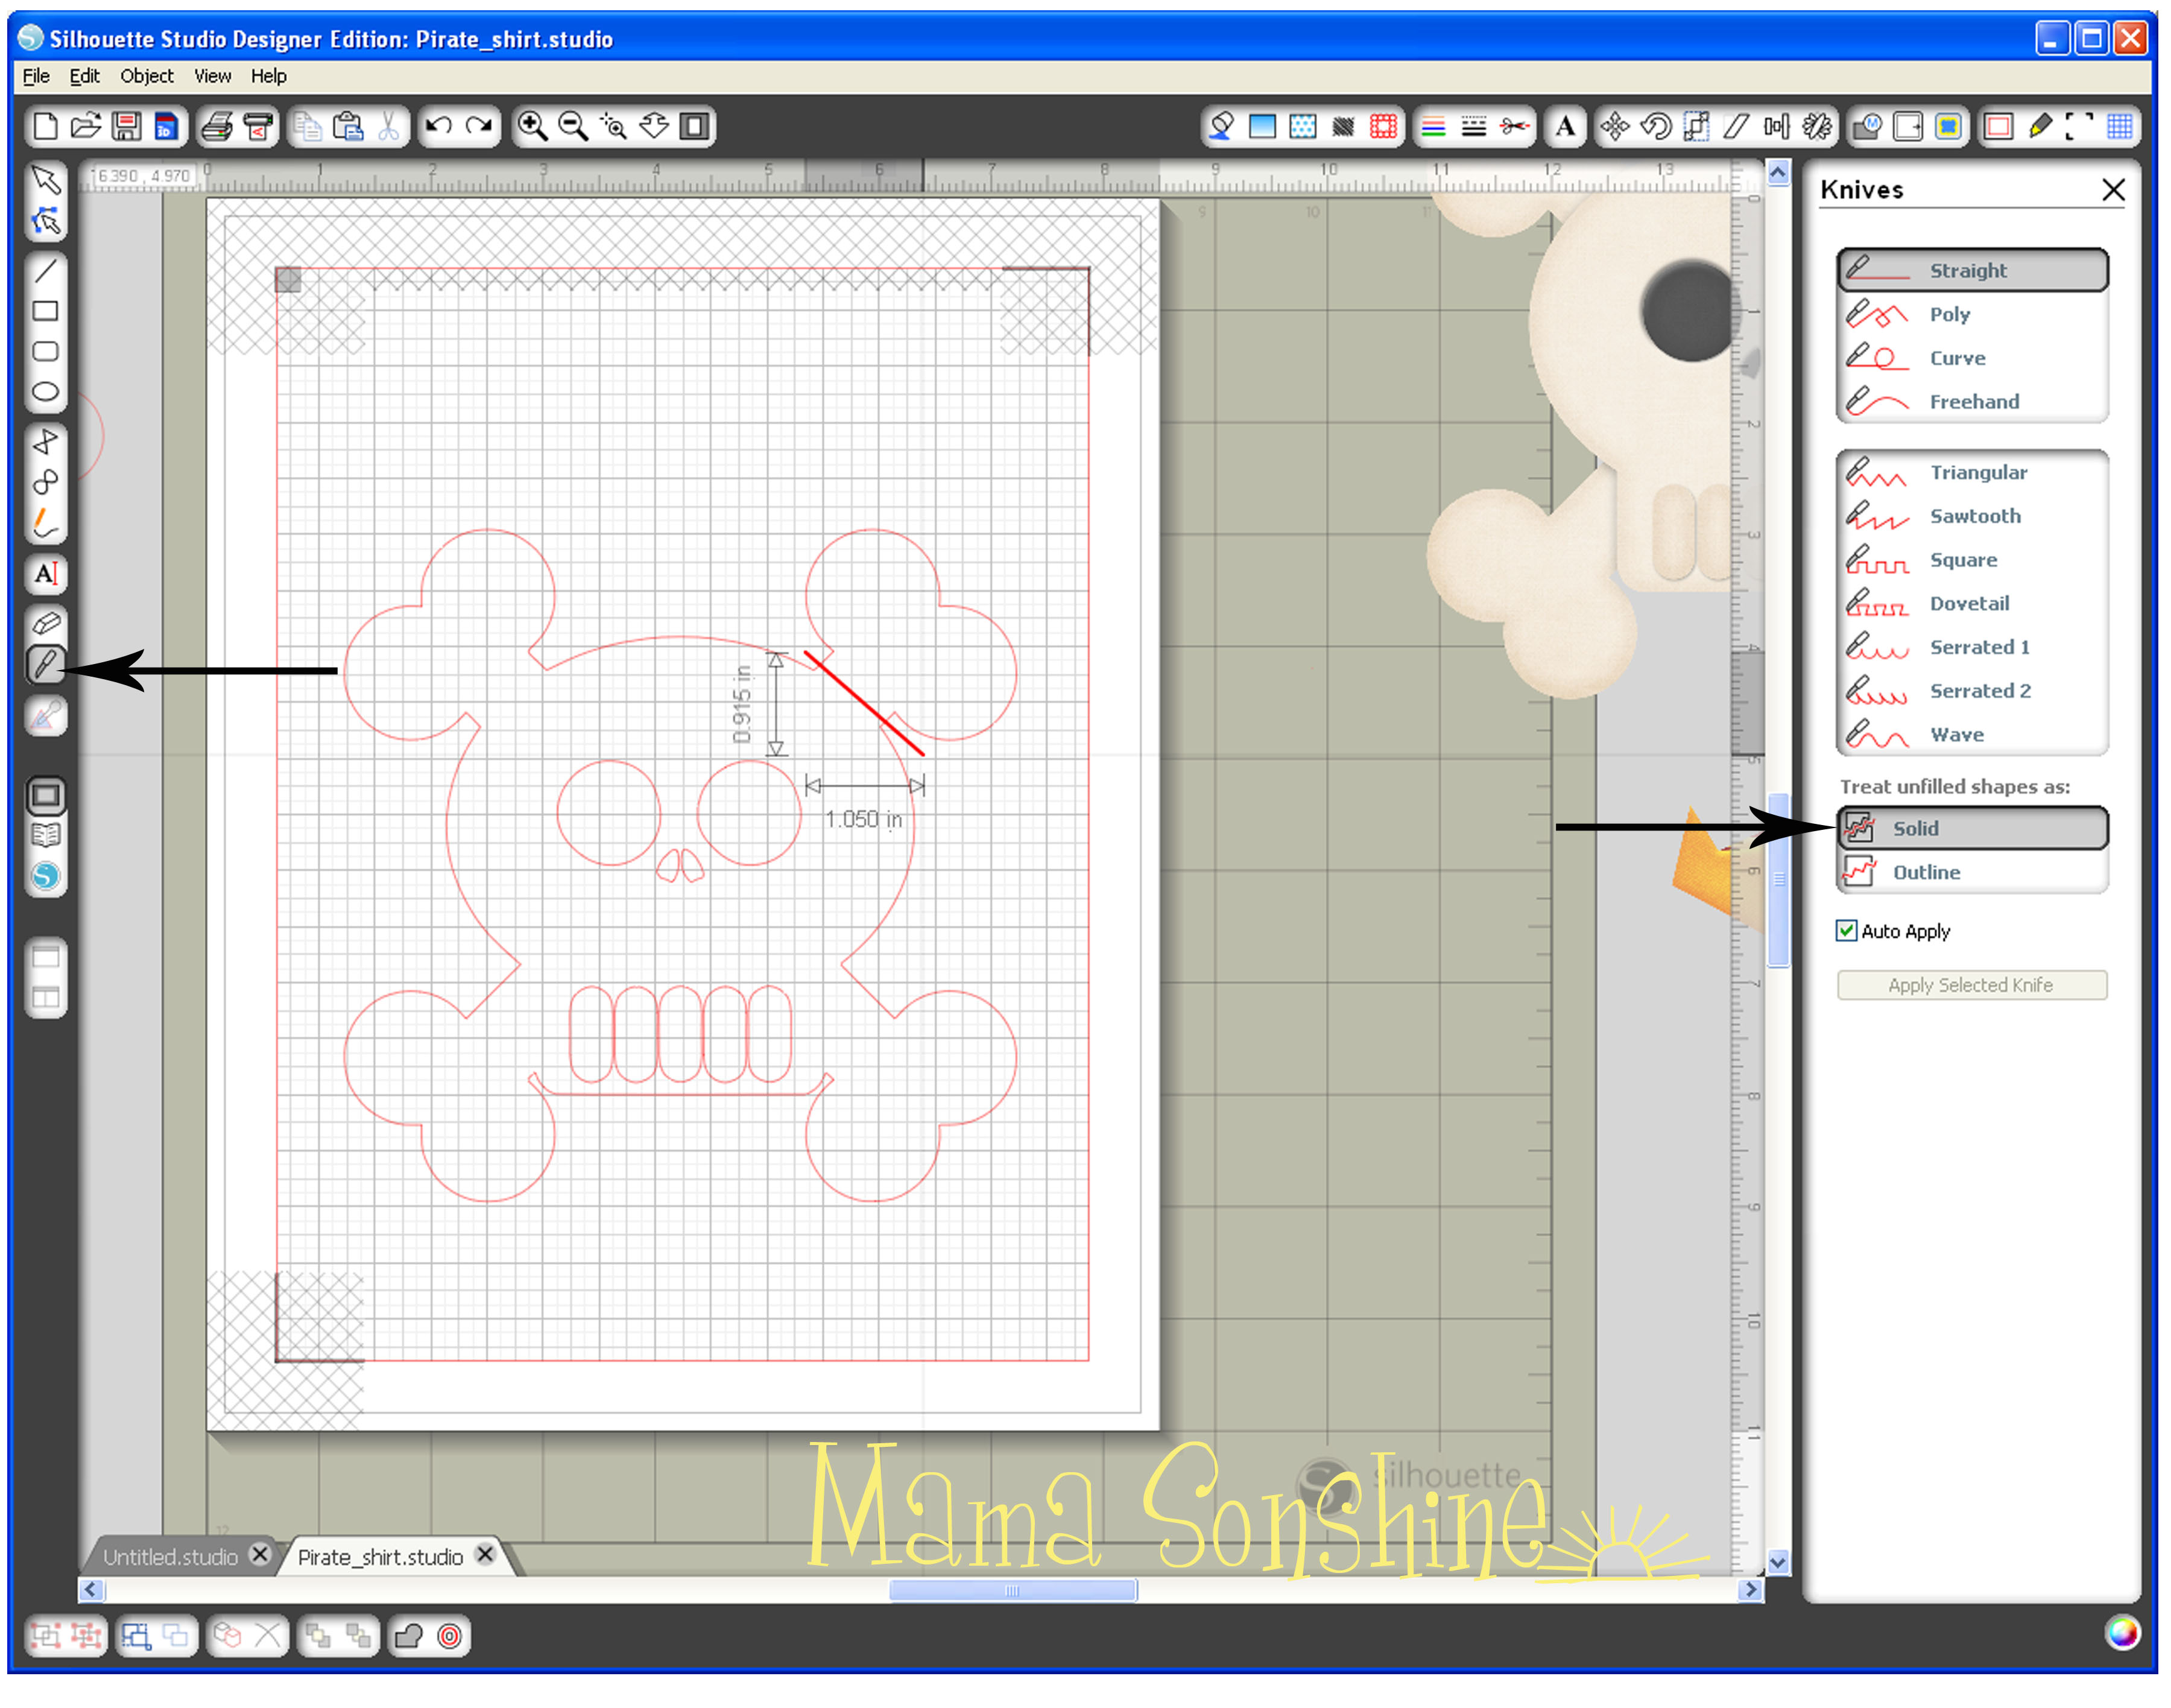
Using the knife tool I simply drew a line through the bone, making sure that “solid” is selected in my tool box.  If you don’t have the designer edition of the software this is the default setting.

MSS_PirateShirt_Tutorial09This portion of the bone can now be deleted.  I then went back and smoothed the part of the skull where I made the cut.

MSS_PirateShirt_Tutorial10

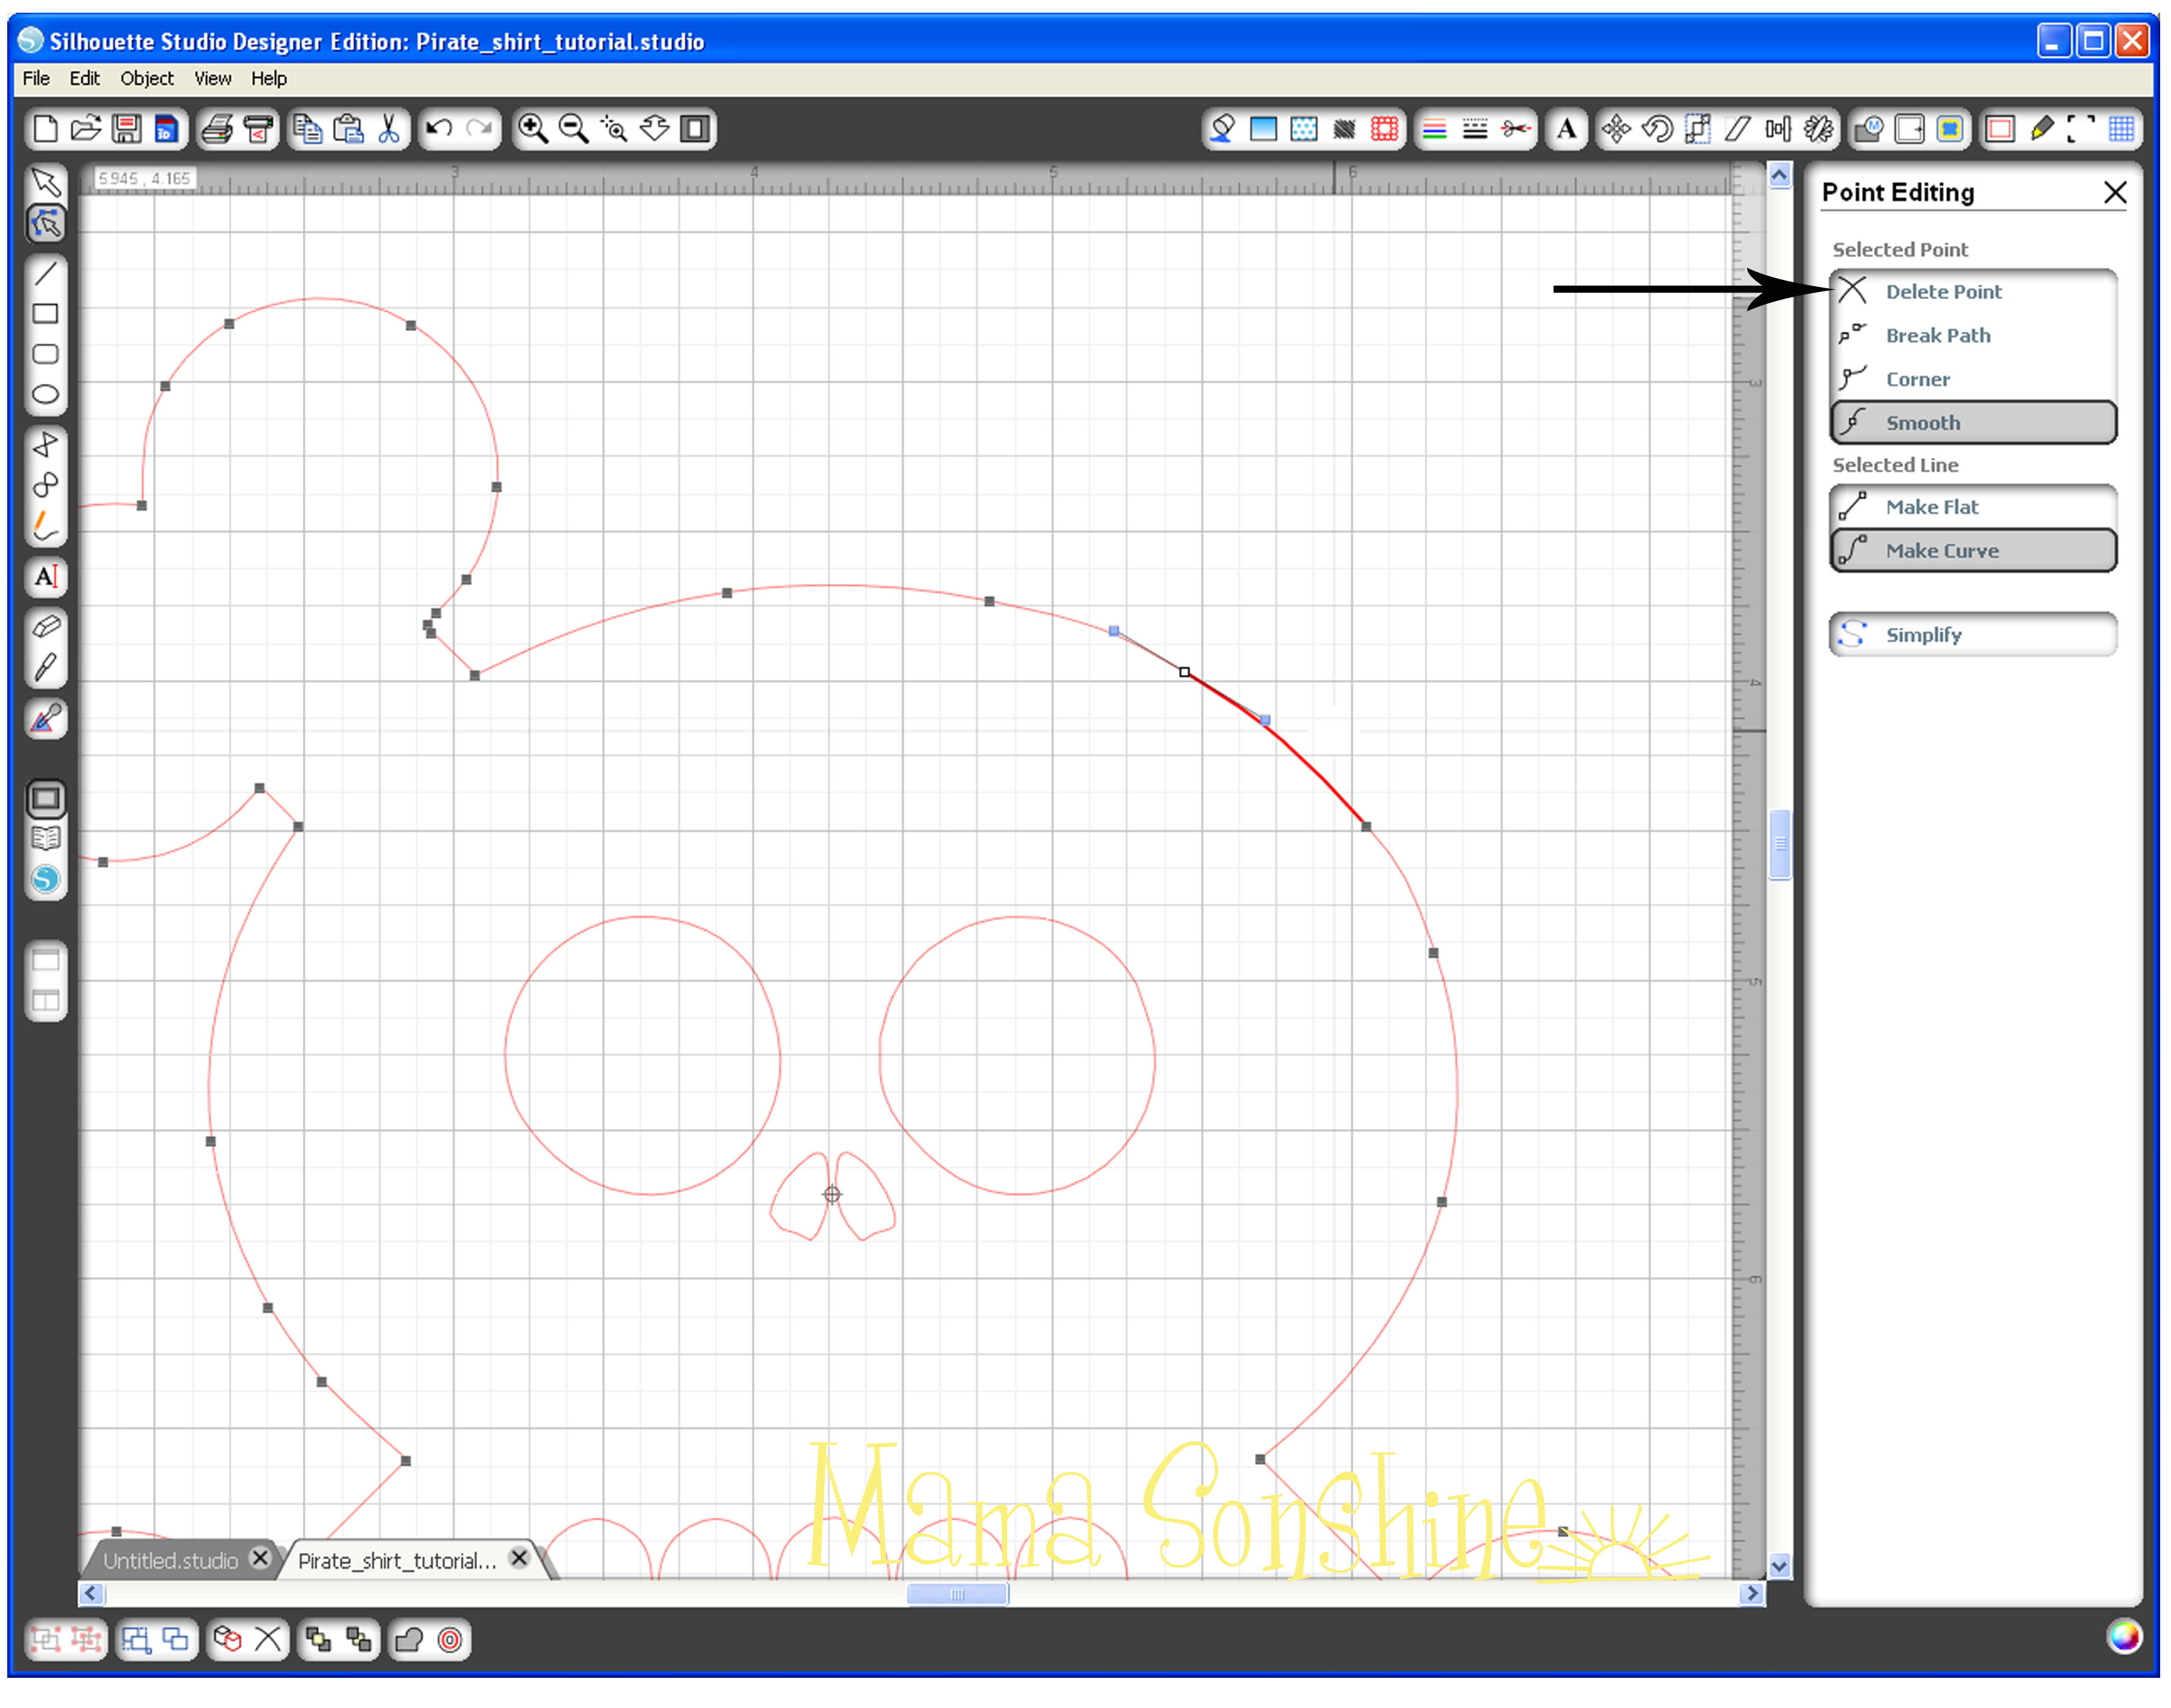
Using the point editing tool box, I deleted all points above the curve of the skull and smoothed out the remaining ones.  It is not shown in this tutorial, but I also added curved lines to separate the skull and reaming three bones.  I didn’t want the separate but I wanted a cut line there to give more depth to the finished product.

MSS_PirateShirt_Tutorial11
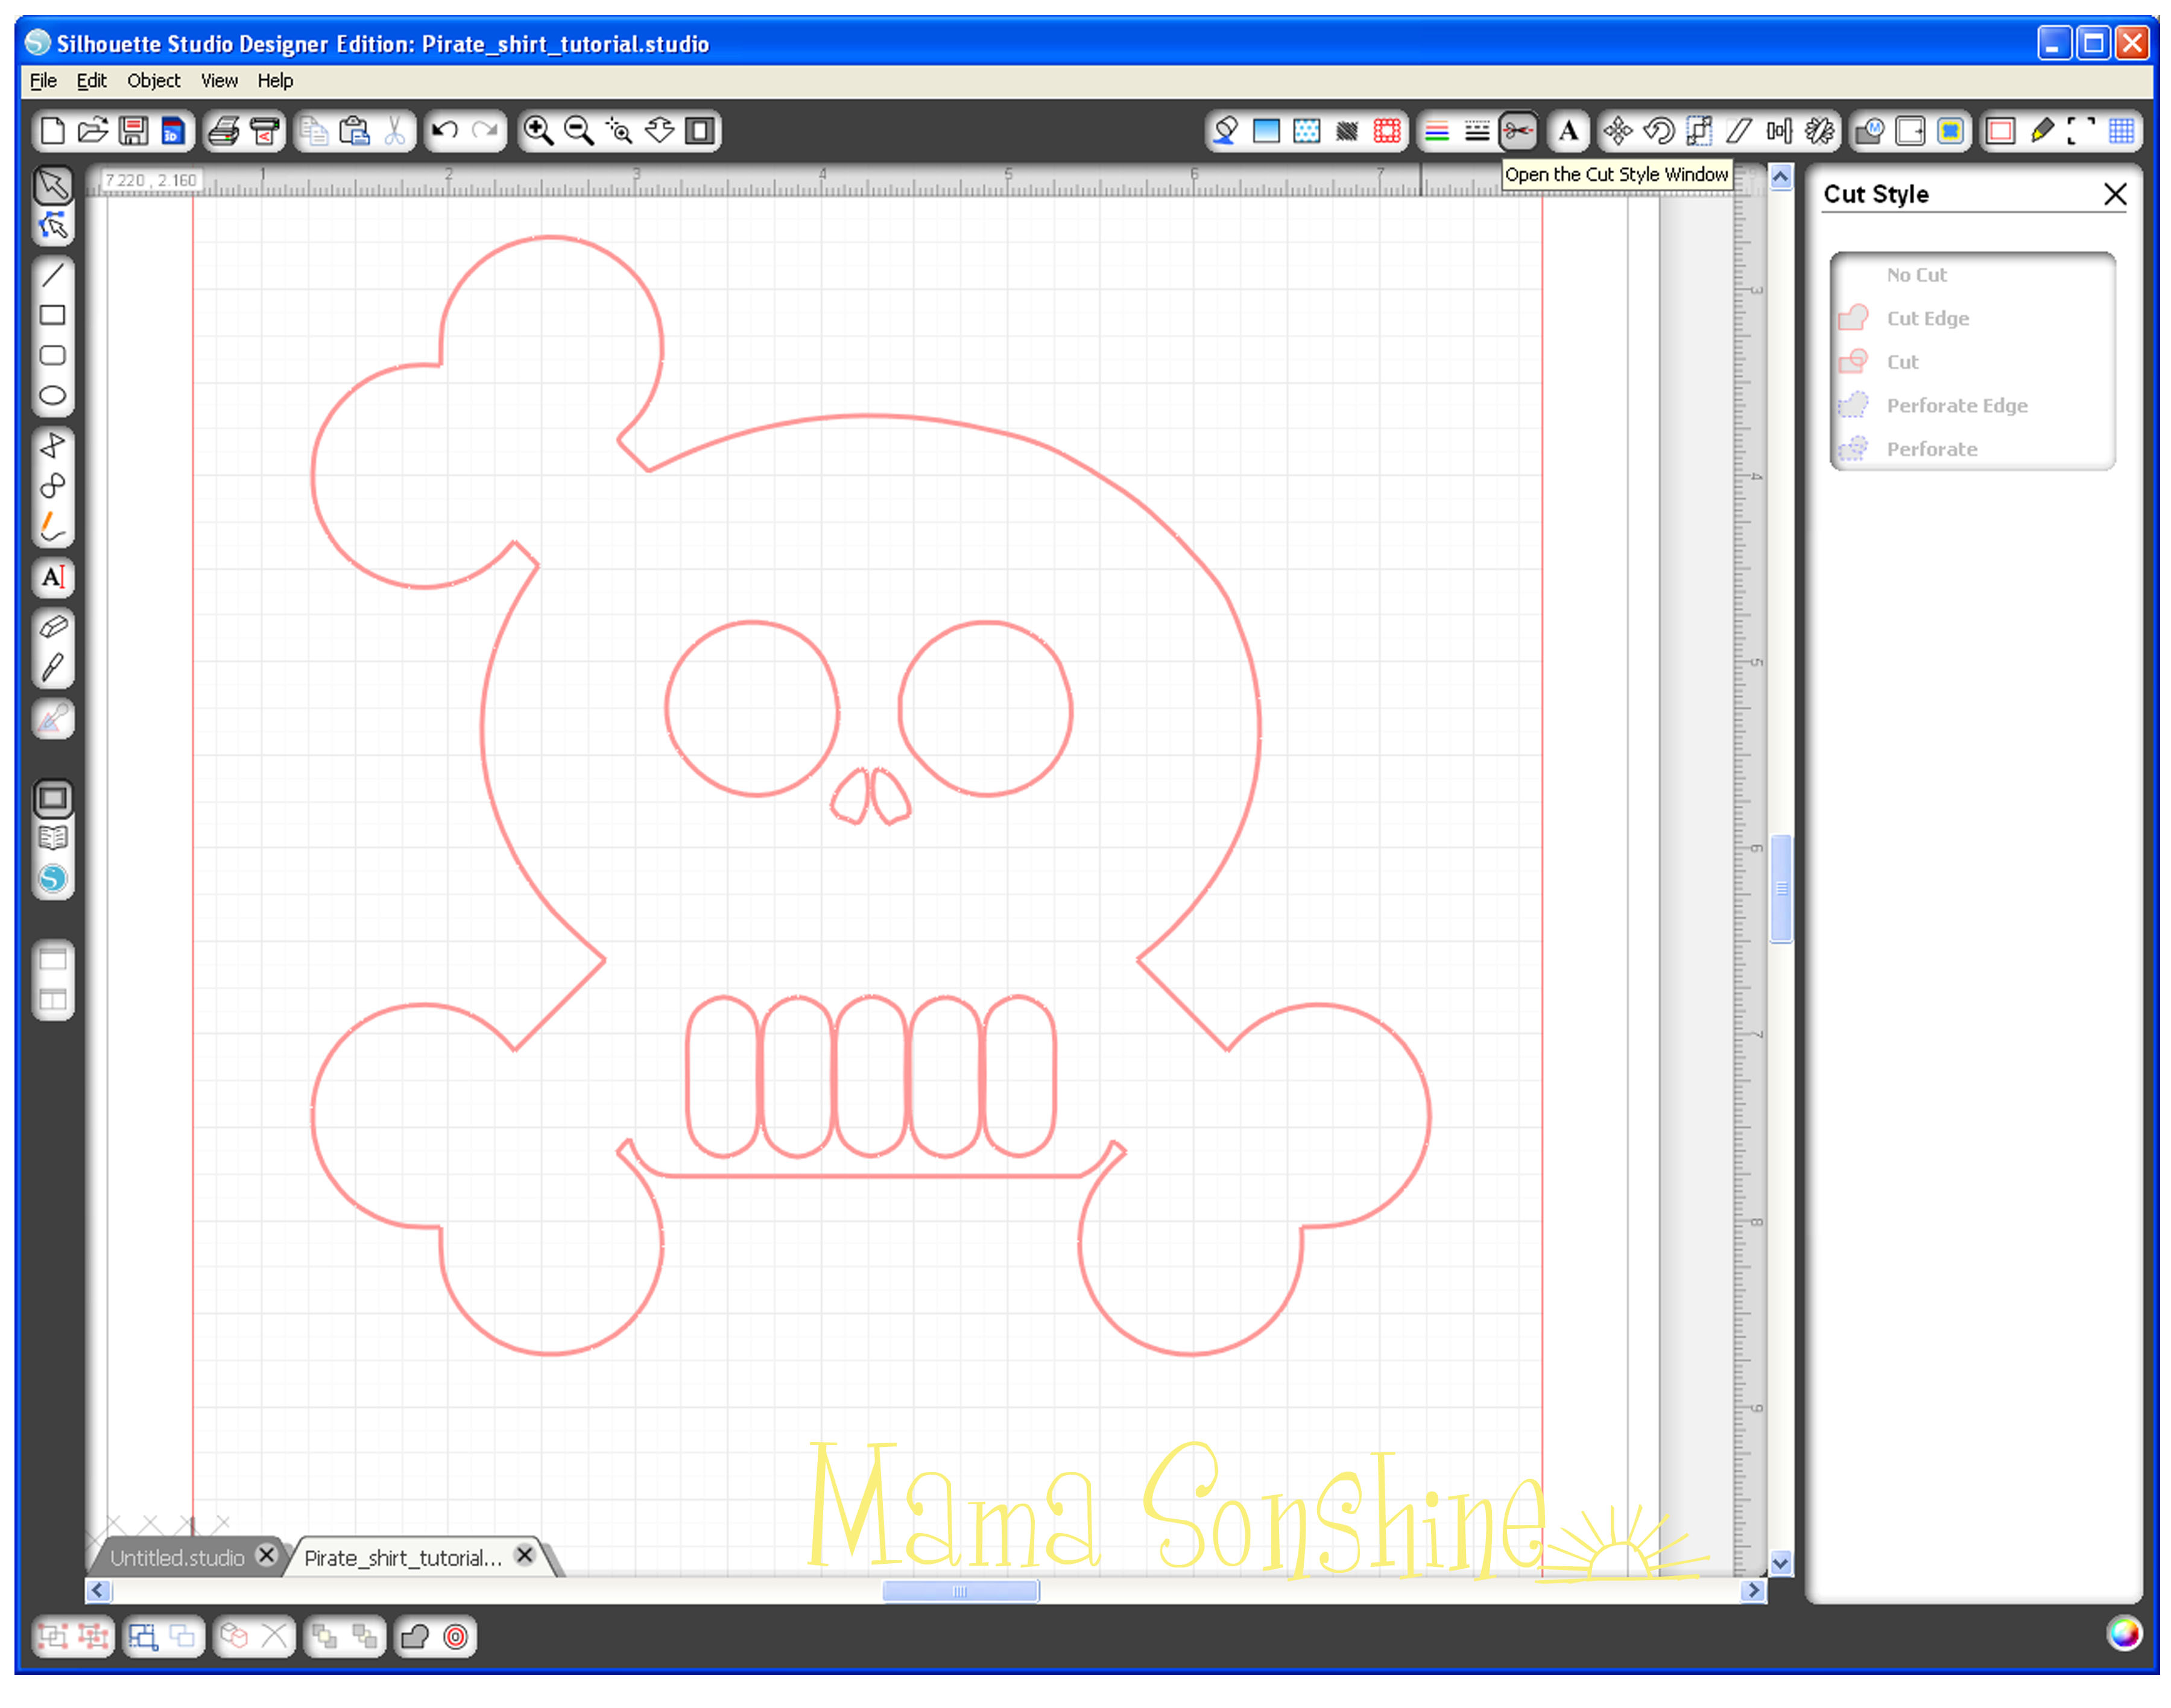
In the cut style tool box make sure “cut” is selected so that it also cuts out the eyes, nose and teeth.  The shirt will show through on these parts.

MSS_PirateShirt_Tutorial12
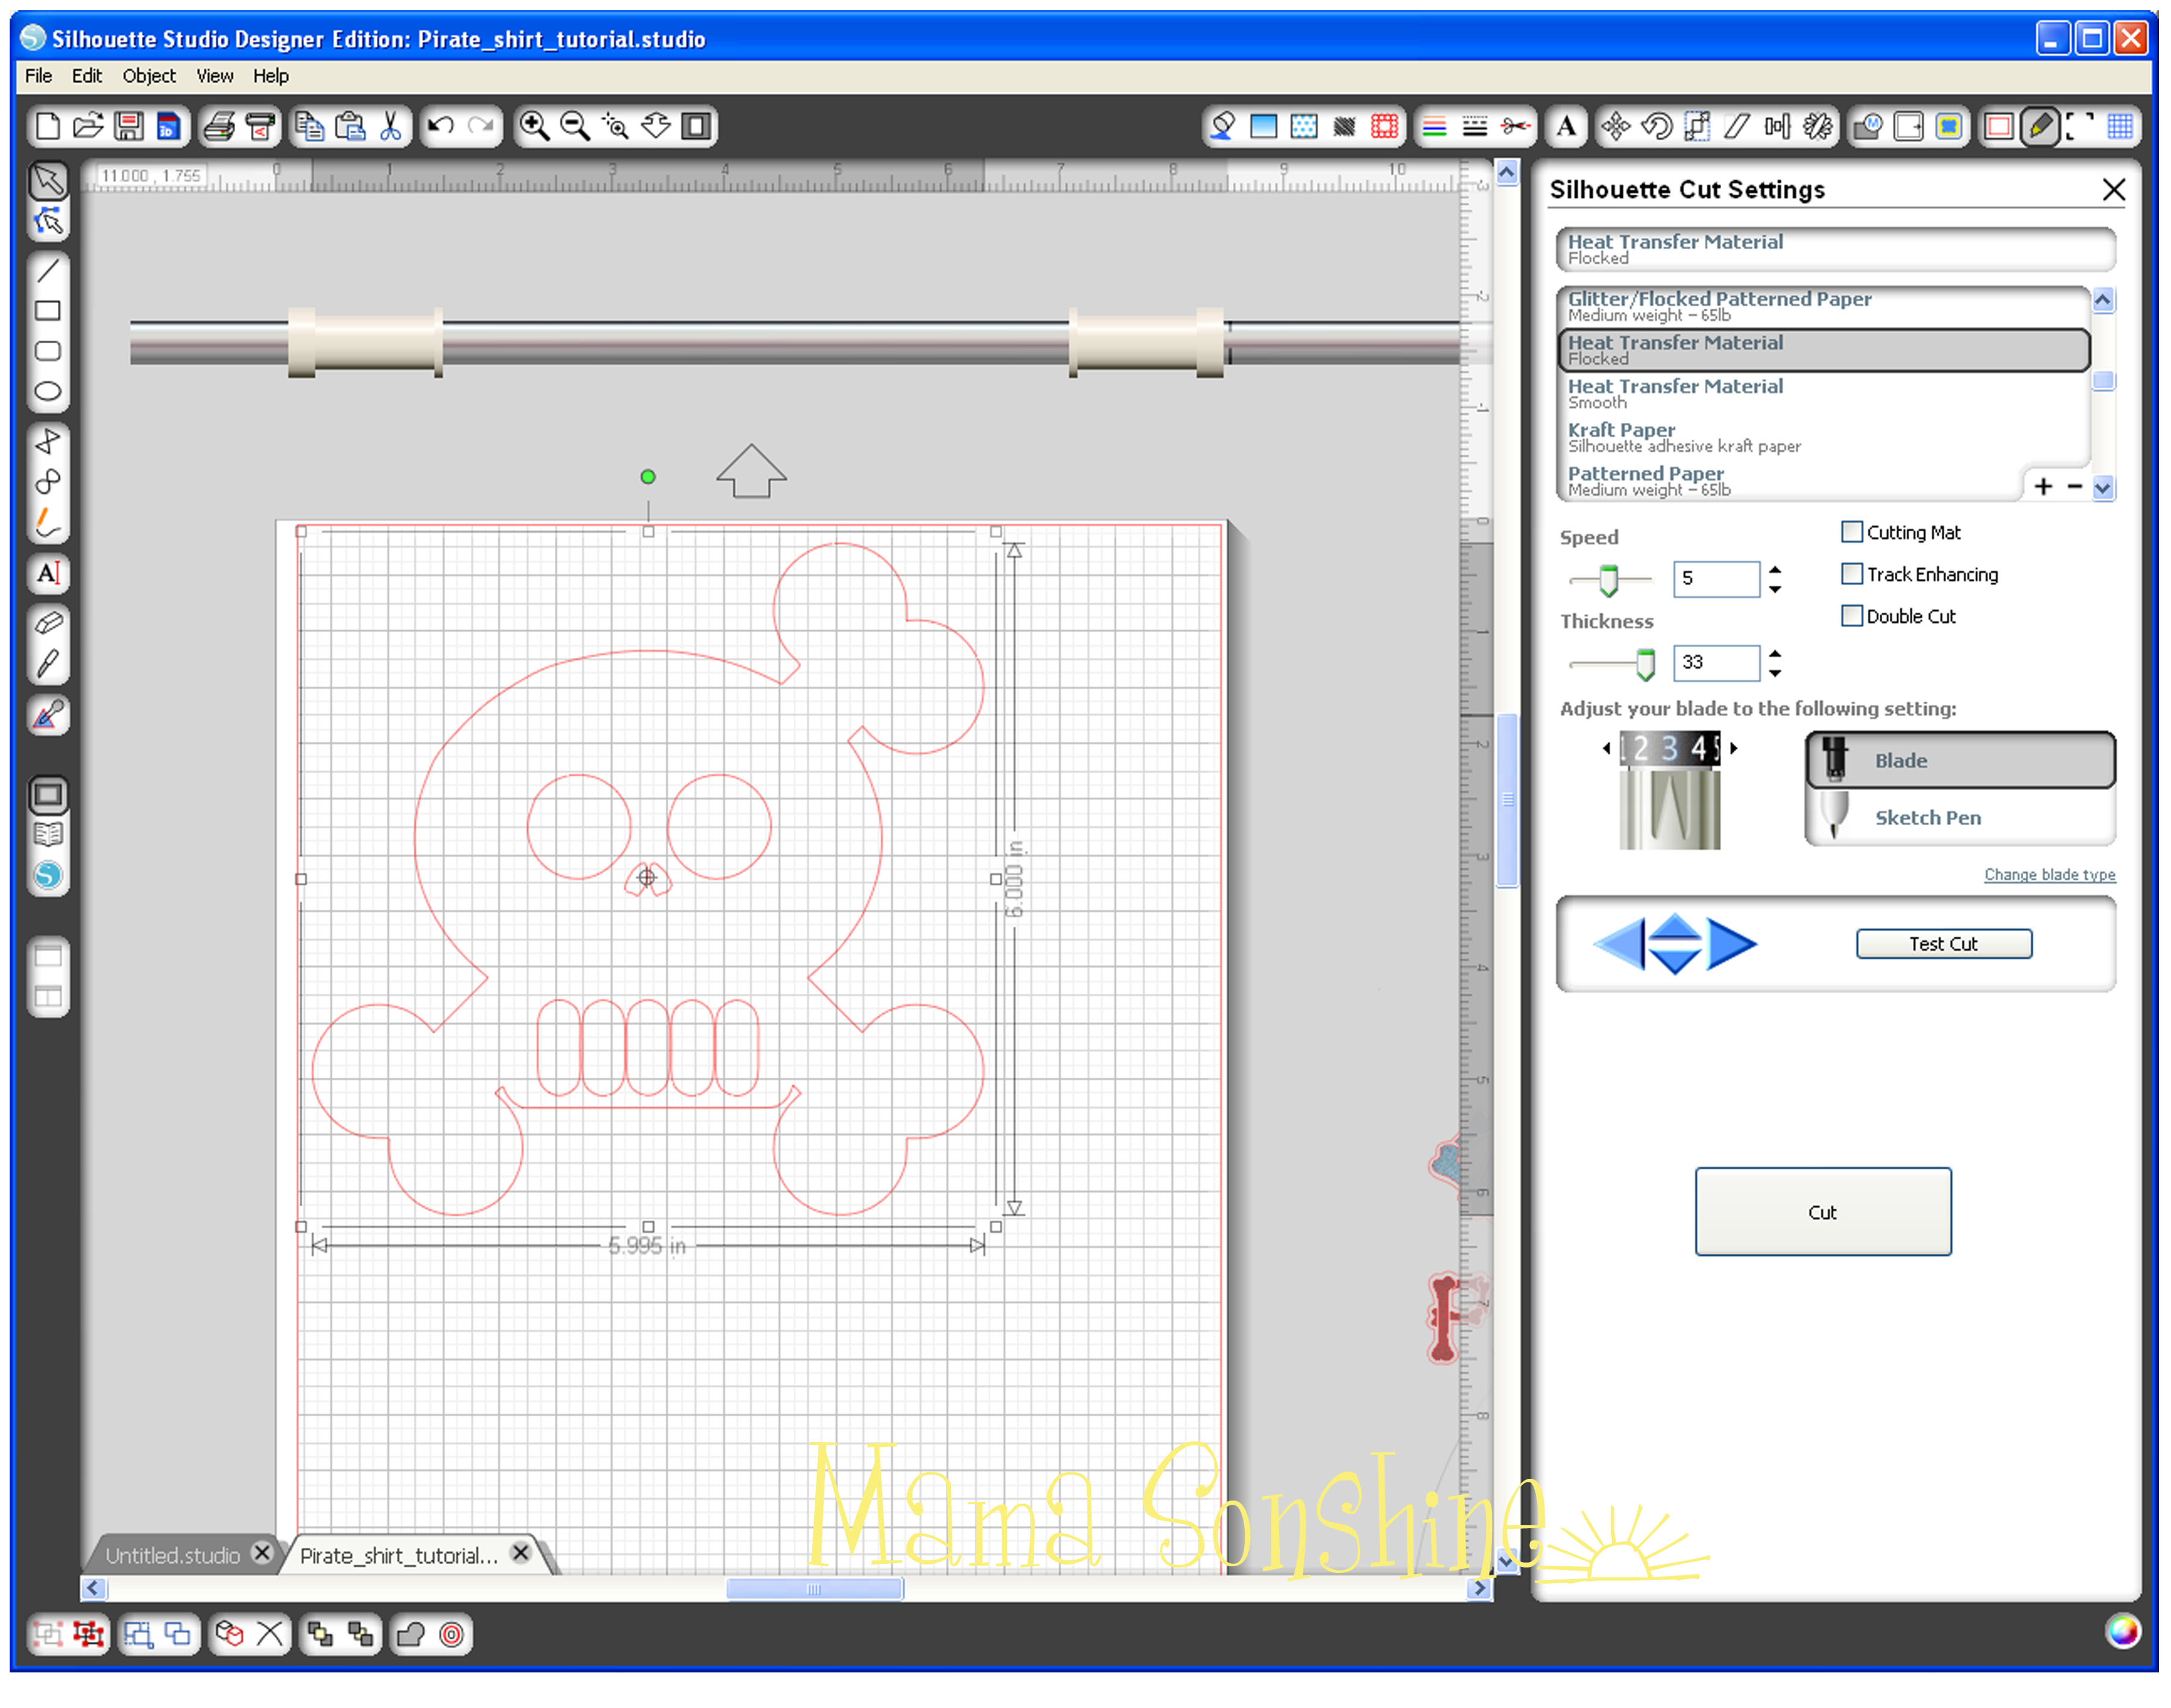
Before you actually cut your design you want to flip it horizontally, make sure all elements are selected (ok to group them together).  You can right-click, or go to the edit menu, and select ‘flip horizontally.’  The cut settings for Heat Transfer Material Flocked worked perfect because it is a Silhouette media.  If you are unsure make a test cut first.  You don’t need a mat, so un-click that box and make sure the shiny side is down when cutting.  If unsure, follow the directions on the package.

For the rest of the shirt check out Part Two & Part Three.

Happy Crafting

signature-black

facebook instagram pinterest parties by mamasonshine etsy bloglovin google+ email twitter Image Map
Enhanced by Zemanta


3 Comments

Birthday Pirate Shirt

When my son makes a decision he sticks to it.  The past two Halloween’s I asked him to pick a costume in August and he stuck to that choice. For TWO months.

Oh, did I mention he is three?

His birthday is next month, March, so in December I mentioned that we needed to start thinking about a theme for his birthday party.

Without hesitation he asked for a Skeleton Birthday party.

We were in the car with my husband and we were talking about it and this is what was said:

Hubby: do you want a Dia de Muertos party?
Ian: No dad. A skeleton party.
Hubby: I know but a Dia de Muertos party has skeletons…
Ian: No Dad! a skeleton party because skeletons are my favorite.  Skeletons, turtles and seals are my favorites.

So I started planning a skeleton party.  For about a week.  Until we got a catalog with party supplies in the mail.

Ian looked through it for a few days.  He kept talking about who was going to have what party.  He then said “This boy is gonna have a pirate birfday party” while pointing to his chest.

After some discussion we decided to have a pirate party instead of a skeleton party.  There was still almost three months to plan.

He has not changed his mind, but he has picked out his next five party themes.

I wanted to make him a shirt for his birthday party.  My Silhouette Cameo has the ability to cut heat transfer material to iron on clothes.

I designed a shirt with a skull and crossbones wearing a birthday party hat and the words “Birthday Pirate” instead of ‘Birthday Boy’

It was going to be a surprise but when the only time you have to work on something is when the kids are home nothing is a surprise.   Everyday he asked where his skeleton shirt was and if he could wear it.

MSS_BirthdayPirateShirt

I was finally able to say yes, and he was so excited.  Only about 2 months before his party.

You can read about the process in a three part series starting here.


Want to Check Out More Silhouette Projects?

My Silhouette Challenge buddies and I are all sharing projects on our blogs, so pursue the projects below for a wealth of Silhouette inspiration!

Silhouettechallengecollage

  1. DIY Screen Printed Curtains by Chicken Scratch NY
  2. “Cute as Cupid” shirt by crafts, cakes, and cats
  3. Easy Easter Bunny Onesie – Silhouette Cameo Craft by Adventures in All Things Food & Family
  4. Hearts-A-Lot Burlap Pillow Cover by My Paper Craze
  5. DIY Monogrammed T-shirts with Silhouette Heat Transfer Material by Pitter and Glink
  6. Sew Cute Applique by Life After Laundry
  7. Machine Applique with SIlhouette Cameo by The Sensory Emporium
  8. Mommy and Em’s Coordinated Aprons by TitiCrafty
  9. Valentine’s OWL Always Love You T-shirt by My Favorite Finds
  10. Teddy Bear by Work in Progress
  11. Fabric Envelopes for LEARNING LETTERS! (& cut file) by From Wine to Whine
  12. Upcycled Birchbox Cameo Accesory Organizer by Cupcakes&Crowbars
  13. No-Sew Valentine’s Day Pillows by A Tossed Salad Life
  14. Nerdy Baby Onesies + Free Cut File by Essentially Eclectic
  15. Lady Bug Tote Bag with Silhouette Rhinestones by Ginger Snap Crafts
  16. Valentines Baby Onesie & Boy’s Shirt + Free Cut Files by The Frill of Life
  17. Easy Fabric Art by McCall Manor
  18. Easy Heart Appliqued Onsies by Create & Babble
  19. DIY Bleach Spray Shirt by Practically Functional
  20. Felt Star Wands by Cutesy Crafts
  21. Baby Quilt by Dragonfly & Lily Pads
  22. Canvas sketch project and a share by Clever Someday
  23. Glitter Iron-On Top by Simply Kelly Designs
  24. Crawl, Walk, Bike by It’s Always Craft Time
  25. Stenciling Sherlock by Please Excuse My Craftermath…
  26. Monogrammed Burlap Garden Flag by The Turquoise Home
  27. “Team Betty” Tote Bag by The Thinking Closet
  28. Customizing textiles with Heat Transfer Vinyl (working title) by feto soap
  29. Foxy Lady Pajamas by Mabey She Made It
  30. Rhino Onesie by It Happens in a Blink
  31. Surprise Holiday Banner by Whats Next Ma
  32. No-Sew Interchangeable Fabric Bunting by unOriginal Mom
  33. Freezer Paper Stenciled Tote Bags by Weekend Craft
  34. Fabric Applique Valentine’s Day T-Shirt by DailyDwelling
  35. Pretty Up Some Organza Bags by Getsilvered
  36. Birthday Challenge by Fadville
  37. Yoda Kid’s T-Shirt by Architecture of a Mom
  38. DIY Sock Minion by Create it. Go!
  39. Big Sister Gift & Silhouette Cut File by Creative Ramblings
  40. Bleach Pen Gel & Freezer Paper Stencils Made with the Silhouette Machine by Bringing Creativity 2 Life
  41. Fabric Painted Quilted Wall Hanging by Terri Johnson Creates
  42. Nautical Pillows by Lil’ Mrs. Tori
  43. Mark Your Territory- Dog Flags by Black and White Obsession
  44. “Good Morning, Sunshine!” Memo Board by Tried & True

Happy Crafting

signature-black

facebook instagram pinterest parties by mamasonshine etsy bloglovin google+ email twitter Image Map


Leave a comment

Ian’s First Valentine Exchange

This is Ian’s first year at pre-school.  I am having such a wonderful time.  Oh, he is enjoying it as well.

My favorite thing about him being in school is the stuff he gets to make.  I LOVE it!  But I also love the stuff I get to make for class room parties and stuff.

As you may know today is Valentine’s Day.

I don’t like Valentine’s Day.  Seriously, it is my least favorite holiday.

You don’t get time off from work/school.  You don’t get ‘real’ presents.  If you are a girl you may get flowers or candy, and every once in a while some jewelry.  But those are anniversary gifts.  Plus if you want to go out to dinner or away somewhere, good luck!  Everything is always booked or you have some ridiculous wait time.

But you know why I really don’t like Valentine’s day?

The hearts.

Yep, that’s right.  I can’t stand hearts.

Except these kind.

Seriously, these are great.

I was trying to figure out some kind of valentine for Ian to give to his school friends that did not include “Be Mine” or “Love” or some other gross mushy heart filled sentiment.

Come on people! they are 4-year olds!  They can’t even read the cards!

Ok, so I found I found these:

Smarties Valentine Valentines

They are cute and use Smarties, which we all love.

So I tried to make something like that with my Silhouette Cameo.  Tip Junkie does offer a free printable for these cards, but I wanted to make my own.

This is as far as I got:

MSS_SmartiePants Valentine
I didn’t really like how they looked. The pants never looked right (that’s why they are not pictured) they were too big, the smarties didn’t sit in the right. I just wasn’t happy with the outcome. Plus there are hearts on it! yuck!

So I decided to try something else.  I wanted to give little gift bags, that way I could more than just one piece of candy in it.  I could add little sticker or an eraser or something like that.

Since I got my Silhouette Cameo I joined a Facebook group and someone posted this super cute card with glasses and a pun-ny little saying “In my Eyes…something or other.”  Using that as inspiration I made these:

MSS_EyeThinkYou'reSpectacular Valentine

I made my own cut files using a bag template and png file (for the glasses) that I already had.  I cut the word “Eye” out of black glitter card-stock, and the bag is just regular 65lb card-stock.

Of course my Cameo did all the cutting & writing for me, I just had to glue and fill.  I know, I know, there is a heart on the glasses.  What’s a girl to do?  It is Valentine’s day after all.

MSS_EyeThink_valentine

I had thought about letting Ian write his own name.  But he just wasn’t game.

Happy Crafting

signature-black

facebook instagram pinterest parties by mamasonshine etsy bloglovin google+ email twitter Image Map
Enhanced by Zemanta

I linked this project up to

Silhouette Challenges


Leave a comment

Seven Days of thanks ~ Week 3

I want to give daily thanks in honor of Thanksgiving this year.  Instead of a new post each day, I will recap what I am thankful for at the end of the week.  It is a great way to reflect on the little things in our daily life that we should be thankful for.

First I have to give thanks to you readers who are going to forgive me for not posting this days ago.  I forgot to schedule it, and didn’t realize it.  oops.


7 Days of Thanks Nov 15-21

Nov 15
The ability to easily make friends.  This boy can and will make friends with anybody where ever we go.  I’m not gonna lie, sometimes the other kids don’t realize they are friends or that Ian is playing with them, but he is.  It allows him to have fun and be carefree where ever we are.

Thanks_week3_friends


Nov 16
Family get togethers.  I have a wonderfully amazing family.  And we try to find any excuses to have a party.  Even if it is only to try out some new coffee.  Which then became a birthday party, but alas I didn’t take pictures of the actual people there.

Thanks_week3_family


Nov 17
Fearlessness.  OK, so sometimes I am not really thankful for it, because he gives me a heart attack like every thirty seconds.  But I am thankful that he is adventuress and has the drive to figure things out.  He couldn’t reach the door handle, so he pushed his chair over.

Thanks_week3_sid


Nov 18
Our fume hood.  Stinky thiols are horrible to work with, and I am so thankful that I have a working fume hood to keep them.

Thanks_week3_hoodpng


Nov 19
The things this kid says.  I try really hard to write down what he talks about, but sometimes it is so much and so funny, I can’t get it all down.  I really need a recorder in my car, or better yet, just attached to him.  He is constantly making me laugh.

Thanks_week3_ian


Nov 20
The treadmill.  I know sick right?  But if it were not for the treadmill, I would be out walking/running in the very cold wet yucky weather.  Plus I can use it, at the gym, after the boys go to bed without fear of running in my neighborhood.  This way I am able to stick to the C25K program that I just started.

Thanks_week3_gym


Nov 21
Another thing I am thankful for at work is these auto-tip fillers.  Could you imagine refilling this by hand?  That is like a million little tips to fill the box.  Maybe an exaggeration, but not if you are filling them by hand.

Thanks_week3_pippetts


What are you thankful for?
signature-black

Top Mommy Blogs - Mom Blog Directory