I Tri and Craft

thoughts from a mother of boys, a marathoner, a triathlete, a crafter, a wife, and a scientist


4 Comments

Tips for Printable Heat Transfer Material

I may have mentioned once or twice how much I love the print and cut feature on my Silhouette Cameo.

Well, I am going to bring it up again.  Only this time I will be using a Heat Transfer Material to make a gift.

There are other brands out there that sell this kind of material, but I use Avery, because I can buy it just about anywhere.

Here is the concept, you print something out on your computer, cut it out and then iron it on to something made of fabric.  And viola! Your very own custom shirt, coat, bag, pillow, blanket, etc.

I wanted to make a six-year-old girl a bag with her favorite Monster High Character.   I could have made one by layering colored heat transfer vinyl (HTV) but the characters from Monster High have sooo many coloring shades, that it would either too much work (& too munch HTV) or it wouldn’t give me the same look I was going for.

Lagoona Blue Tote Bag


I have used this material in the past, so I am very familiar with it, but as with all projects, I ran into some trouble.  I figured it would be beneficial to others if I shared my snafu, so you will not make the same mistake.

Here are a few tips for using the printable heat transfer material:

  • Know your printer.  Printer inks are different and behave differently.  If you have an ink jet printer, get the material designed for ink jet printers.  If it is a laser printer, there is a different material for that, as well as the other inks, like UV.  If you choose the wrong type your ink will not set and will either run or fade.
    • Print a test page on regular paper to see how your image will fit, and line up.  You don’t want to waste any of the transfer material.Print a test page first
  • There are two different kinds of transfer material.  One for light-colored fabrics and one for dark.
    • The one for light-colored fabrics is an actual ink transfer material.  It will transfer the ink on to your shirt, so the places in your design that are white, will be transparent, meaning the shirt will show through.  The material that it is printed on will adhere to the fabric, so there is a protective layer between the ink and the outside world.  You must also remember to flip your design on the horizontal plane when using this material.
    • The one for dark-colored fabrics is like a sticker.  It is a white material and so the white areas in your design will remain white.  Plus, there is no need to flip the design.  It is the one I like to use the best.Dark Fabric Material
    • Weed carefully, this material can tear easily.  But it is not sticky, so you can do it in sections.
    • Don’t use the shade of fabric alone to make the decision on which one to use.  Think about what you want your project to look like in the end.  I use the material for dark fabrics all the time, even on light-colored fabric like this tote bag.Light colored bag, but using dark fabric transfer material
  • Your iron must be hot and dry.  If you use this to iron out the wrinkles in your clothes, dump out the water.  Set your iron to the hottest setting.  It is also not recommended you not use an ironing board.  This could be because you don’t want an uneven surface, but it is also because of the reflective heat material under the cover.  Heat on the bottom of the material may interfere with it bonding to the fabric.  I place a folded, ironed sheet on my kitchen counter.MSS_HTM_MHbag09
  • Cool removal or not?  Some heat transfer material requires you to wait until the design has cooled before removing the transfer plastic.  If it does and you rush it, you can peel off your design with the transfer plastic, so be patient.Sometimes you have to wait for it to cool before removing protective/transfer layer
  • Don’t be discouraged when it takes longer to adhere than the instructions say.  I have held the iron in place for minutes, when the instructions say 45-60 seconds.
  • Apply constant high pressure.  You are not ironing out the wrinkles, so don’t move your iron around.  You can mess up your design, as I did.What can happen when you move your iron around
    • But not all is lost if you do.  Here is something you might not know: the heat that put it on, can take it off.
      • Apply heat back to the design and quickly use something to scrap away the design before it cools.  I first used my weeding tool to pull the design, but that was taking too long.  I then thought of my scrapping tool (a used Sil gift card), when the design was still hot I just scrapped it off.  You have to keep applying heat to small areas and scrapping, and repeating.  The scrapping doesn’t take too long, and within 10 minutes, it was gone.  There is a slight bit of ‘glue’ left, it’s not really glue, but there is a residue, it’s kind of like a shiny outline of your design.  MSS_HTM_MHbag07
    • That’s OK, because you are going to reprint your design and reapply.  This time, not moving the iron around.MSS_HTM_MHbag08


It turned out just the way I wanted it to, and the birthday girl was happy.

MSS_HTM_MHbag01


The bag went perfectly with the personalize Monster High water bottle & Lagoona Blue card I made.

MSS_HTM_MHbag11


Happy Crafting

signature-black
facebook instagram pinterest parties by mamasonshine etsy bloglovin google+ email twitter Image Map


Enhanced by Zemanta


Leave a comment

Birthday Pirate Shirt ~ A Silhouette Cameo how to (Part 3)

I wanted to share with you the steps I took to make my son’s birthday shirt. There was a few problems I had that I was able to work through.   Hopefully this will help so others won’t get stuck like I did.

In this tutorial I use my Silhouette Cameo and the Silhouette Studio DE software to make a custom shirt for my son’s birthday party.  I used graphics from Just So Scrappy‘s YoHo YoHo Pirate kit.  I used the Silhouette brand Flocked Heat Transfer Material for the skull, and Avery Dark T-Shirt Transfers for Ink Jet Printers.

Part One will be how to make the Skull & Crossbones

Part Two will be how to do the words & party hat

Part Three will be how to iron everything on and some tips.

MSS_BirthdayShirt01

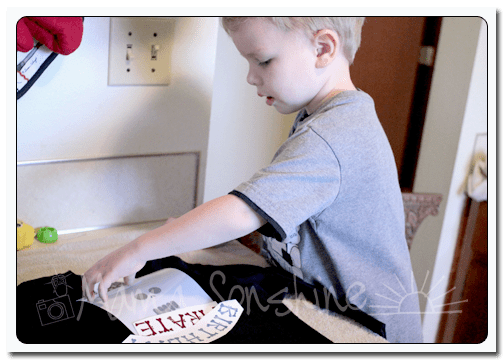
My first tip; if you want your words to be in the correct direction I would advise you not to let your three-year old place them on the shirt.

MSS_BirthdayShirt04

The flocked transfer material has a clear plastic film over the top.  This is the side you face down when cutting, you want the Silhouette to cut through the transfer material but not this film.  After weeding out the areas that you want the shirt to show through, lay your transfer material with the film facing up.  I would advise ironing on one piece at a time, just to ensure proper placement.

Use a dry iron, on the highest setting (please read the directions that come with your material) and a piece of thin cotton fabric between the iron and your material.  I used a pillowcase after determining a dish towel was too thick.  You want to apply a lot of pressure for up to a minute, or more.  Again, this is where you want to double-check the instructions that come with your material.  The time can very depending on manufactures, but the main thing is if isn’t sticking, you need more time and pressure.  Try not to move the iron around like you are ironing your clothes.  Just hold for a minute, then move to another area and hold, with lots of pressure.  Have I made it clear that pressure is important?

Some material is cool peel, meaning you need to wait until the ironed on design has cooled before removing the top film.  If this is the case, wait!  You will only ruin your design if you get impatient.

MSS_BirthdayShirt02


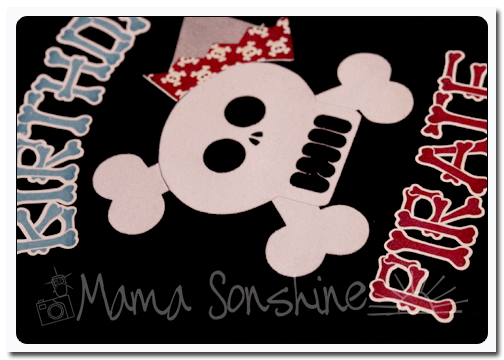
The intricate cut around the words was done as stated in the previous tutorial, but I wanted to separate the words from the page and lay them on the shirt without yet removing the backing, so I just cut them out with scissors.  The Silhouette settings I used made a ‘kiss cut’ meaning it cut through the transfer material but not through the backing.  When you are ready to iron on the material you peel it off like a sticker.

After placing the elements where you want them use the same iron settings but use the piece of parchment-like paper that comes with  the printable transfers between the material and your iron.  Again using lots of pressure.  Also, make sure something is covering the areas that have already been ironed on.  If you apply direct heat to this material you could melt it.

MSS_BirthdayShirt03


As I have stated above I used the printable material for dark fabric and ink jet printers.  The dark fabric is like a sticker.  What is face up is what will show, this is different from the material for light fabric.  The dark fabric material also leaves a white area on the printed material where there is a white area on your screen.  With the light fabric material, where there is white on your screen the shirt fabric will show through.  This is something to consider before purchasing your transfer material.  Also it is very important for you to  know what kind of printer you will be using.  The way an ink jet and laser printer adhere the ink to the paper is different and for this type of material it does make a difference.

The first time I printed this out I used a laser printer without thinking of the consequences.

MSS_BirthdayShirt05

It looks fine, there wasn’t any difference between it and the one I ended up printing on my ink jet printer.  At least not until I ironed it on.

MSS_BirthdayShirt06

See how the hat has faded?  This is because of the toner in a laser printer.  It can come off the printable heat transfer material when heat is applied.  I had to go back and reprint everything on an ink jet printer.  At this point I also had to make the hat a little bigger to cover up  the faded one.

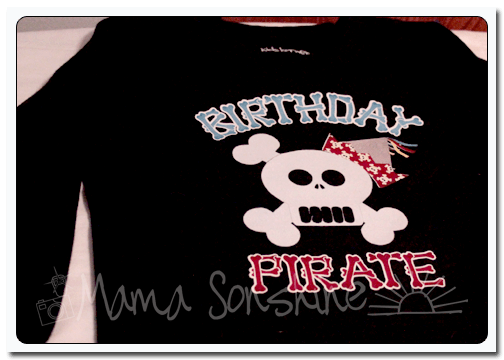
But the end result was still one happy birthday-boy-to-be.


MSS_BirthdayPirateShirt

If you want to see how I designed the skull check out Part one.

If you want to see how I designed the print and cut words and hat see Part Two.


Happy Crafting

signature-black

facebook instagram pinterest parties by mamasonshine etsy bloglovin google+ email twitter Image Map


Enhanced by Zemanta


Leave a comment

Birthday Pirate Shirt ~ A Silhouette Cameo how to (Part 2)

I wanted to share with you the steps I took to make my son’s birthday shirt. There was a few problems I had that I was able to work through.   Hopefully this will help so others won’t get stuck like I did.

In this tutorial I use my Silhouette Cameo and the Silhouette Studio DE software to make a custom shirt for my son’s birthday party.  I used graphics from Just So Scrappy‘s YoHo YoHo Pirate kit.  I used the Silhouette brand Flocked Heat Transfer Material for the skull, and Avery Dark T-Shirt Transfers for Ink Jet Printers.

Part One will be how to make the Skull & Crossbones

Part Two will be how to do the words & party hat

Part Three will be how to iron everything on

MSS_BirthdayShirt01

This part of the shirt was made using printable heat transfer material for the Dark Shirt Transfer Material and an Ink Jet printer.  The HTM for light material is different and the steps you take to print and cut are different.  Also be sure you know what kind of printer you are going to be using, either ink jet or laser, and get the appropriate transfers.  The way the ink sets on the paper is different, if you use a laser printer on the ink jet papers your color will come off when ironed.

In the studio software I used the same file I had open for the skull & cross-bones because I needed the skull for a size and placement reference.  When I didn’t want it on the screen I simply moved it off the mat.

First the party hat:

I wanted a birthday hat shape that I could fill with a pattern, using the digital papers from the YoHo Pirate kit mentioned above.  I chose a party hat .png file I had because I liked the shape.  Since I don’t want the pattern or colors that are currently I made a new cut file using the .png as a template.

MSS_PirateShirt_Tutorial13

I wanted to make the stripe portion one pattern, the yellow portion a different pattern, and I wanted to change the color of the ribbons.  The trace tool could not cleanly make these five individual elements.  Even when I selected trace instead of trace outside edge, I still only got the outside edge traced.

This slideshow requires JavaScript.

I found it more difficult to try to trace each portion than to simply make a new shape.  I selected the draw polygon tool and made a new shape for the yellow portion of the hat.  It is important not to move the picture after tracing it and drawing the shape.  You also don’t want to use the line tool, because you want an element that can be filled with a pattern.

I used the draw curve tool to make the three different ribbons on the top of the hat.  Again, the ribbons are three different shapes that sit on top of the traced hat.  After this you no longer need the picture of the hat, so you can delete it or just move it off the page.

Use the fill pattern window to select the patterns for each element.  Bring back the skull & cross-bones to fit the hat on the skull.  Select all five elements of the hat, re-position and re-size the hat until you get the look you want.  Unselect all elements, then select only the bottom border of the hat, here the red portion.  Use the point edit tool to fit the hat to the shape of the skulls head.  At some point you may also need to edit the points of main hat shape.

MSS_PirateShirt_Tutorial18

Once you have the hat fitting the shape of the head go to your cut style tool box because you don’t want the elements of the hat cut in separate pieces.  Select all the elements, and select no cut, then select only the main hat shape and select cut edge.  This ensures that you are only going to cut around the hat’s edge after printing.  Select the five elements of the hat and group them together, you don’t want any of them moved away from each other now.

MSS_PirateShirt_Tutorial19

Now for the text:

First I wanted the word birthday to be arched, I drew a circle, typed the text then dragged the text to the circle using the little circle with a cross inside.  Resize and move the text until you get it the desired results.  If the green outline and move tool go away because you had to select off the text, just double-click the text till they come back.  I had to move the skull off the page, because the text kept trying to link with it instead of the circle and move it back to fit the text to the skull size.

This slideshow requires JavaScript.

This next part is where I had the most difficulty.  I really liked this Bones font I found, the problem is that each letter has little bones that would be cut separately.  This would happen even if cut edge was selected, because the software sees each bone as a different element.  After hours of trial and error I finally figured out the simplest way to cut around the word, and not each individual letter or bone.

MSS_PirateShirt_Tutorial22

The first time I did this I took a very long route to get where I wanted.  I released compound paths, duplicated, filled patterns, made new compound paths, welded, grouped, un-grouped, made offsets, moved, re-sized, moved again, etc.  After I got the result I wanted I realized I was adding a bunch of extra steps.

This slideshow requires JavaScript.

First select your text and go to the offset tool box, create an offset and adjust size so it is just slightly bigger than your text.  If you are using the dark T-shirt transfer material your offset will show as white, so it is up to you how much white you want to show.  At this point each letter will cut out separately, which I didn’t want because I didn’t want to align them on my shirt, I wanted the whole word as one element.  So I move my text up slightly to work with my offset.  I moved each offset letter closer to each other with a very slight overlap so I could weld them together.  The offset and the text no longer match up, so you may have to ungroup your text to move each letter back to the offset, but do not release compound path.

Choose a pattern to fill the text for printing.

MSS_PirateShirt_Tutorial28

Go to the cut style window and select all the letters of your text, then select no cut.  Select the offset and cut edge.  You will see that your machine will now cut around the letters as one piece.

Repeat the steps for your second word and align everything, including the skull, to make sure size and proportions look good.

MSS_PirateShirt_Tutorial29

Since the skull is not part of the print ‘n cut, you would move it off the page.  Show registration marks and move your elements on your page for printing.  Just make sure your hat elements are grouped together and the text and offsets are grouped together.  After printing, do not move anything, it will need to be in the same location for cutting.

MSS_PirateShirt_Tutorial30

I found the cut settings for Silhouette Studio has for printable heat transfer-dark material worked great.

For the rest of the shirt check out Part Three.

If you want to see how I designed the skull check out Part one.

Happy Crafting

signature-black

facebook instagram pinterest parties by mamasonshine etsy bloglovin google+ email twitter Image Map

I have shared this project at

 Tip_Me_Tuesday_Button_TipJunkie-jpg


Leave a comment

Birthday Pirate Shirt ~ A Silhouette Cameo how to (Part 1)

I wanted to share with you the steps I took to make my son’s birthday shirt.

There was a few problems I had that I was able to work through.  Hopefully this will help so others won’t get stuck like I did.

In this tutorial I use my Silhouette Cameo and the Silhouette Studio DE software to make a custom shirt for my son’s birthday party.  I used graphics from Just So Scrappy‘s YoHo YoHo Pirate kit.  I used the Silhouette brand Flocked Heat Transfer Material for the skull, and Avery Dark T-Shirt Transfers for Ink Jet Printers.

Part One will be how to make the Skull & Crossbones

Part Two will be how to do the words & party hat

Part Three will be how to iron everything on with some tips

MSS_BirthdayShirt01

The flocked heat transfer material I had is 9″ wide, I set my paper size to normal Letter 8.5″x11″ since I will also be doing a print ‘n cut portion for his shirt.  Keeping the size the same helped me with proportions.

MSS_PirateShirt_Tutorial01I selected the skull and cross-bones from my library.  Since it is a .png file I had to trace the element.  I planned on cutting the skull out of the flocked heat transfer material, so I won’t need the picture after tracing it.

MSS_PirateShirt_Tutorial02No matter what my settings were, I could not get the eyes, nose and teeth to be traced.  This is because they are colored parts of the png, so the software couldn’t differentiate between them and the skull.  I chose to trace the outline first, then do the inside elements separate.

MSS_PirateShirt_Tutorial03

Since the teeth are basically the same color as the skull, I couldn’t get them to trace cleanly.

MSS_PirateShirt_Tutorial04

Notice all the yellow dots.  I could have gone back and deleted them all, but it is easier to just use the drawing tools.

MSS_PirateShirt_Tutorial06

I used the circle tool to make an oval about the shape of one tooth, I then used the point editing tool to match the shape of one tooth.  Using the Replicate tool box, I made copies of the teeth and aligned them with the original picture.

MSS_PirateShirt_Tutorial07

Since I no longer need the picture, I can delete it, or just move it off the mat.  One part of the bones needs to be removed because this is where the party hat will be.

MSS_PirateShirt_Tutorial08Using the knife tool I simply drew a line through the bone, making sure that “solid” is selected in my tool box.  If you don’t have the designer edition of the software this is the default setting.

MSS_PirateShirt_Tutorial09This portion of the bone can now be deleted.  I then went back and smoothed the part of the skull where I made the cut.

MSS_PirateShirt_Tutorial10

Using the point editing tool box, I deleted all points above the curve of the skull and smoothed out the remaining ones.  It is not shown in this tutorial, but I also added curved lines to separate the skull and reaming three bones.  I didn’t want the separate but I wanted a cut line there to give more depth to the finished product.

MSS_PirateShirt_Tutorial11In the cut style tool box make sure “cut” is selected so that it also cuts out the eyes, nose and teeth.  The shirt will show through on these parts.

MSS_PirateShirt_Tutorial12Before you actually cut your design you want to flip it horizontally, make sure all elements are selected (ok to group them together).  You can right-click, or go to the edit menu, and select ‘flip horizontally.’  The cut settings for Heat Transfer Material Flocked worked perfect because it is a Silhouette media.  If you are unsure make a test cut first.  You don’t need a mat, so un-click that box and make sure the shiny side is down when cutting.  If unsure, follow the directions on the package.

For the rest of the shirt check out Part Two & Part Three.

Happy Crafting

signature-black

facebook instagram pinterest parties by mamasonshine etsy bloglovin google+ email twitter Image Map
Enhanced by Zemanta