I Tri and Craft

thoughts from a mother of boys, a marathoner, a triathlete, a crafter, a wife, and a scientist


21 Comments

Hand Made Decorations for a Pirate Party

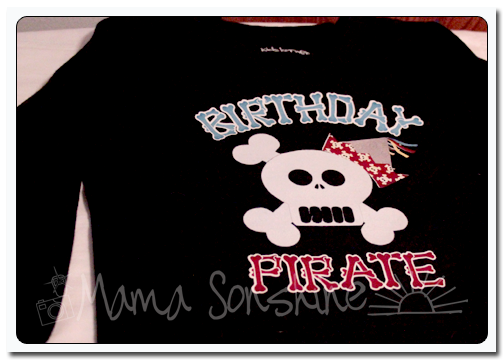
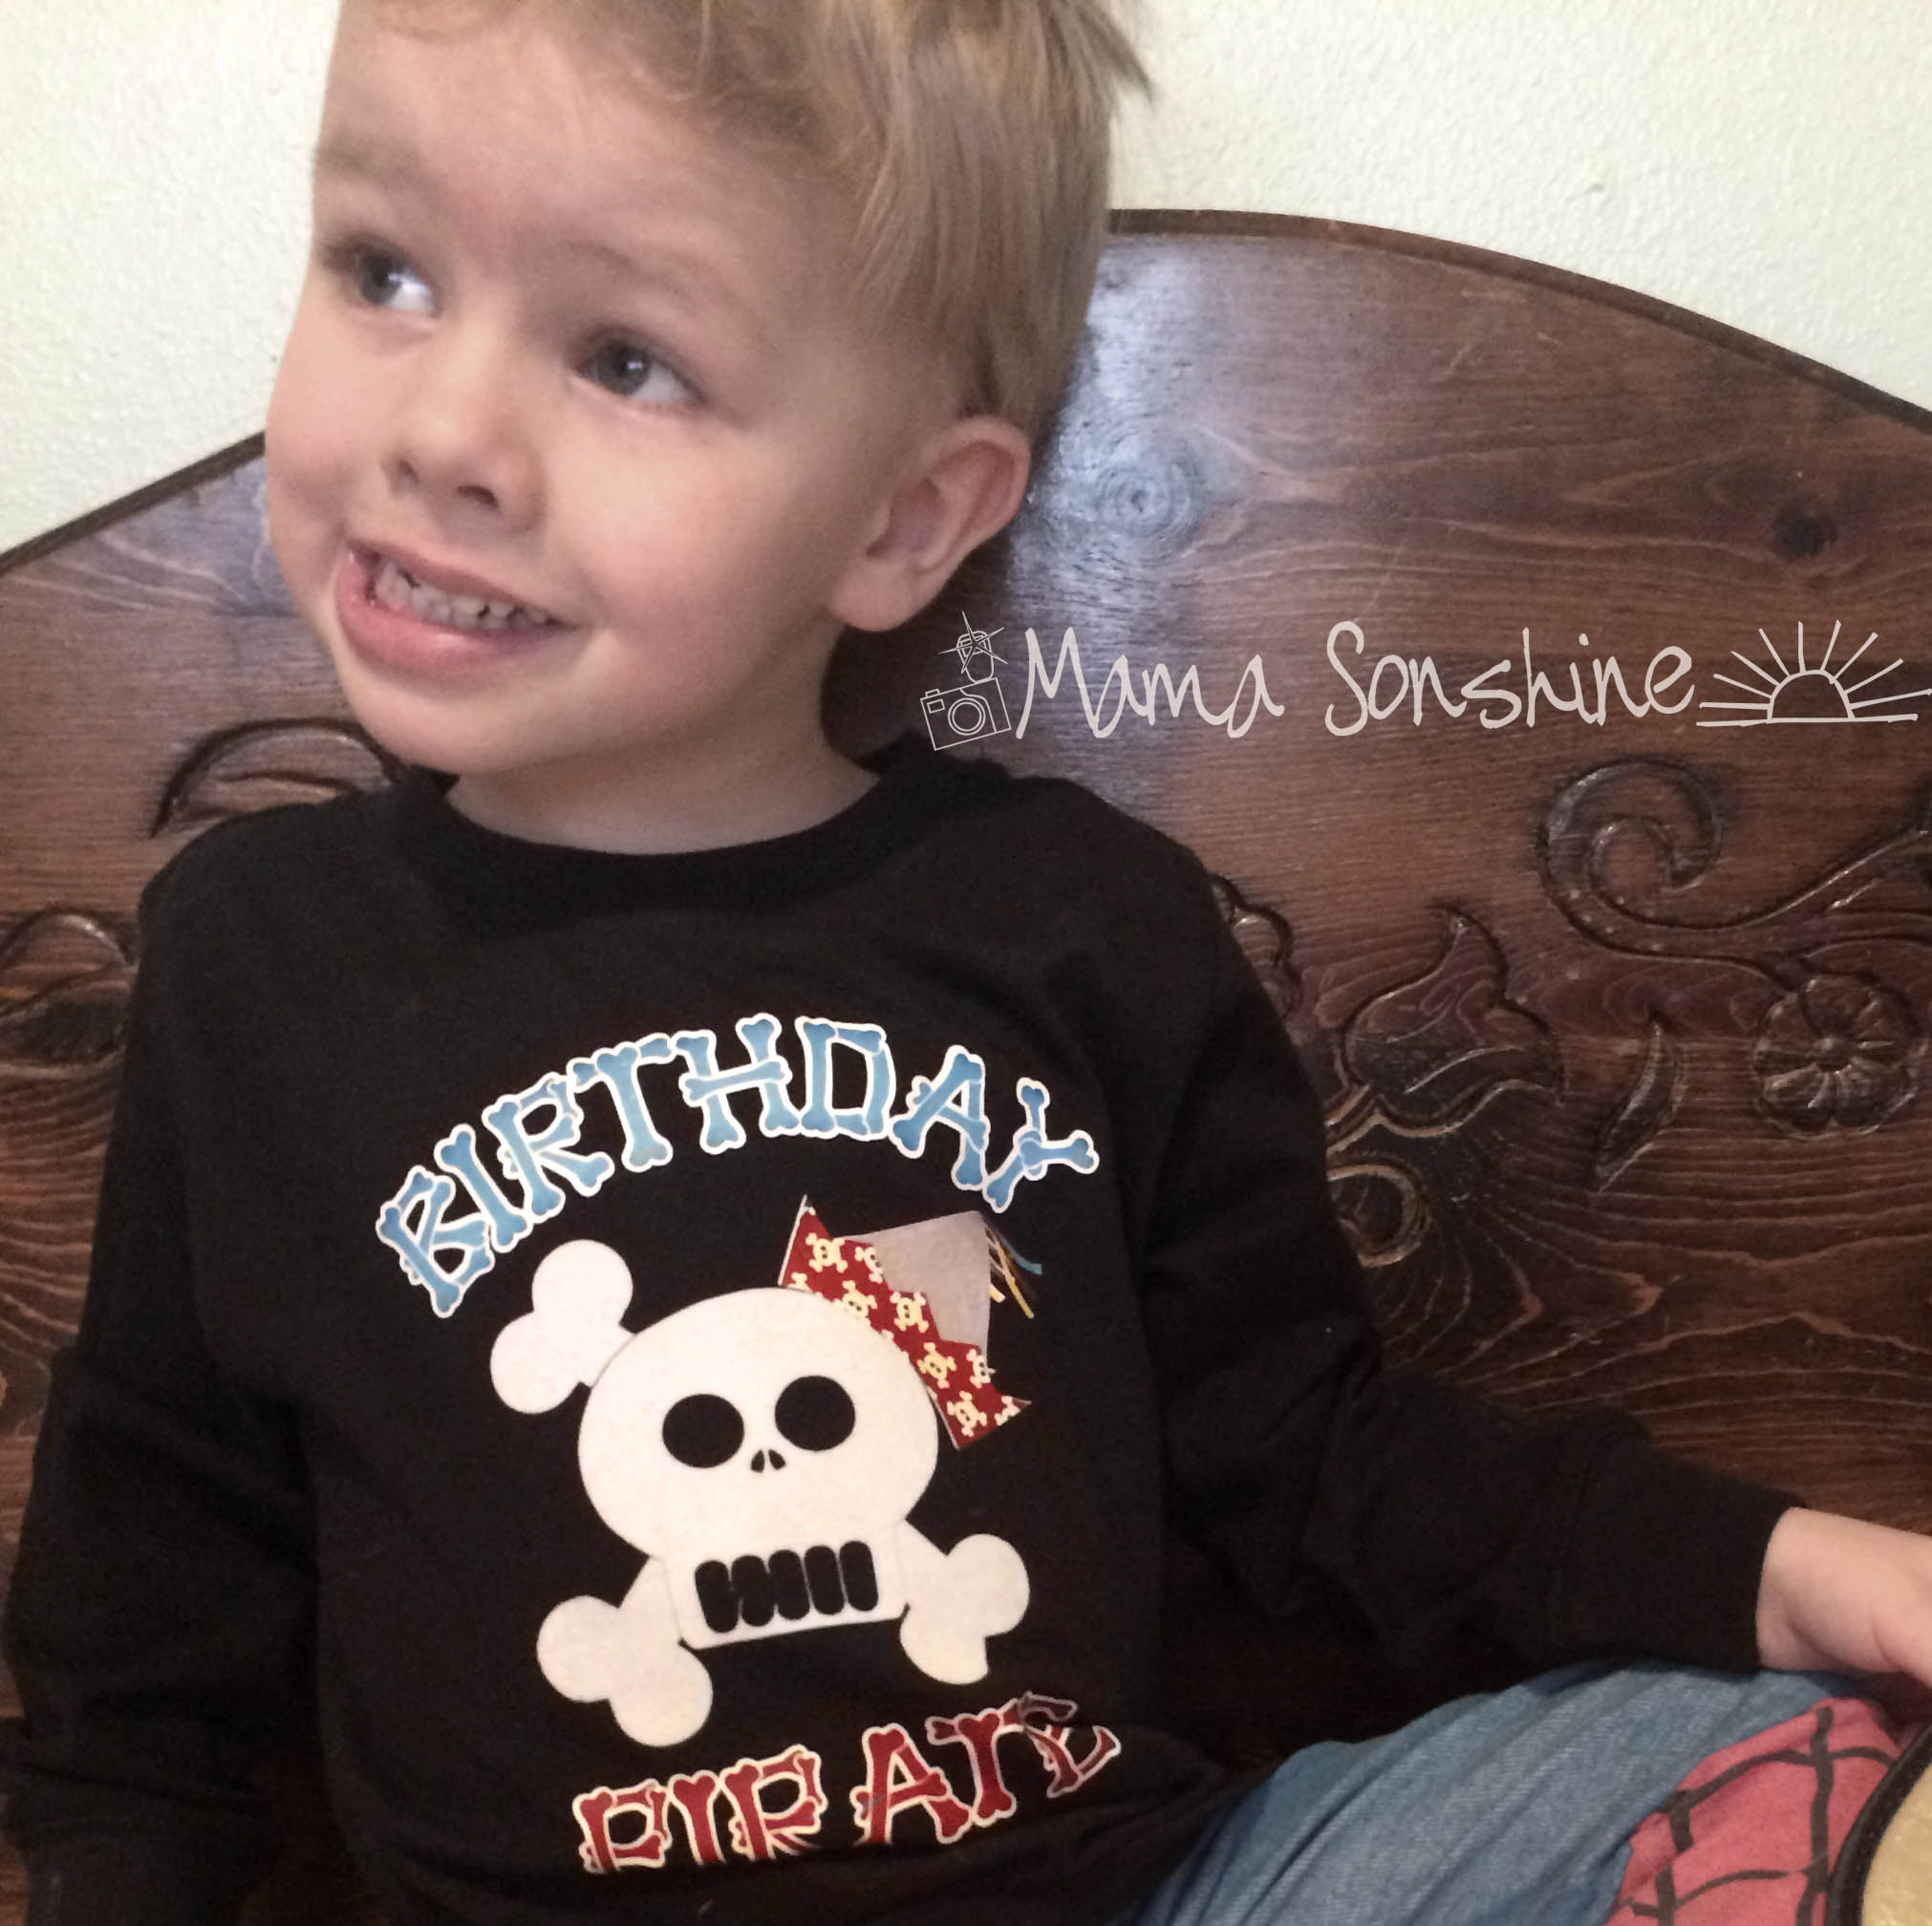
This past month I have been busy making Ian’s birthday party decorations.  I wanted to share a few of the items I am making.

I don’t want to spoil the surprise, so this is just a sneak peek at what I can do now that I have my Silhouette Cameo to help me.

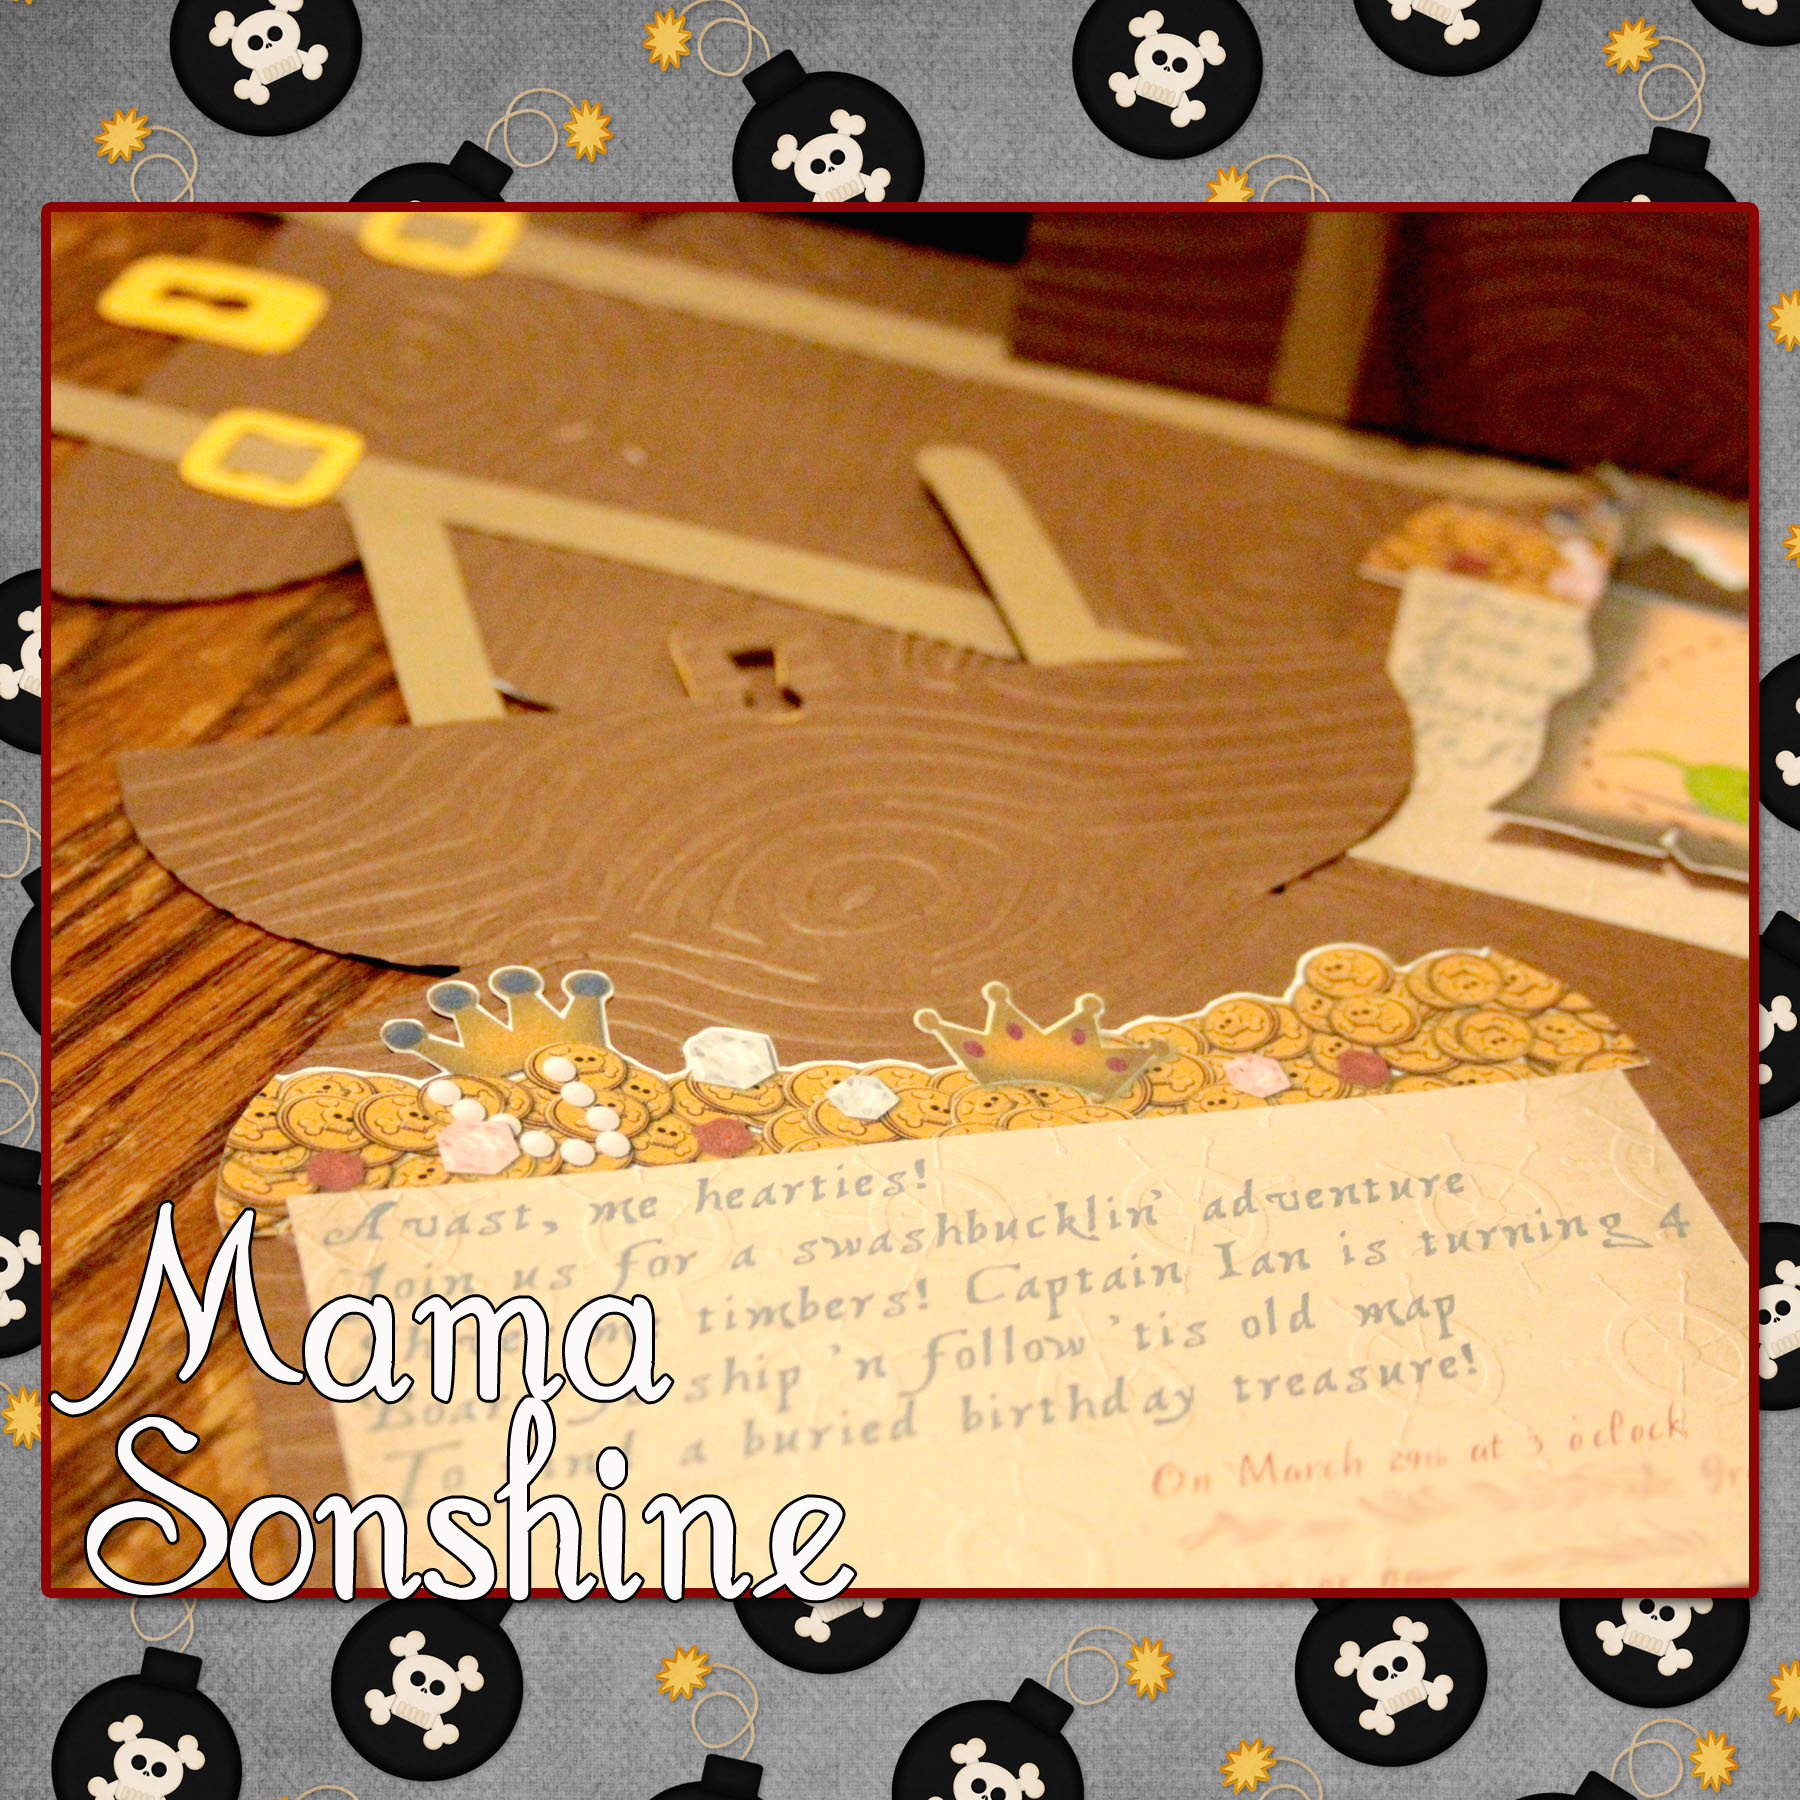
Ian had decided he wanted a pirate birthday party this year.  I wanted his invitations to be pirate chests that open up to revel treasure, and a treasure map.

MSS_MarchSilChallenge09_2014

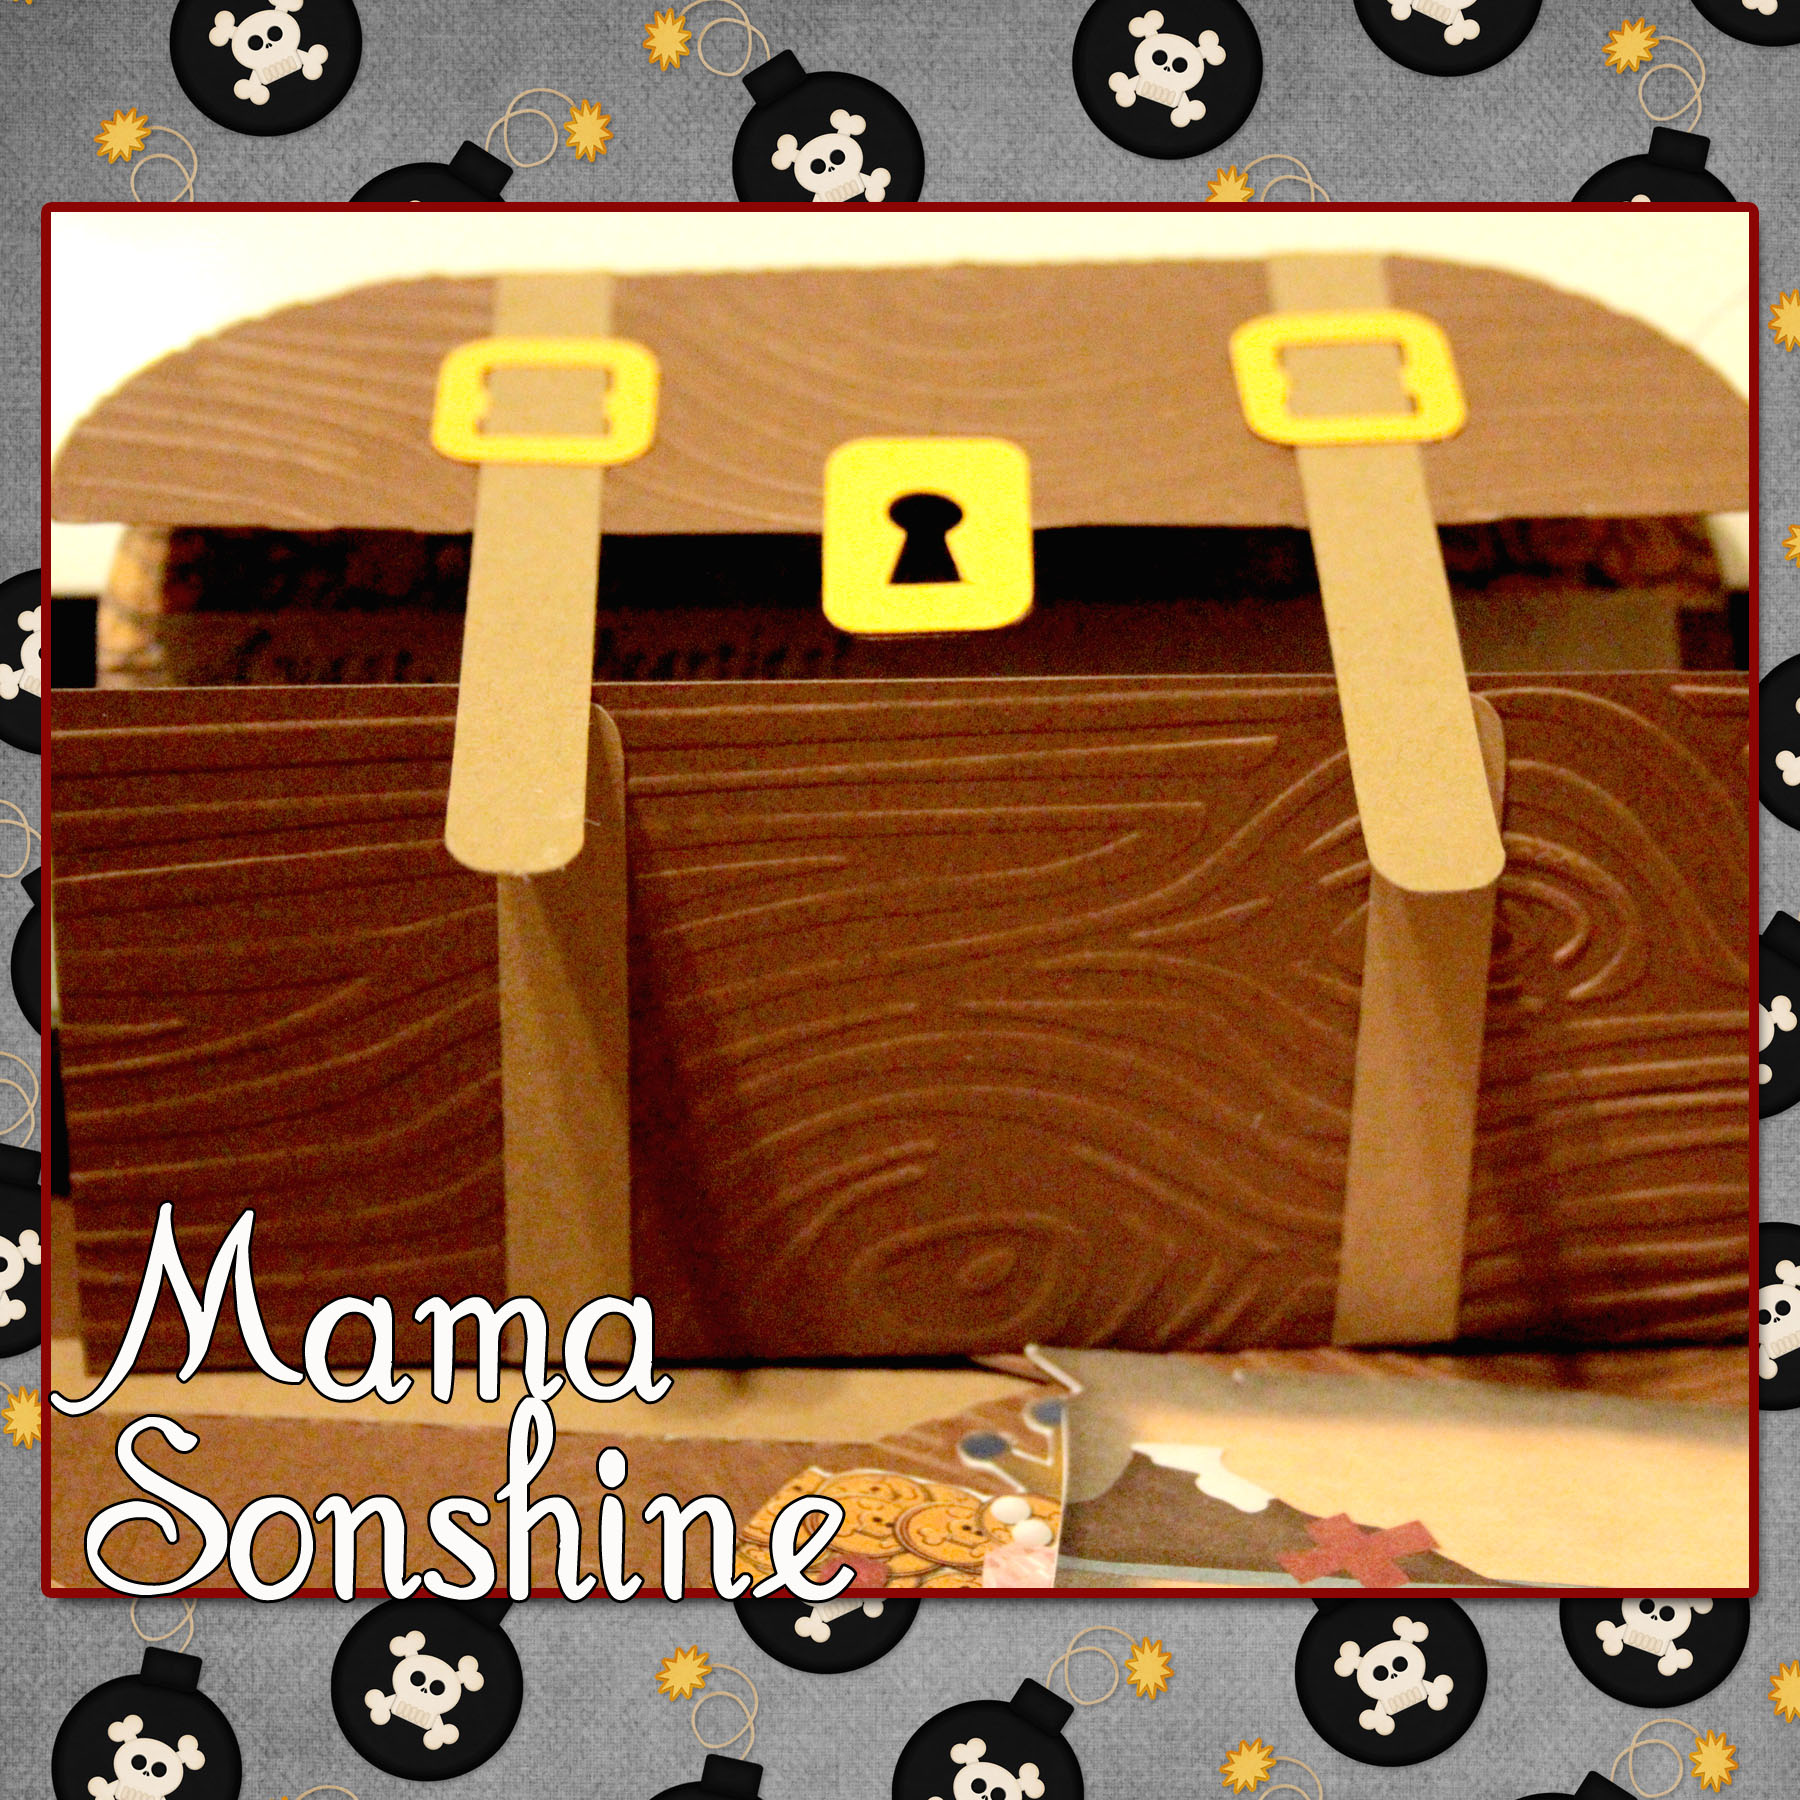
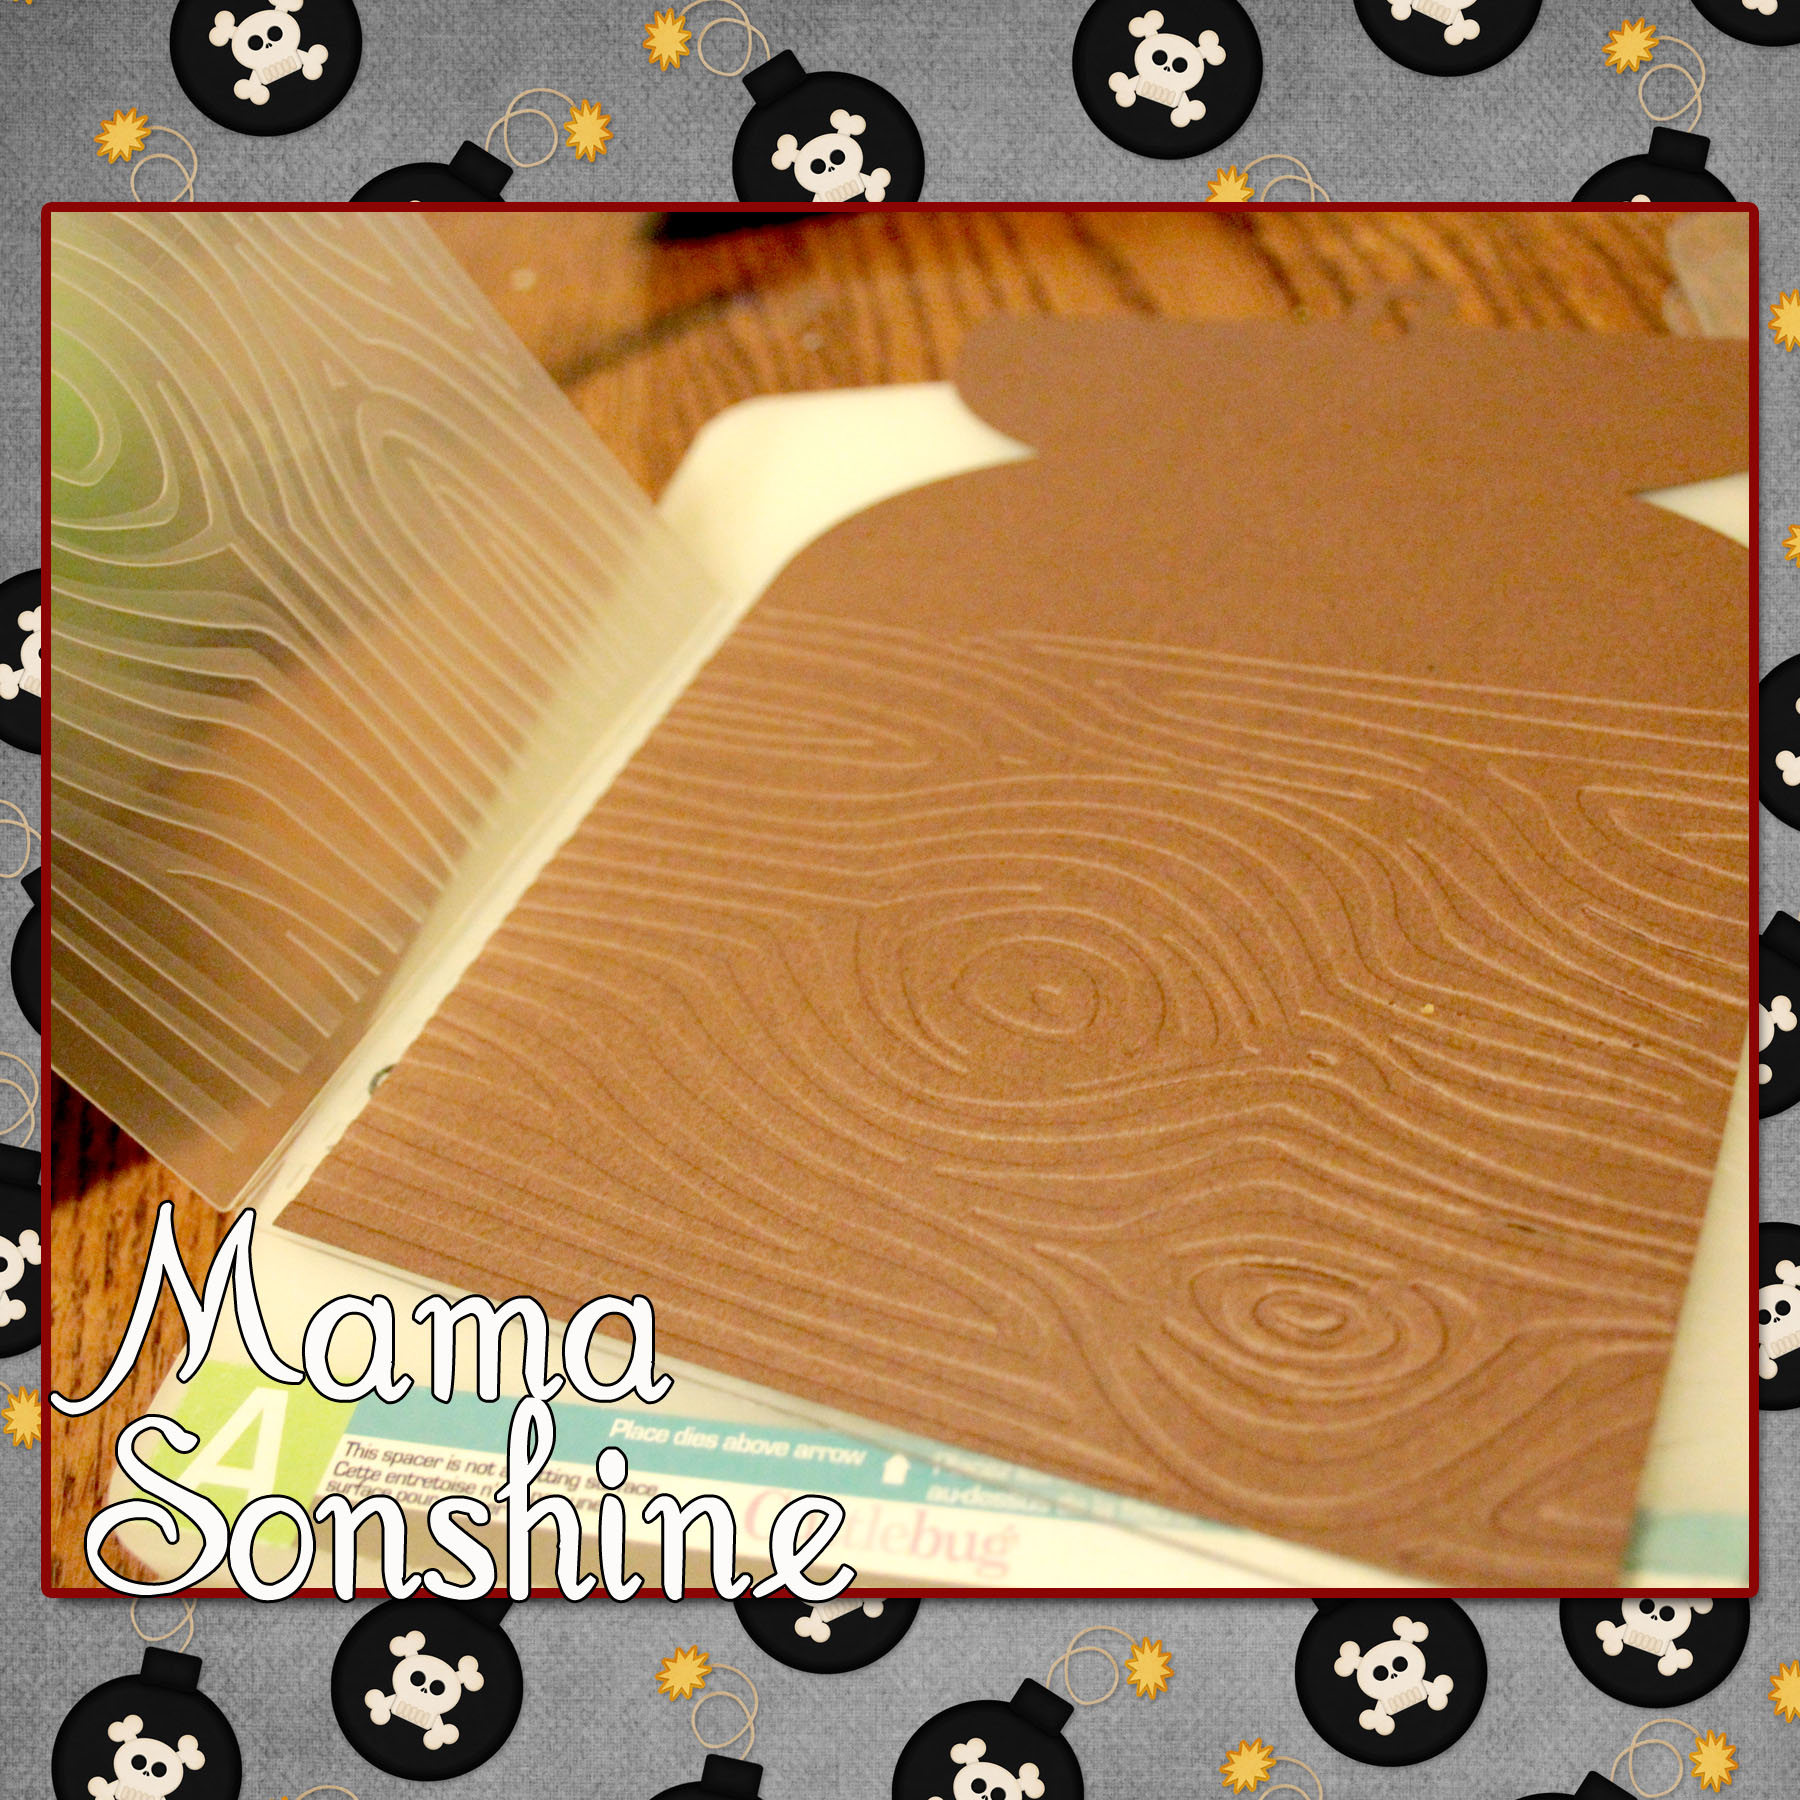
I quickly gave up trying to draw a treasure chest and just purchased a cut file from the Silhouette Studio Store.  After which I ran it through my Cuttlebug to emboss the paper with a wood grain.

MSS_MarchSilChallenge06_2014

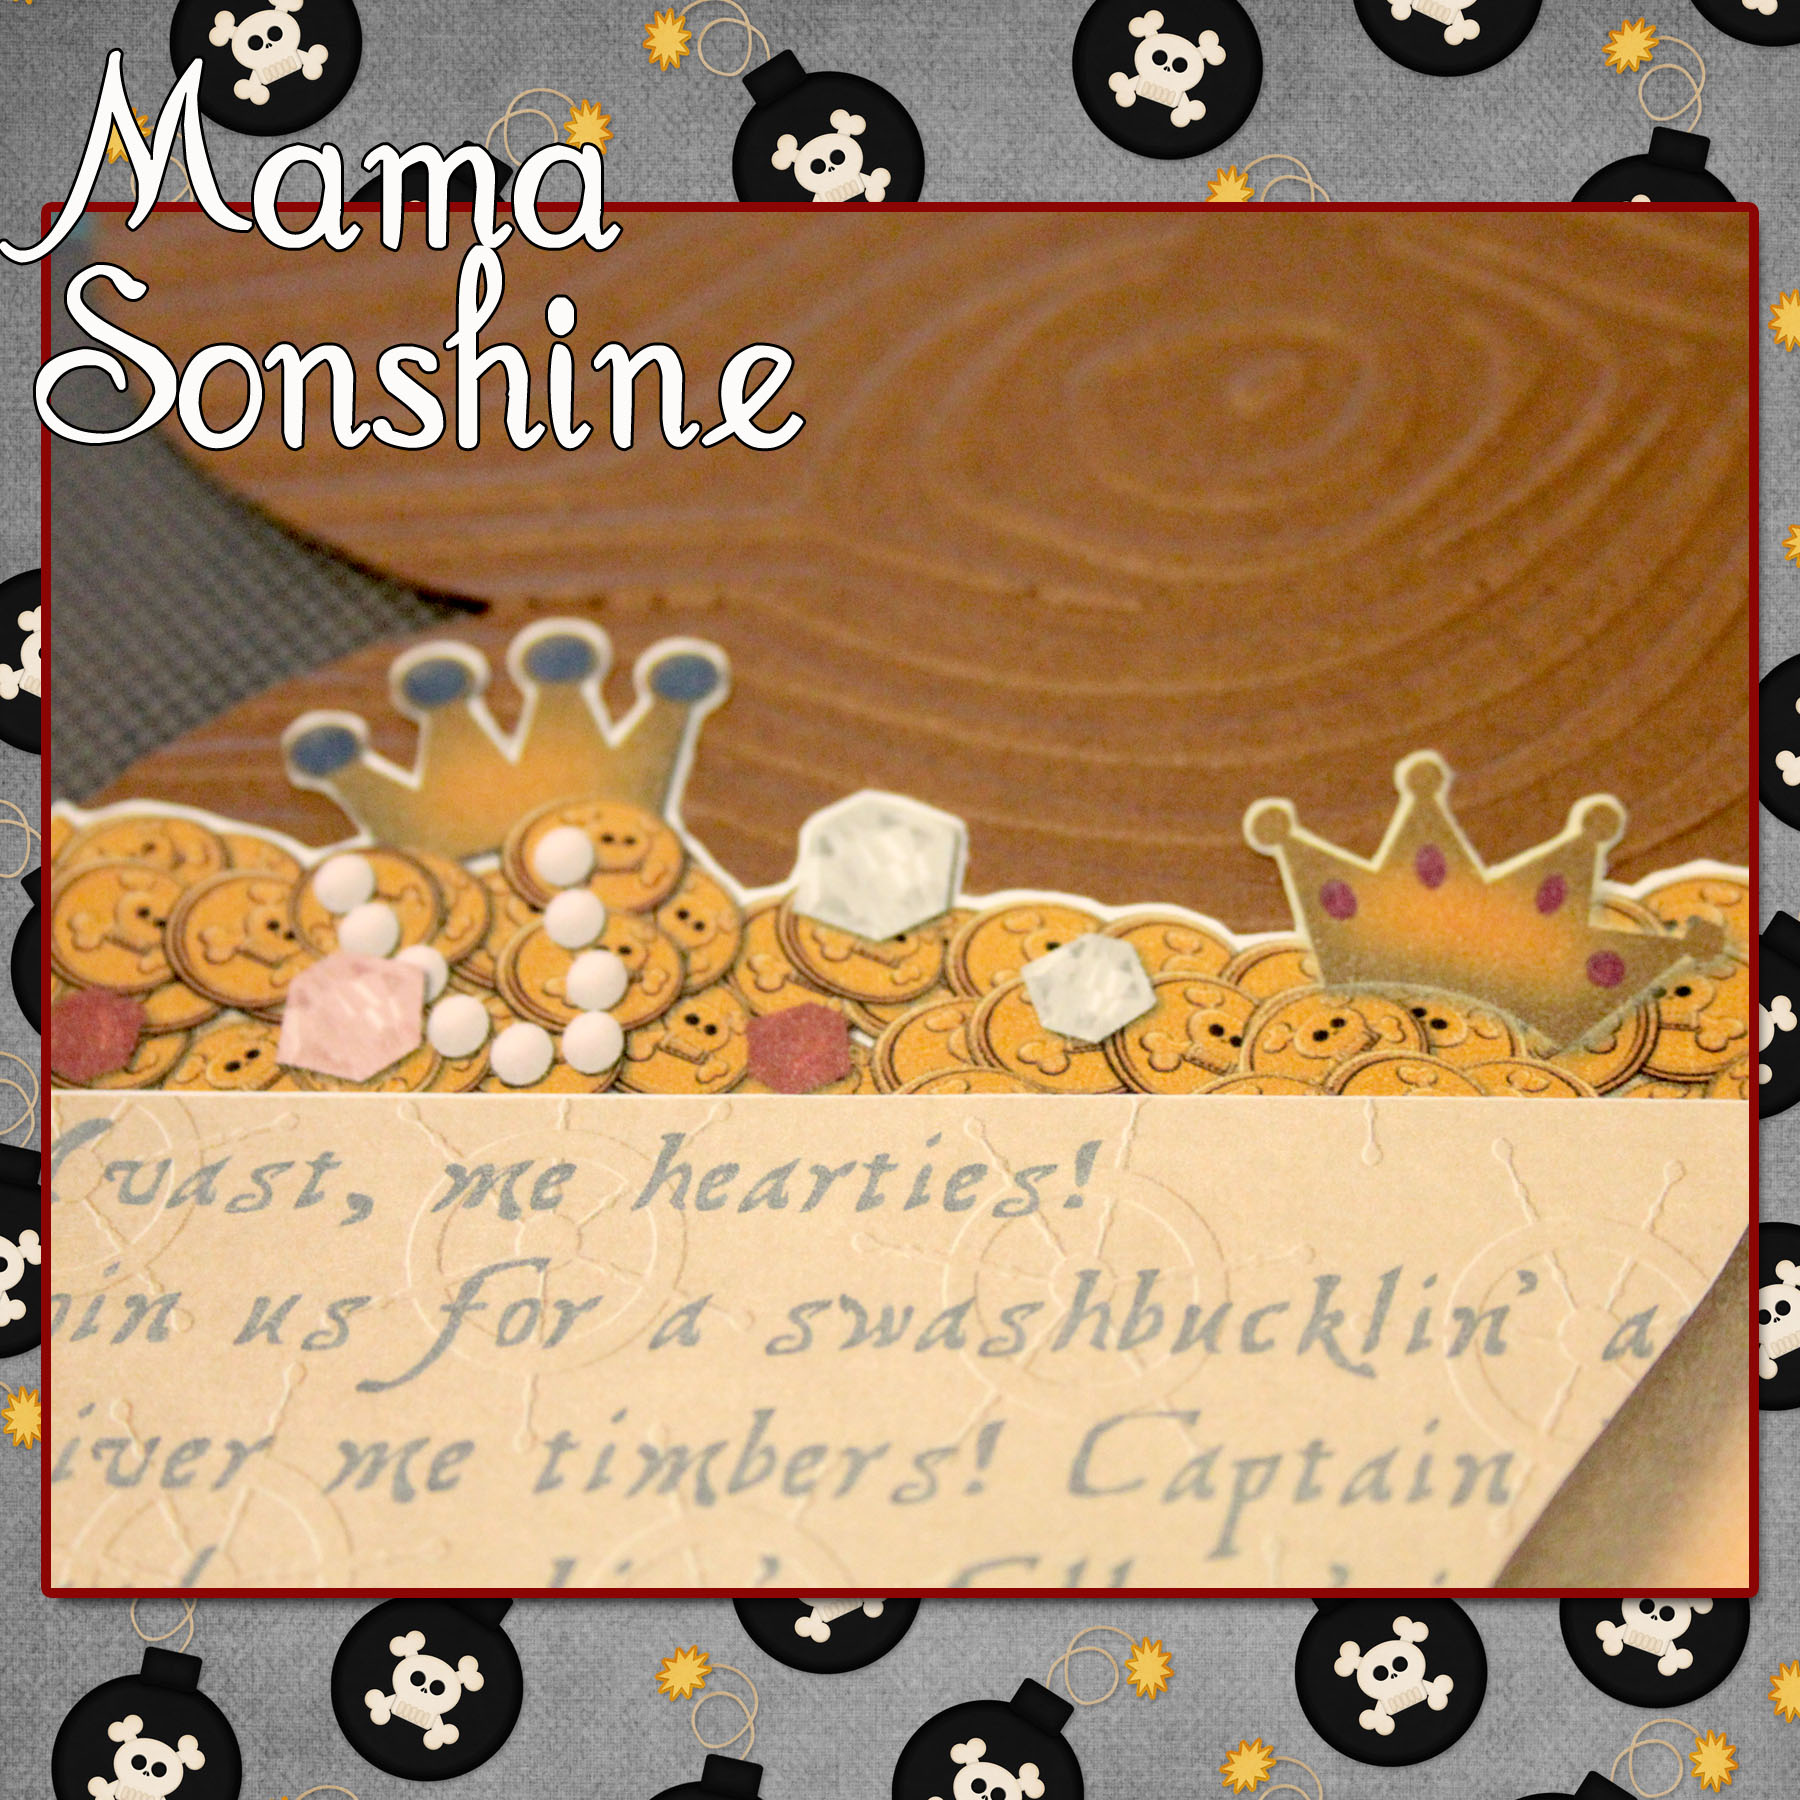
I went to Photoshop and created a picture of coins and jewels that matched the shape of the card.  I imported that image into the Silhouette Studio software so that my machine would cut around all the little shapes for me.

MSS_MarchSilChallenge04_2014

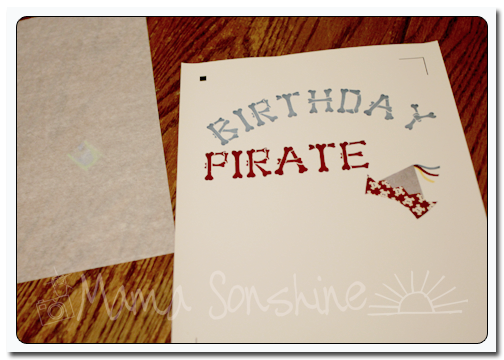
I also created a cut out that would contain all the information on the card.

It says

“Avast, me hearties!
Join us for a swashbucklin’ adventure
Shiver me timbers! Captain Ian is turning 4
Board ye ship ‘n follow ’tis old map
to find a buried birthday treasure!”

MSS_MarchSilChallenge07_2014

I used the digital graphics from Just So Scrappy‘s YoHo Pirate kit (as I will do for various other items I made for this party) to make cut out a treasure map.

MSS_MarchSilChallenge08_2014

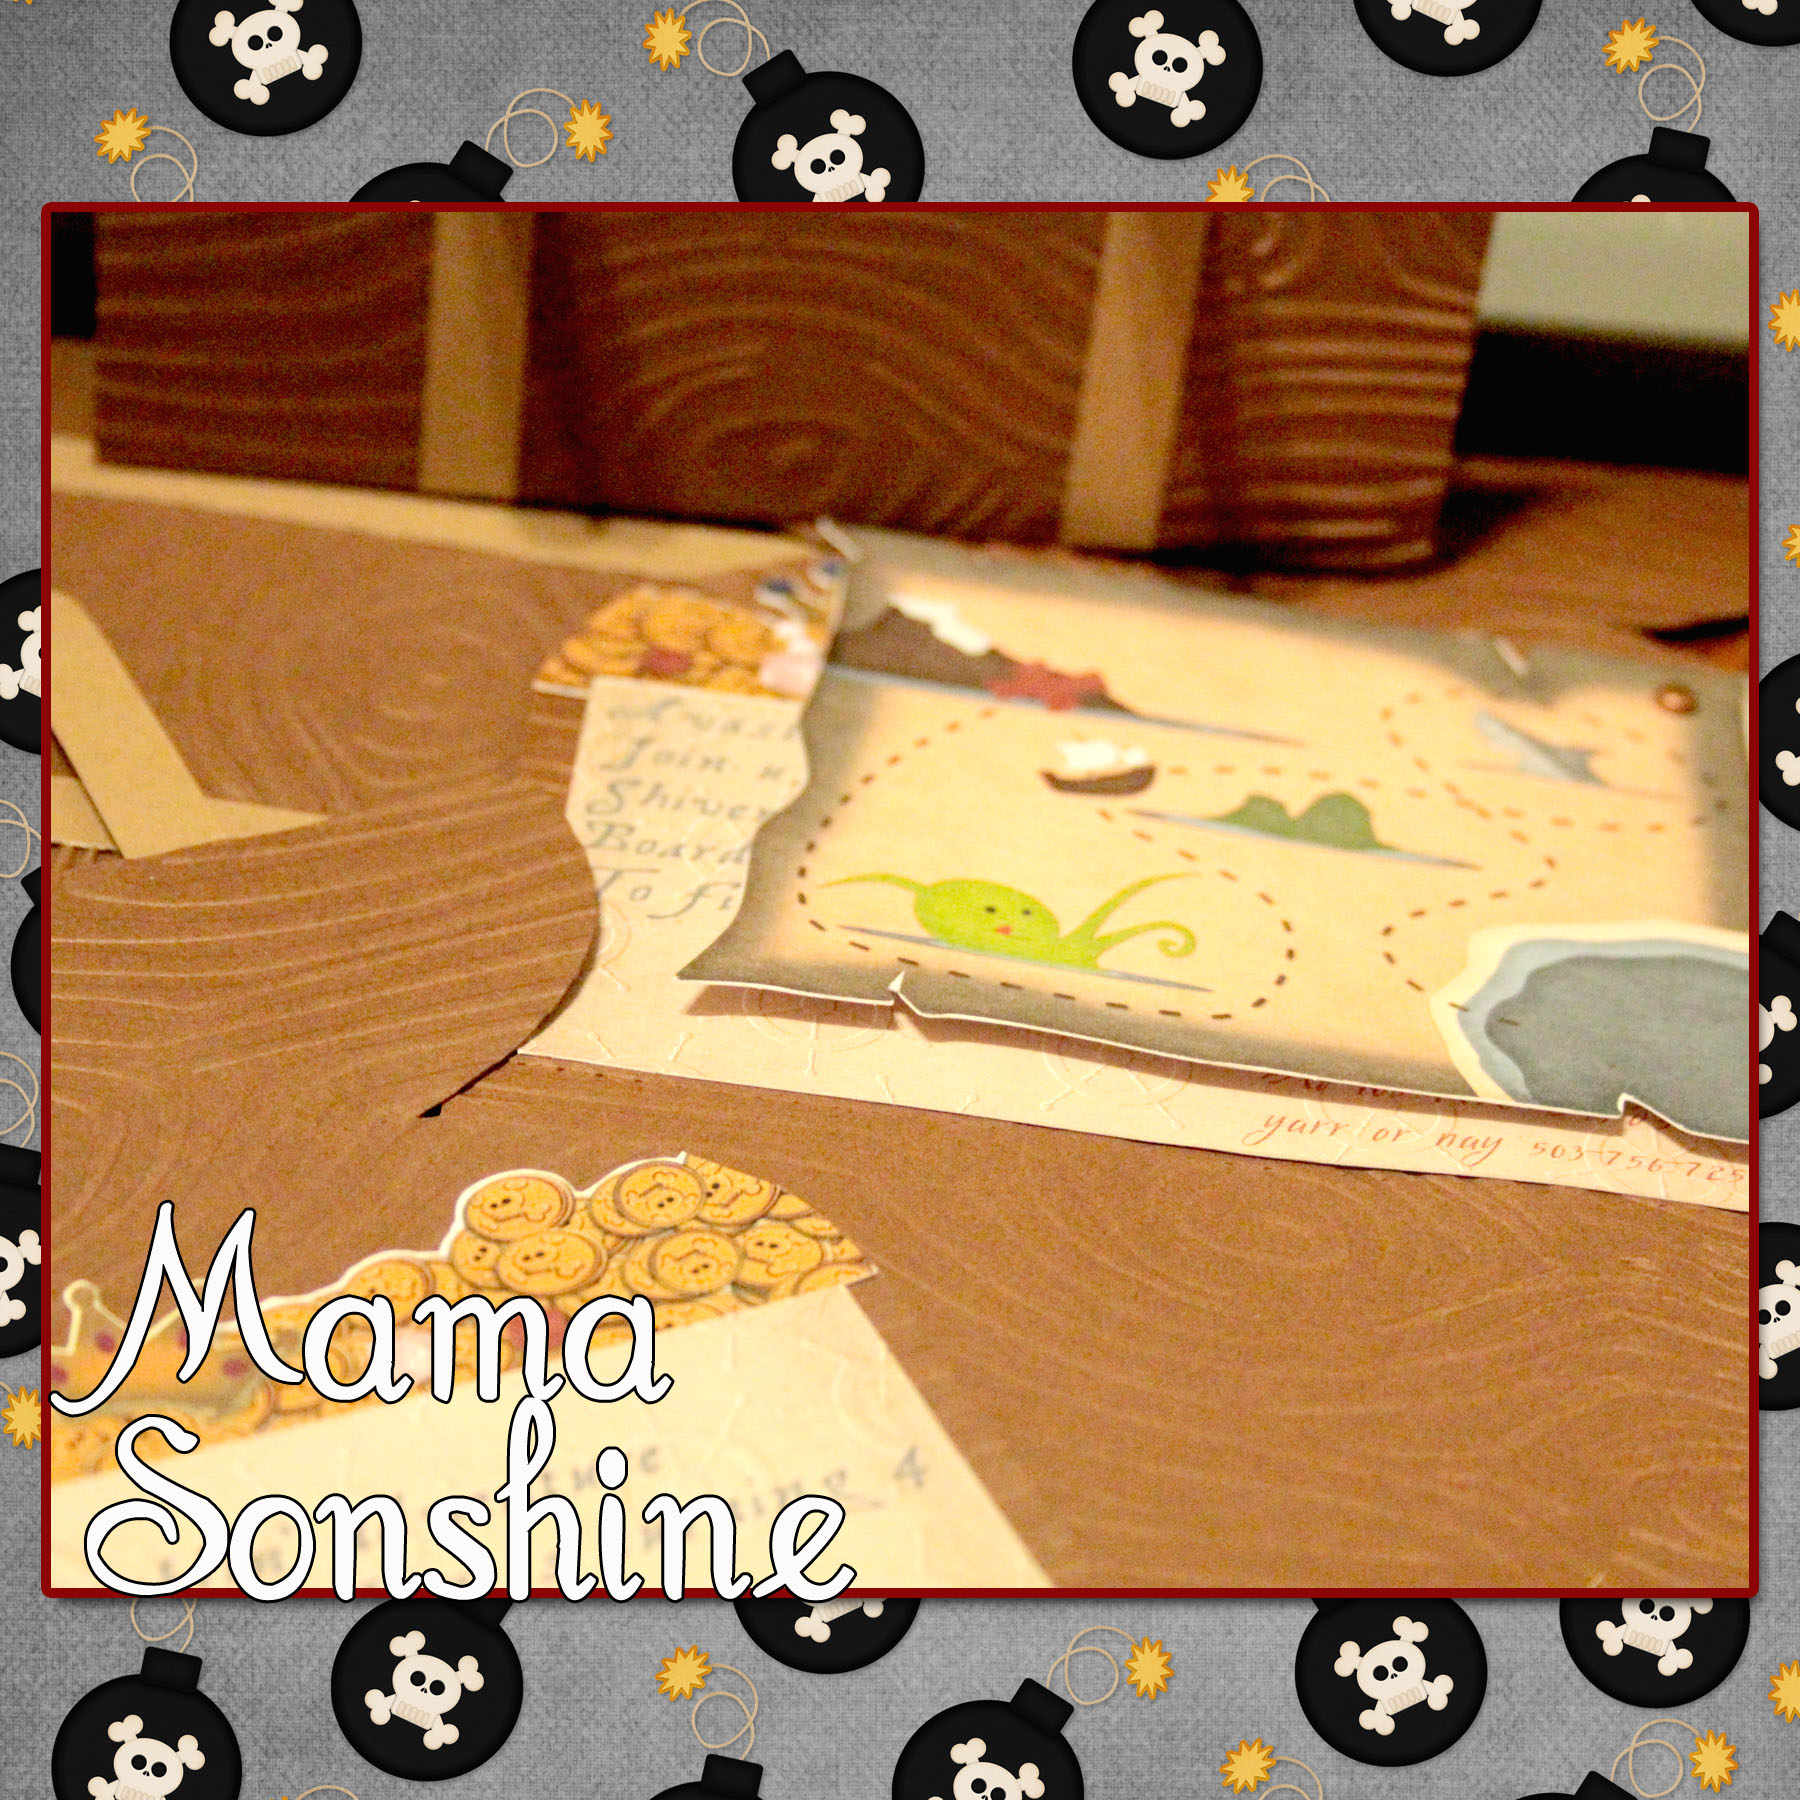
The three elements inside the card were made with the Silhouette’s Print ‘n Cut feature, which I think is da bomb!

I cut the treasure chests out in a light brown and dark brown cardstock.  I also cut the straps in the same two colors, I then used the light straps on the dark chest and vice versa.  The buckles and locks were cut out using a gold-colored cardstock.  I glued all the elements together, except the map, which I attached with a brad so it can be moved.

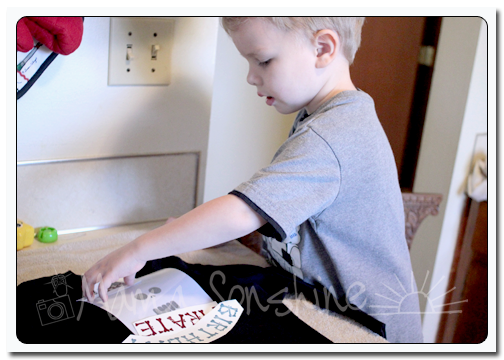
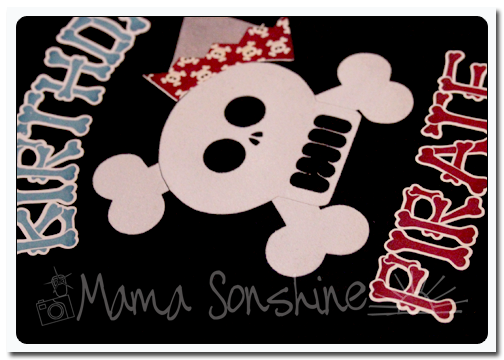
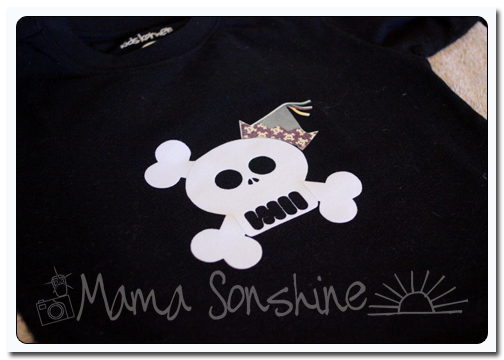
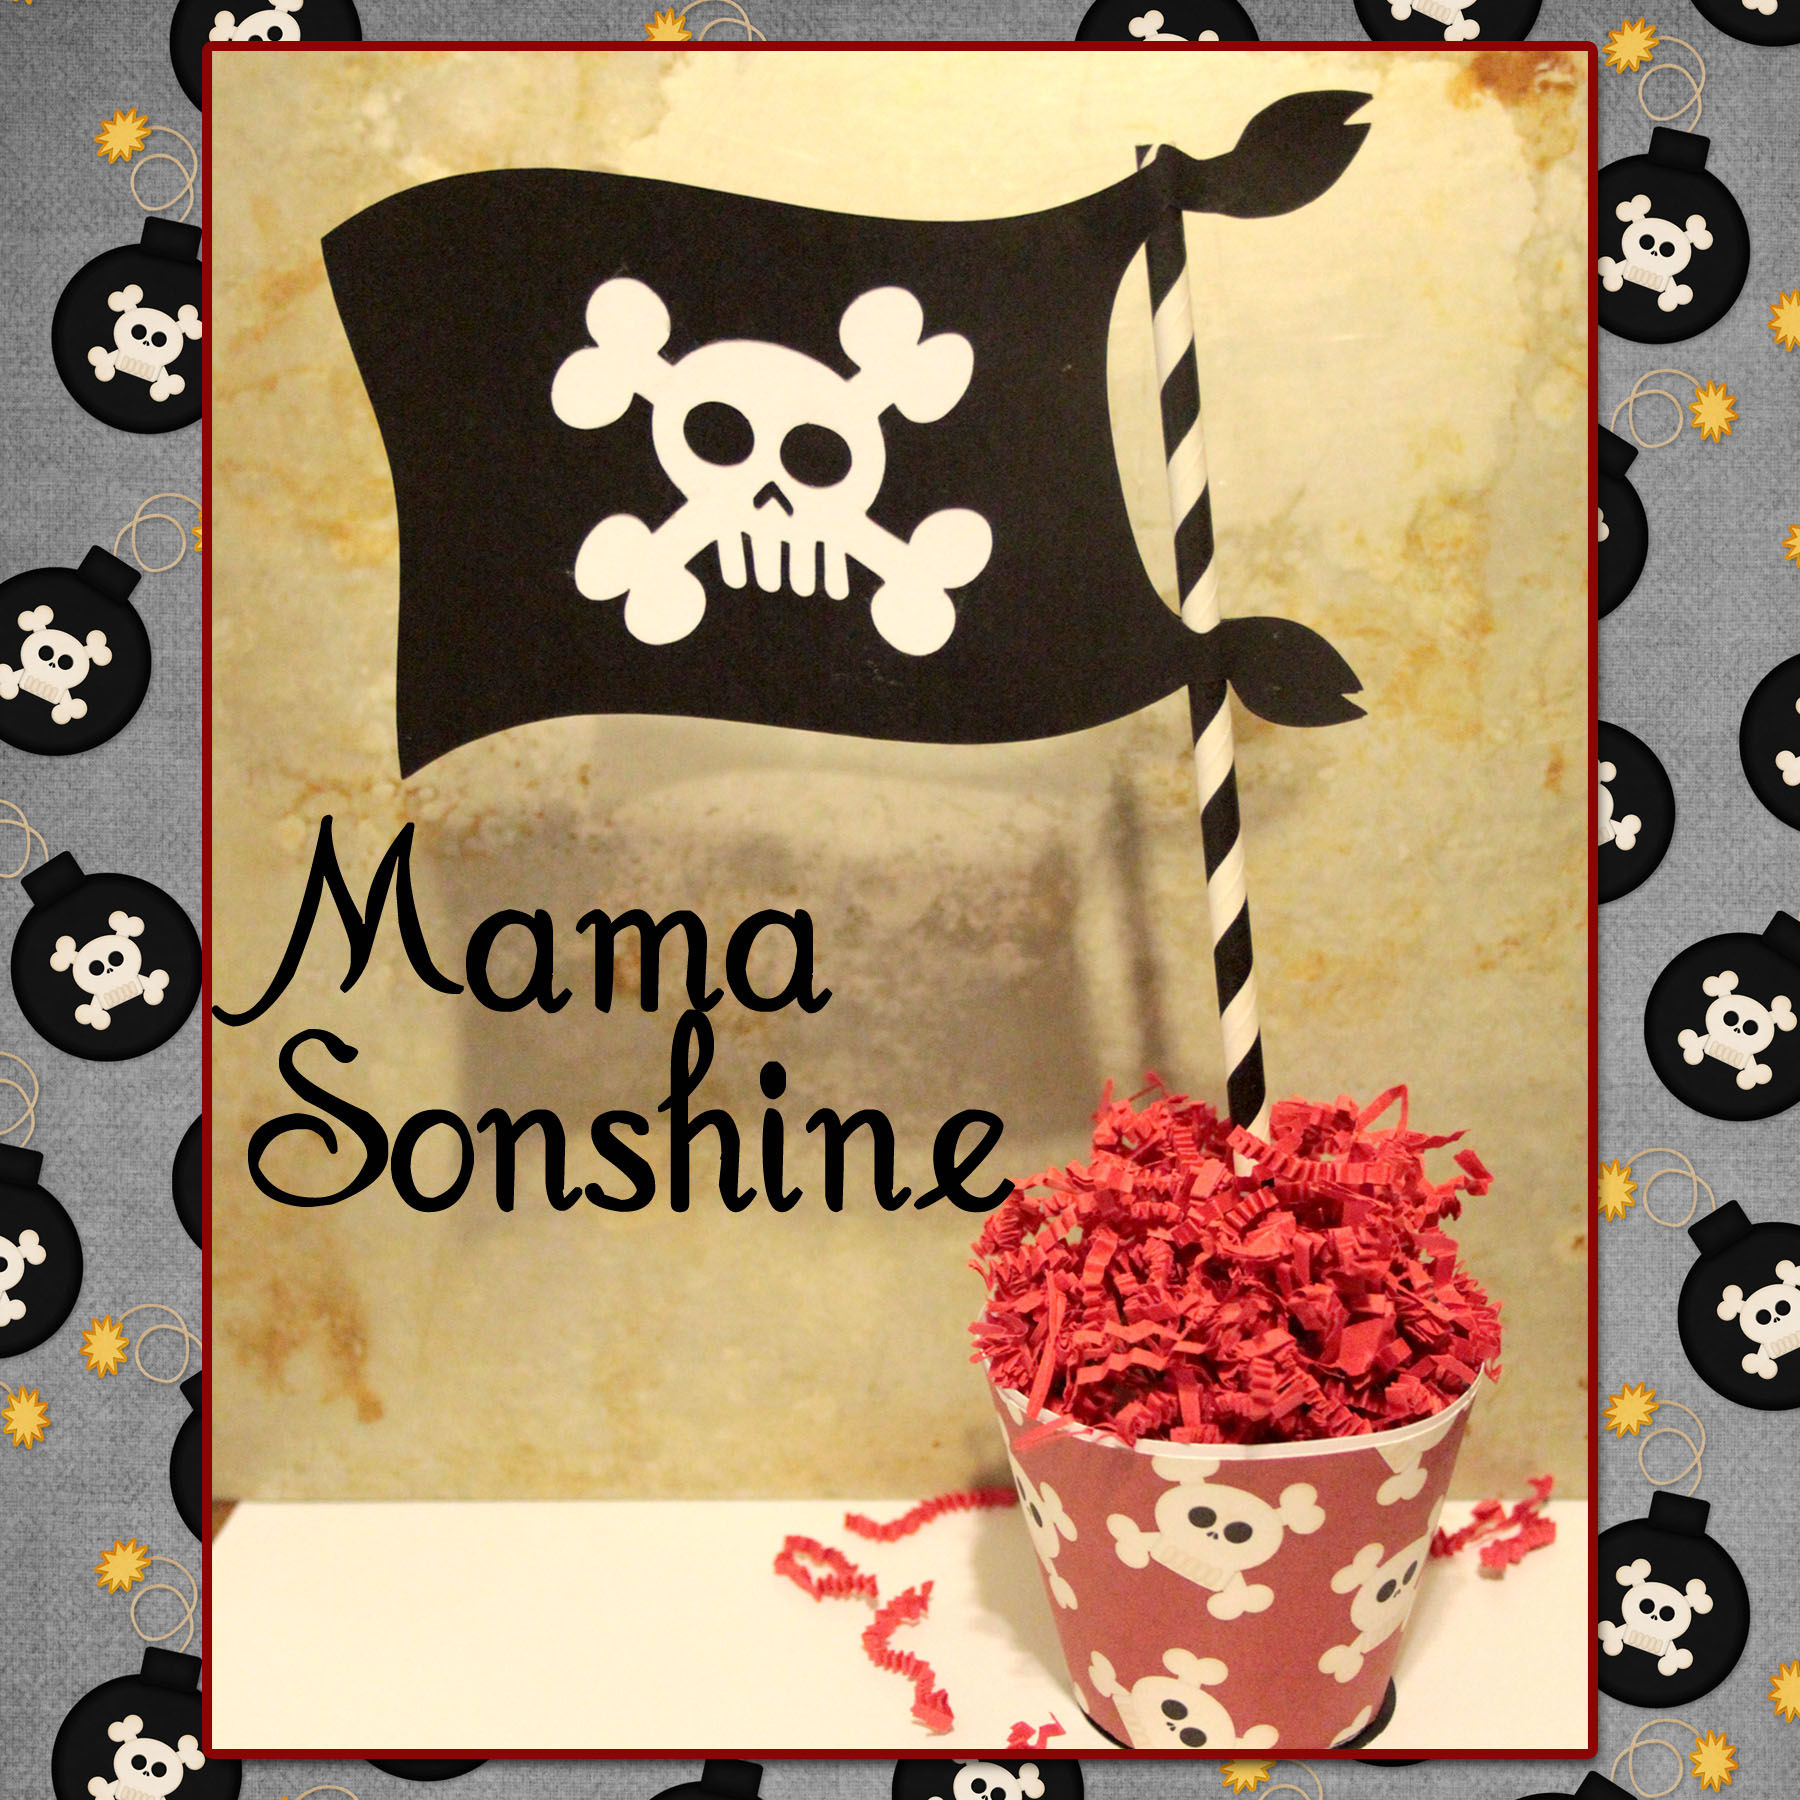
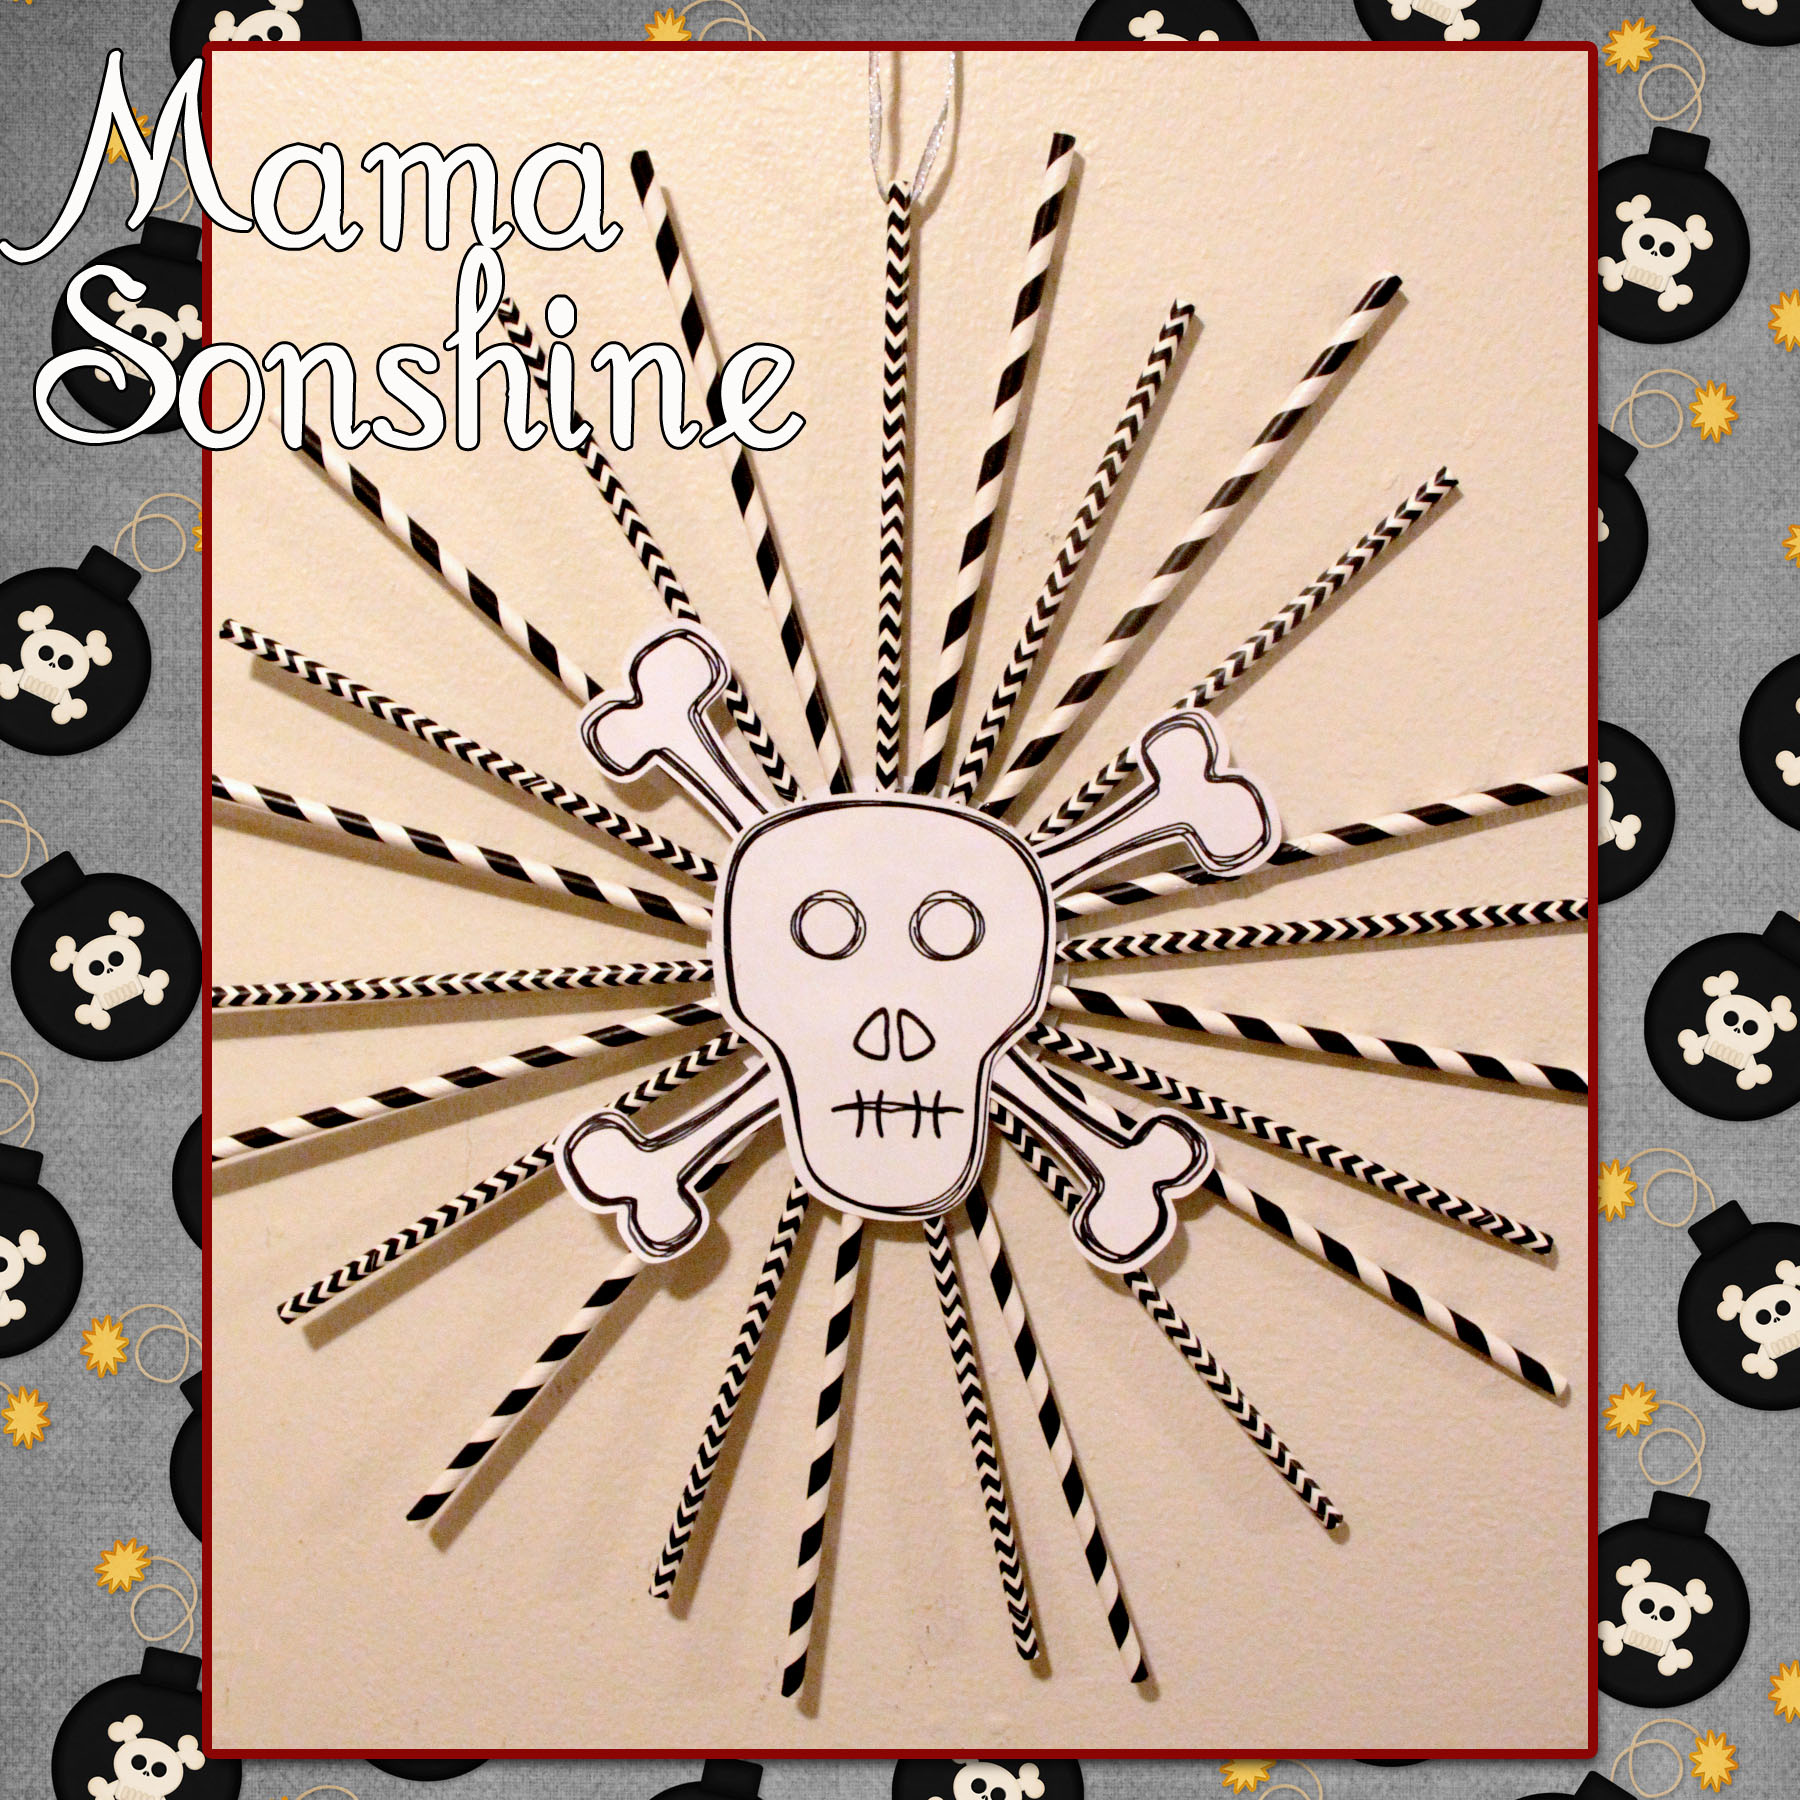
Using the same digital graphics I created a pirate flag topiary  table decoration.  I had to create my own cut file for the flag portion, cutting out the skull and crossbones.

MSS_MarchSilChallenge05_2014

I sandwiched a white piece of cardstock in between the two flag pieces, which I glued to a paper straw.  The base is made using the print and cut feature, it is an adapted cupcake wrapper shape.

MSS_MarchSilChallenge_2014 copy

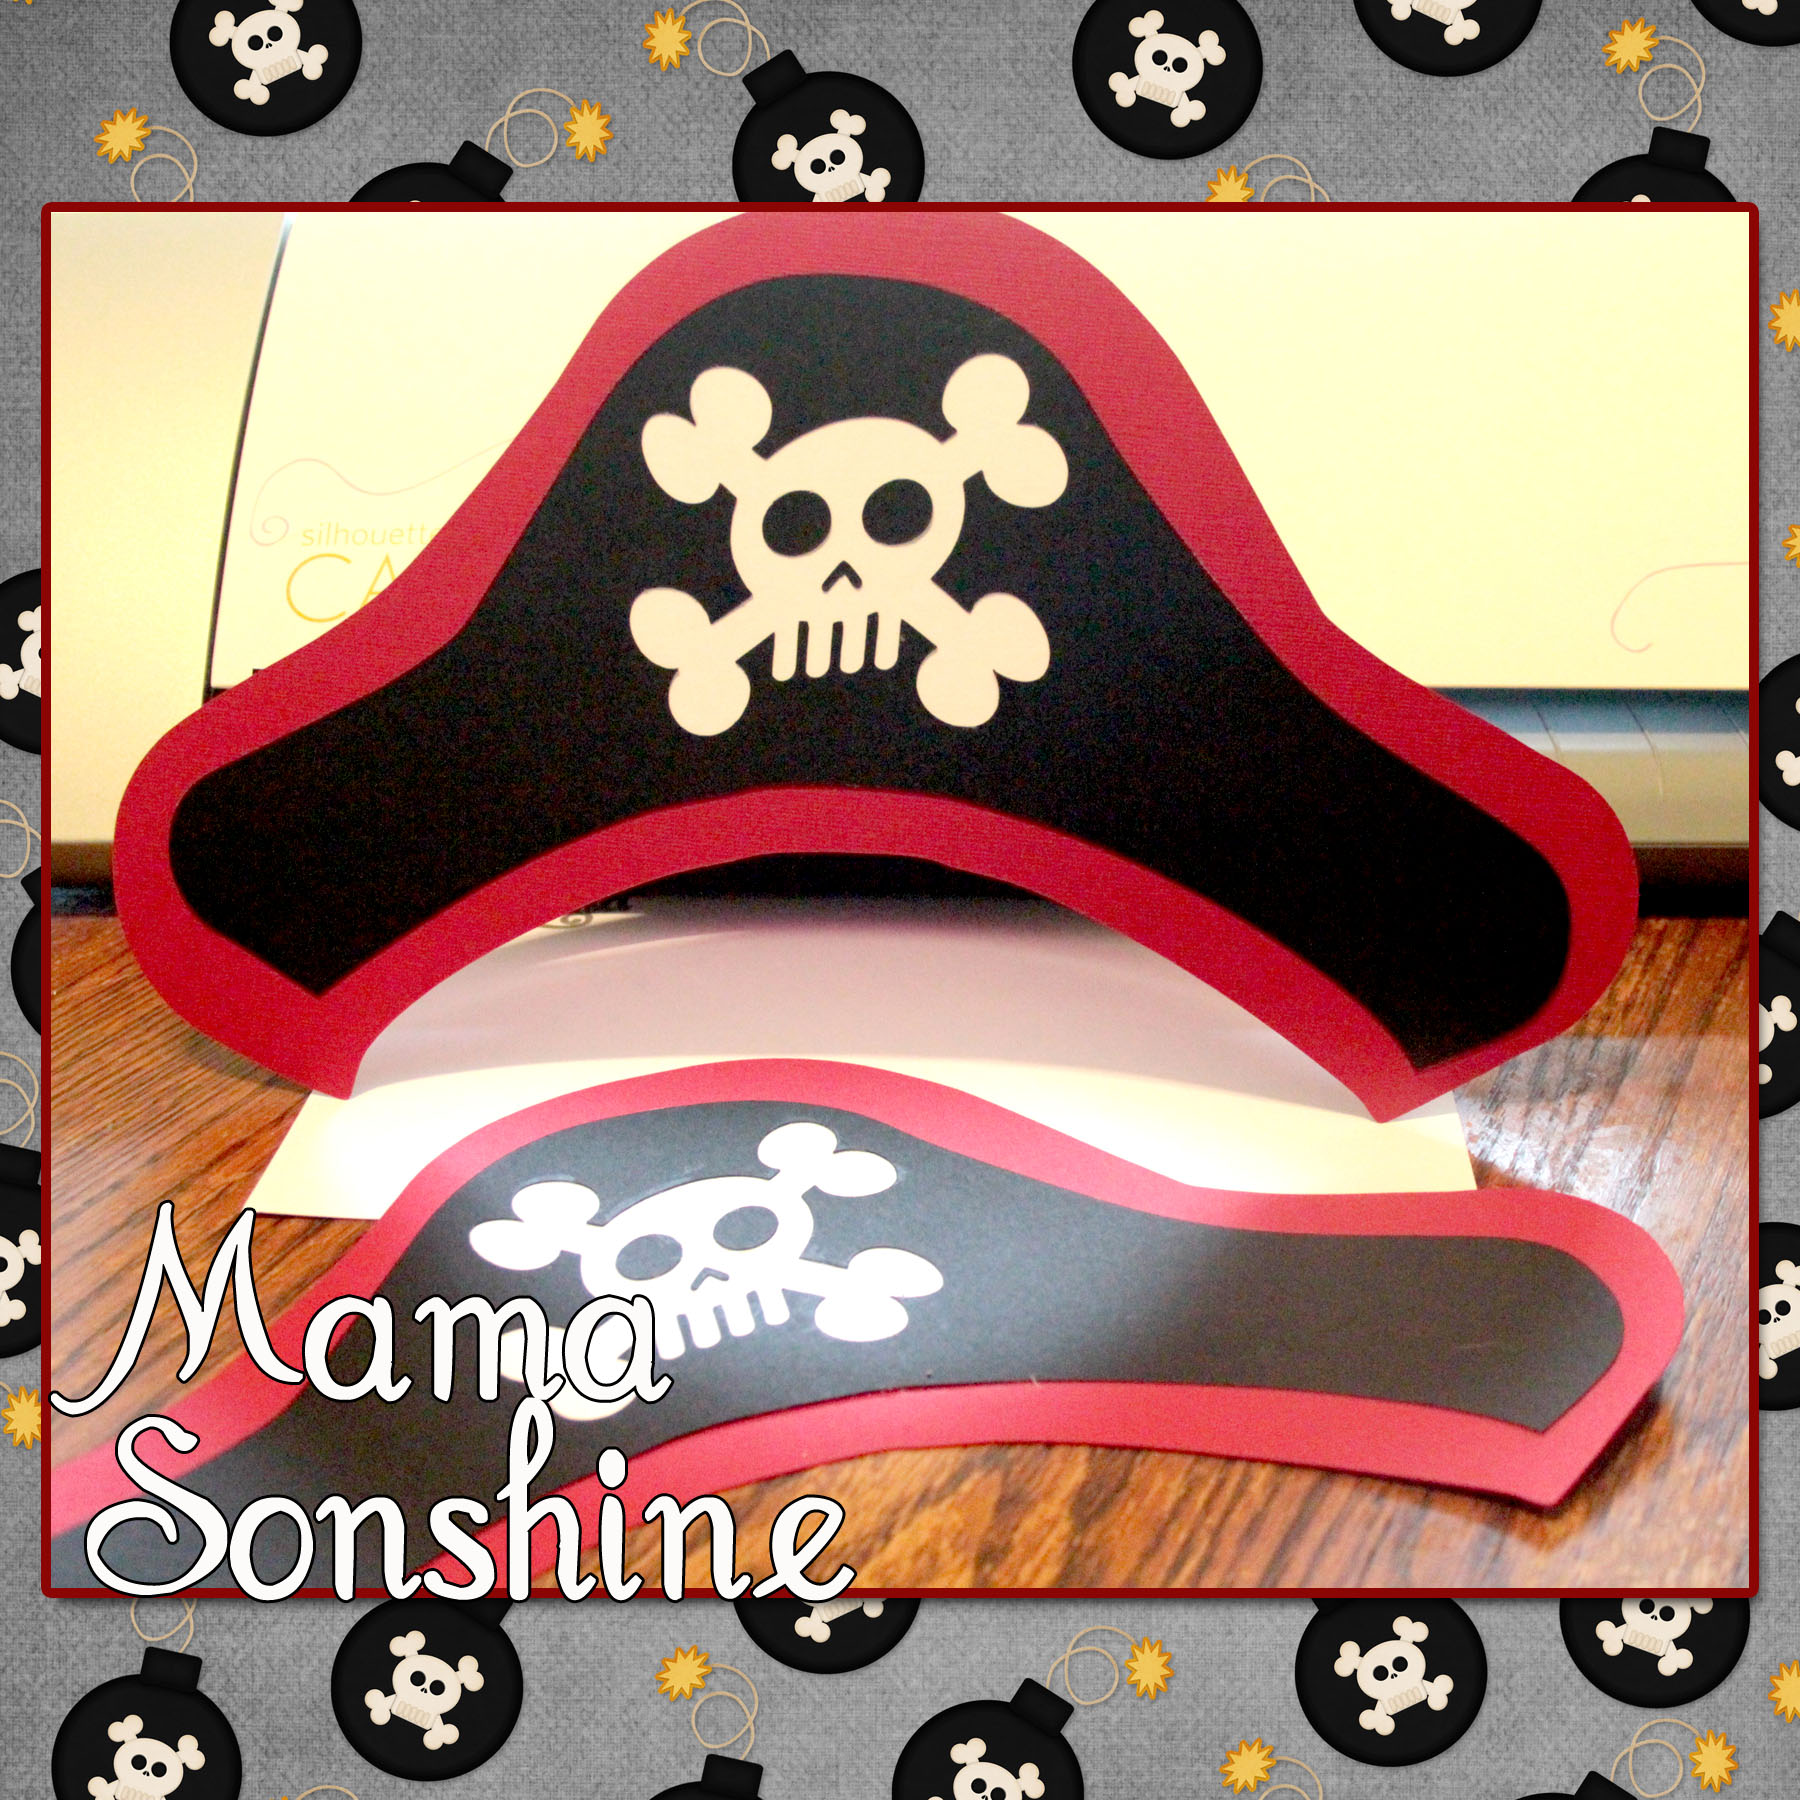
And what it just wouldn’t be a party with out party hats!

MSS_MarchSilChallenge10_2014

For the pin wheel I used the sketch feature that can only be found in the Silhouette Studio Designer Edition.

MSS_MarchSilChallenge02_2014

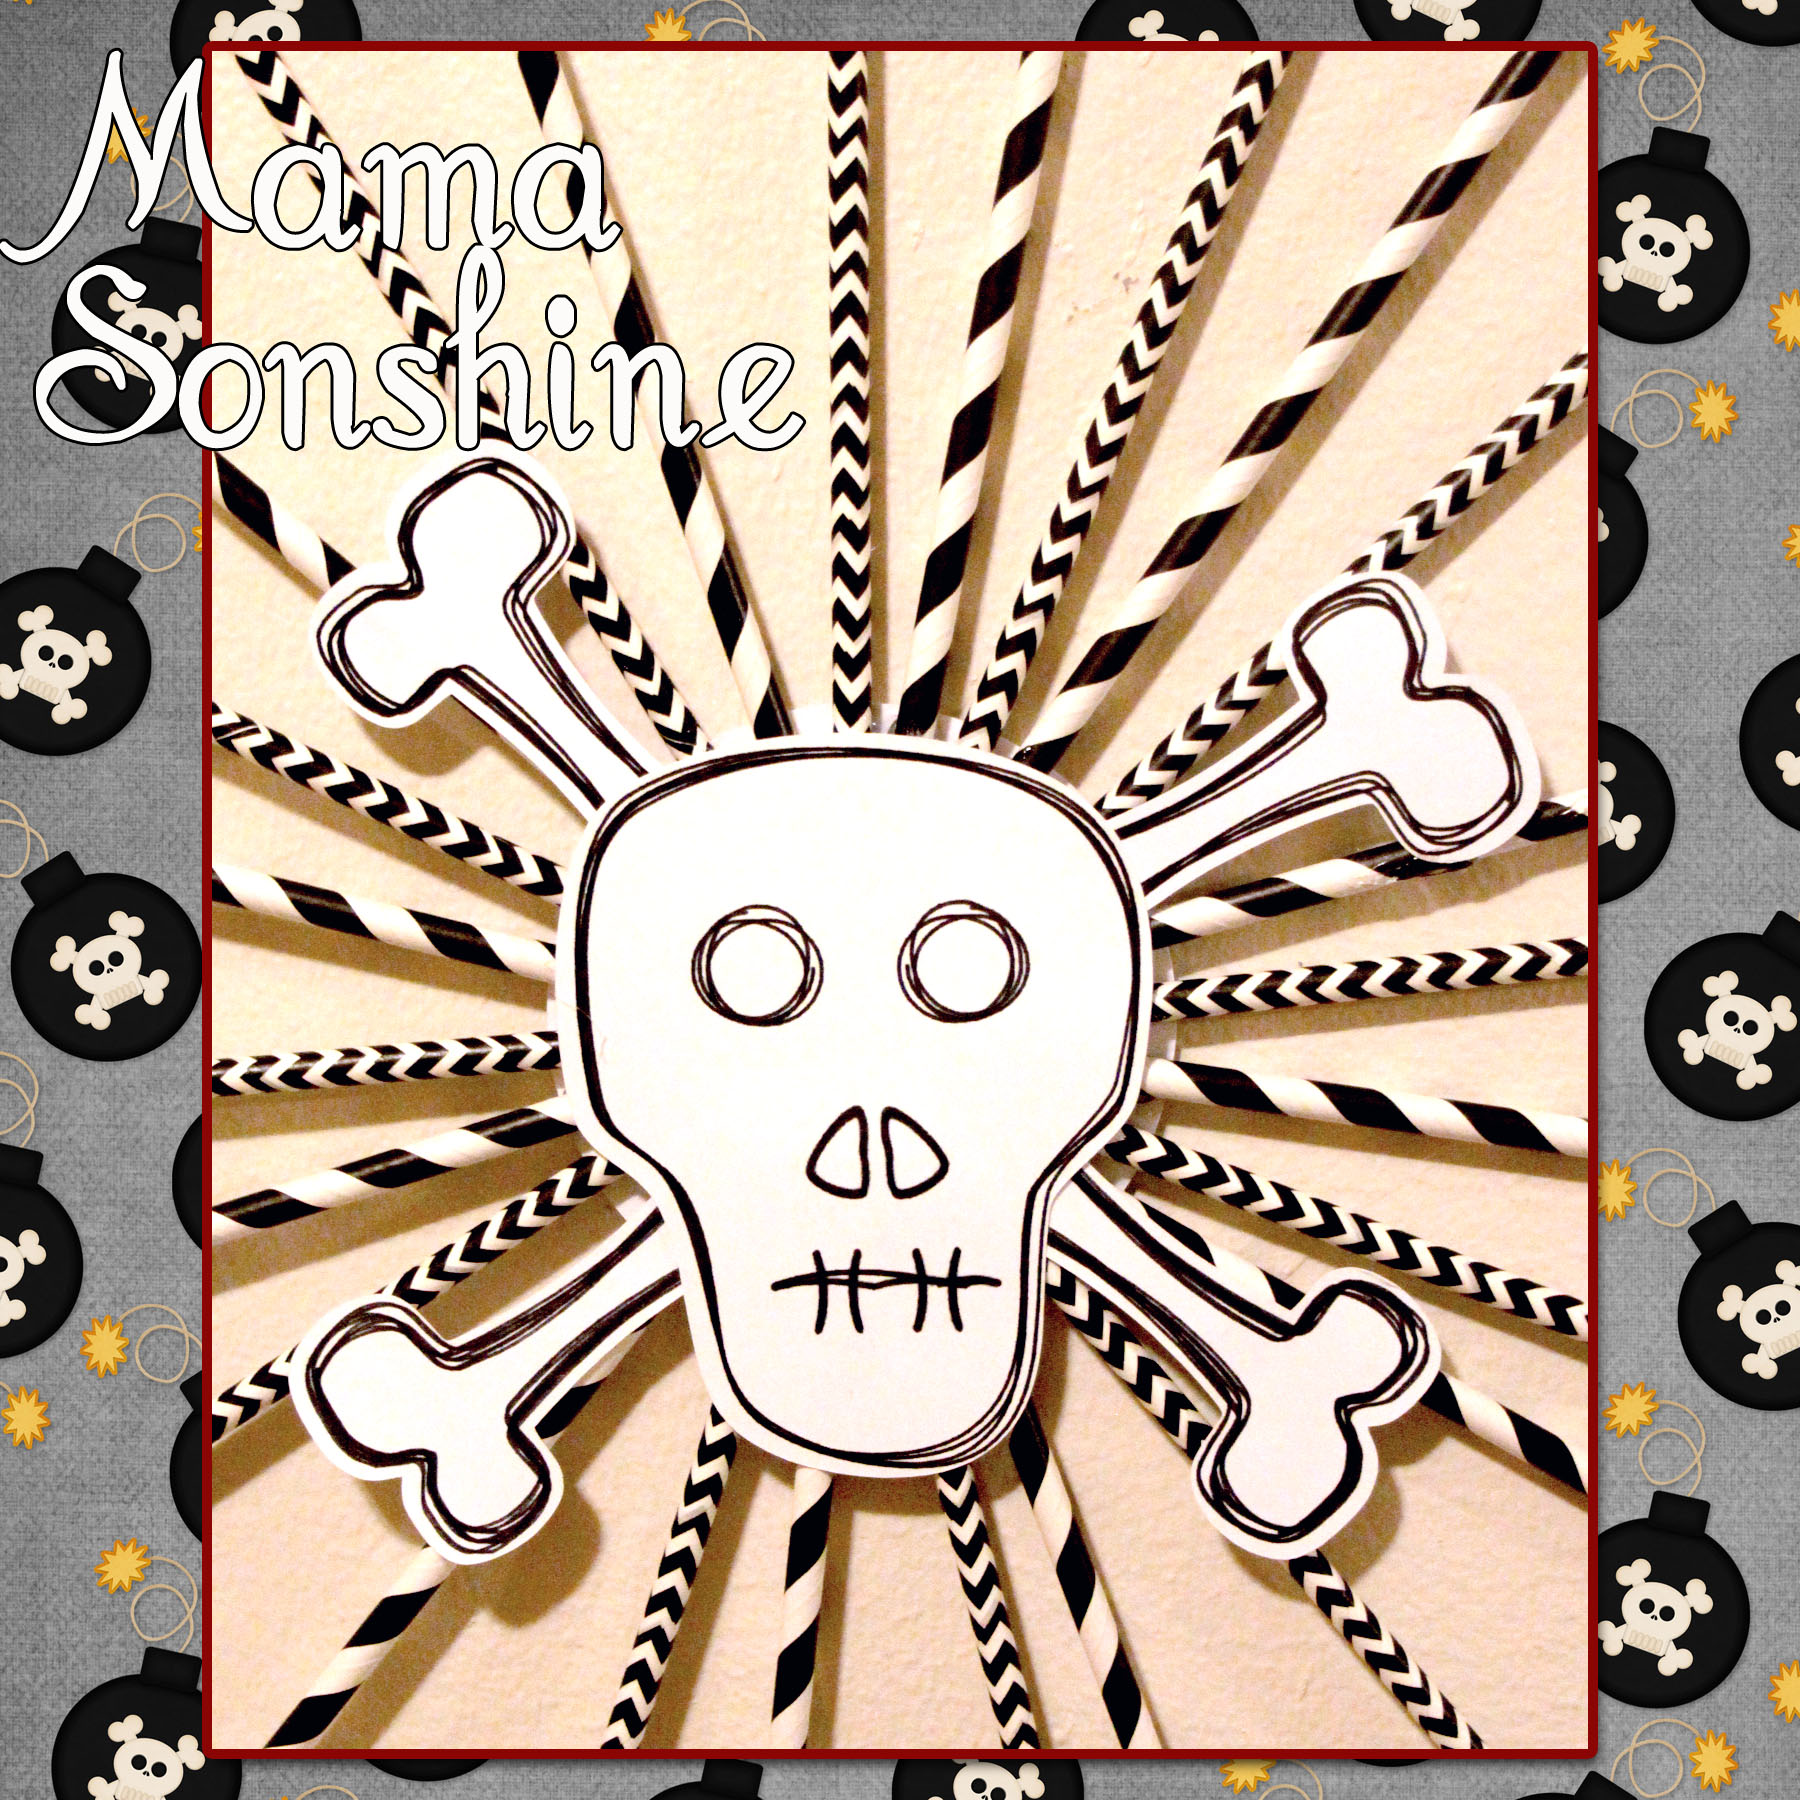
I ‘hand’ drew the skull and bones, and by hand I mean I used the draw polygon tool.  I used the sketch tool to make the skull look more hand-drawn.  I used a black Sharpie Marker to draw the lines with the Cameo and then made the cut around it.

MSS_MarchSilChallenge03_2014

This is only the tip of the iceberg when it comes to decorations that can be made using a personal cutting machine.  I would never have been able to cut out all the pieces to make forty invitations, if I had to do it by hand.

I have much more planned and will revel more after the party.

Happy Crafting

signature-black

facebook instagram pinterest parties by mamasonshine etsy bloglovin google+ email twitter Image Map

Want to Check Out More Silhouette Projects?

My Silhouette Challenge buddies and I are all sharing projects on our blogs today, so peruse the projects below for a wealth of Silhouette inspiration!

The Great Lamp Rescue Barnyard Animal Paper Garland & Party Details Sweet and Simple Easter Bunny Card Owl Theme Baby Shower Ombre Paint Chip Earrings & Free Cut File Spring is Blooming Drop It (Like It's Hot) Hexagon Tray Spruce Up Your RECIPE BOOK Gift Card Giving Free Cut Files Custom outlines for stamps Mickey Mouse Clubhouse Juice Boxes Wine Themed Bridal Shower Learn How To Make A Sewn Paper Garland! Moroccan Thank You Card 3D Flower Spring Wreath For the Love of Paper: Cutting Embellishments Create Your Own St. Patrick's Day Cupcake Wrappers and Toppers Swimming Word Art St. Patrick's Day Lime White Chocolate Chips Cupcakes + Freebie You're invited to a dog party! I'm so Lucky! Spring Wreath with SIlhouette Cut Flowers Tiny Princesses Paper Dolls Colorful Quote with your Silhouette Get Well Bouquet with Persimmon Roses Greeting Card Holder Baby Shower Invitations How-To Create a Custom Pillowbox on Your Silhouette Machine + Free Cut File! Quality Time Jar Matchbox Cover with {FREE CUT FILE} DIY Baby Girl Shower Invitation Candy Alphabet Travel Game Paper Garland Pretty Paper Roses DIY Geometric Heart Journal Hand Made Decorations for a Pirate Party Wedding Shower Gift Heart Map Decoupaged Letters (A scanner + A Silhouette = Spectacular results!) Easter Pop-up Box Card with Sweet Sorbet Designer Paper from Stampin' Up! Better World Greeting Cards Star Wars Silhouette Canvas Monogrammed Gifts Make Printable Gift Wrap with your Silhouette Software Free Printable: Blank Banner with free Silhouette Cut File

1. McCall Manor // 2. The Turquoise Home // 3. Creative Savings // 4. Sandpaper and Glue // 5. The Thinking Closet // 6. Sowdering About in Seattle // 7. Persia Lou // 8. From Wine to Whine // 9. Dream a Little Bigger // 10. Please Excuse My Craftermath… // 11. Play. Party. Pin. // 12. Everyday Paper // 13. Practically Functional // 14. A Tossed Salad Life // 15. My Favorite Finds // 16. The House on Hillbrook // 17. Adventures in All Things Food // 18. A Glimpse Into Barb’s Life // 19. TitiCrafty // 20. The Experimental Home // 21. feto soap blog // 22. Creative Ramblings // 23. The Stamp Doc // 24. Ginger Snap Crafts // 25. Simply Kelly Designs // 26. Whats Next Ma // 27. unOriginal Mom // 28. Bringing Creativity 2 Life // 29. Cutesy Crafts // 30. My Paper Craze // 31. Create & Babble // 32. Grey Luster Girl // 33. The Sensory Emporium // 34. Lil’ Mrs. Tori // 35. Black and White Obsession // 36. Mama Sonshine // 37. Weekend Craft // 38. Creative Carnival // 39. Peace, Love and Joyce // 40. Tried & True // 41. The Frill of Life // 42. Dragonfly & Lily Pads // 43. Get Silvered // 44. Minted Strawberry


Leave a comment

Menu Plan Monday March 10th

I love how this kid eats.

20140309-230323.jpg

Menu Plan 3/10-3/16

Mon: Sticky Bourbon Chicken with rice

Tue: Slow Cooker Parmesan Honey Pork Roast with potatoes

Wed: Sloppy Joes

Thr: Pizza

Fri: Leftovers

Sat: Kitchen is closed

Sun: Race Day, so no cooking for me!

Happy Cooking

signature-black

Need something to help plan your meals?  I use the Plan to Eat online meal planner.  Try it free for 30 days

Simple Meal Planning - Plan to Eat

Find more recipes at I’m an Organizing Junkie


Top Mommy Blogs - Mom Blog Directory

Enhanced by Zemanta


Leave a comment

Running Log ~ March 9th

7 days.

This time next week I will have completed my first race.

I am excited and nervous.  I am nervous because well all you reader out there in blog land who are keeping up with me (all twelve of you) know about the fact that I am doing this.  You will hold be accountable.  I will have to be truthful with you on how I did.

via Pinterst (orig source unknown)

I will finish.  Doesn’t matter what my time will be.  I will finish.

But how I have been doing?

Tues Run

Tues Run

Thurs Run

Thurs Run

I think Thursday was the farthest I had run since I started running again.  I did two walking segments in there, one to two minutes each.

Sometimes my brain has a hard time remembering 8k is not 8 miles, only about 5.  Because I look at my distance and then think “how am I ever going to get to 8…”  But I like to say I am running a 8k race, because that sounds way more impressive than a 5 mile race.

1 Corinthians 9:24 Know ye not that they which run in a race run all, but one receiveth the prize? So run, that ye may obtain. (KJV)

via Pinterest (source unknown, link broke)


Just. Keep. Running.

C25K interval information can be found here

signature-black
facebook instagram pinterest parties by mamasonshine etsy bloglovin google+ email twitter Image Map


Enhanced by Zemanta


Leave a comment

Birthday Pirate Shirt ~ A Silhouette Cameo how to (Part 3)

I wanted to share with you the steps I took to make my son’s birthday shirt. There was a few problems I had that I was able to work through.   Hopefully this will help so others won’t get stuck like I did.

In this tutorial I use my Silhouette Cameo and the Silhouette Studio DE software to make a custom shirt for my son’s birthday party.  I used graphics from Just So Scrappy‘s YoHo YoHo Pirate kit.  I used the Silhouette brand Flocked Heat Transfer Material for the skull, and Avery Dark T-Shirt Transfers for Ink Jet Printers.

Part One will be how to make the Skull & Crossbones

Part Two will be how to do the words & party hat

Part Three will be how to iron everything on and some tips.

MSS_BirthdayShirt01

My first tip; if you want your words to be in the correct direction I would advise you not to let your three-year old place them on the shirt.

MSS_BirthdayShirt04

The flocked transfer material has a clear plastic film over the top.  This is the side you face down when cutting, you want the Silhouette to cut through the transfer material but not this film.  After weeding out the areas that you want the shirt to show through, lay your transfer material with the film facing up.  I would advise ironing on one piece at a time, just to ensure proper placement.

Use a dry iron, on the highest setting (please read the directions that come with your material) and a piece of thin cotton fabric between the iron and your material.  I used a pillowcase after determining a dish towel was too thick.  You want to apply a lot of pressure for up to a minute, or more.  Again, this is where you want to double-check the instructions that come with your material.  The time can very depending on manufactures, but the main thing is if isn’t sticking, you need more time and pressure.  Try not to move the iron around like you are ironing your clothes.  Just hold for a minute, then move to another area and hold, with lots of pressure.  Have I made it clear that pressure is important?

Some material is cool peel, meaning you need to wait until the ironed on design has cooled before removing the top film.  If this is the case, wait!  You will only ruin your design if you get impatient.

MSS_BirthdayShirt02


The intricate cut around the words was done as stated in the previous tutorial, but I wanted to separate the words from the page and lay them on the shirt without yet removing the backing, so I just cut them out with scissors.  The Silhouette settings I used made a ‘kiss cut’ meaning it cut through the transfer material but not through the backing.  When you are ready to iron on the material you peel it off like a sticker.

After placing the elements where you want them use the same iron settings but use the piece of parchment-like paper that comes with  the printable transfers between the material and your iron.  Again using lots of pressure.  Also, make sure something is covering the areas that have already been ironed on.  If you apply direct heat to this material you could melt it.

MSS_BirthdayShirt03


As I have stated above I used the printable material for dark fabric and ink jet printers.  The dark fabric is like a sticker.  What is face up is what will show, this is different from the material for light fabric.  The dark fabric material also leaves a white area on the printed material where there is a white area on your screen.  With the light fabric material, where there is white on your screen the shirt fabric will show through.  This is something to consider before purchasing your transfer material.  Also it is very important for you to  know what kind of printer you will be using.  The way an ink jet and laser printer adhere the ink to the paper is different and for this type of material it does make a difference.

The first time I printed this out I used a laser printer without thinking of the consequences.

MSS_BirthdayShirt05

It looks fine, there wasn’t any difference between it and the one I ended up printing on my ink jet printer.  At least not until I ironed it on.

MSS_BirthdayShirt06

See how the hat has faded?  This is because of the toner in a laser printer.  It can come off the printable heat transfer material when heat is applied.  I had to go back and reprint everything on an ink jet printer.  At this point I also had to make the hat a little bigger to cover up  the faded one.

But the end result was still one happy birthday-boy-to-be.


MSS_BirthdayPirateShirt

If you want to see how I designed the skull check out Part one.

If you want to see how I designed the print and cut words and hat see Part Two.


Happy Crafting

signature-black

facebook instagram pinterest parties by mamasonshine etsy bloglovin google+ email twitter Image Map


Enhanced by Zemanta