It has been awhile since I participated in a craft challenge. A new challenge over at SVG Cutting Files started on the 15th (theirs run 15th-14th of each month) with a theme of “Spring Treat.” I thought it was a perfect break for me because I love to make treat bags and boxes and wanted something with a bunny on it.
I actually found this bunny slide card and loved the little bunny on it. I used a gift bag file that I have from SVG Cuts (not part of the challenge). I duplicated the grass from the slider card to wrap around the bag.
Of course I had to use my sketch pens to write “Hoppy Spring” on a little egg.
Who knows, I just might have to make some more for Ian’s class mates.
I feel a little behind this year. Ian’s birthday is next month and I have only been working on his invitations for about a week.
Ian decided in December that he wanted a Ninja Turtle birthday party. I knew it was on the list of parties but didn’t know he wanted it this year. (He has the next six birthday’s planned, yep, he takes after me.)
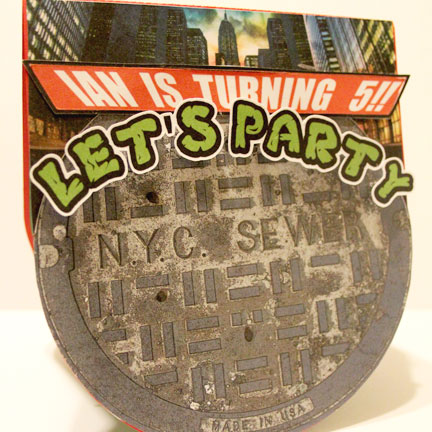
I decided I wanted his invitations to be a pop-up card with the front as a sewer cover. I designed them knowing I would need to use my favorite thing about the Silhouette. It’s Print ‘N Cut feature!
It is the main reason I got it and it just so happens that this month’s Silhouette Challenge was to make a project using this very thing I love so much.
I started with a picture of a NYC manhole cover. I used Photoshop to make the sewer cover look a little more comic-booky. I couldn’t find a TMNT one with out words on it, and while I could have altered it in Photoshop to remove the words, I just didn’t want to go the trouble, this was easier.
I had thought about having just a circle card, but the pop-up part would have been to small, or the circle card would have been too big. So I used a card template from SVG CutsHaunted Forest kit.
I needed something above the manhole cover, and I didn’t want to use a solid color so I used a picture of NYC that I found on one of the TMNT sites. Since the angle of the city is from the street it worked perfectly. For that part and the sewer cover I used the fill with pattern feature, or more accurately, I dragged and dropped the pictures into the shapes.
I used foam dimensional tabs to raise the ‘Let’s Party’ text.
I didn’t want to apply the letters individually to each invitation. I connected them with the offset tool, I made the offset as small as possible while still maintaining connections between each letter.
It was still in two parts, but that was better than 9 parts.
I made the “Ian is turning 5” part in Photoshop and traced it in Studio.
But a TMNT party invitation would not be complete with out some Ninja Turtles!
p.s. I decided to use the Old-School version from my childhood because I like them the best.
I traced a PNG copy of a picture of the four of them coming out of a sewer. This was the part that I wanted to use as a pop-up.
It is pretty amazing how close and accurately the Silhouette cuts with the print ‘n cut feature. I could even cut out the little spaces on the bottom that would have been white after printing. There is no way I would have been able to cut that out by hand.
The party information will be printed out on vellum and attached to the bottom of the inside. I decided on vellum because I didn’t want the inside to be white. I could have printed it on colored paper, but with the size of the card I couldn’t get two on one page, and I hate wasting paper.
Stay tuned for how the party turned out and all the other things I will make, although you will have to wait till a couple of months.
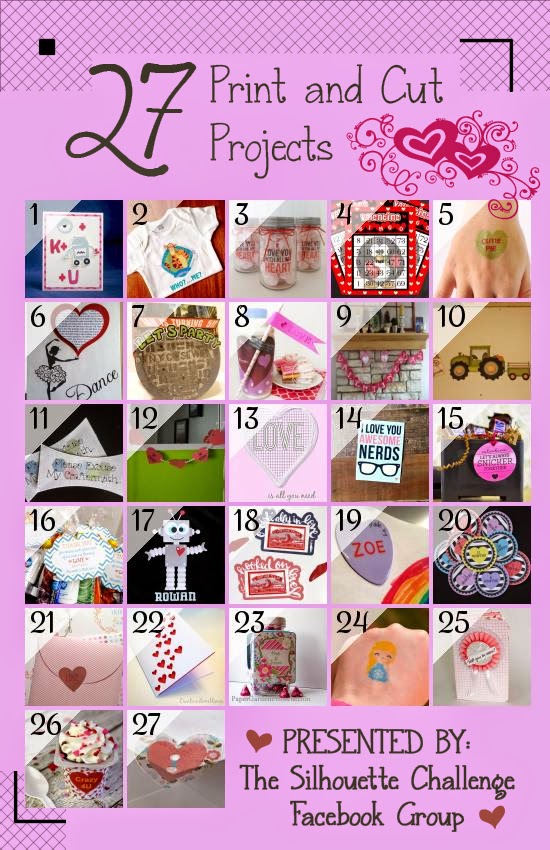
Want to Check Out More Silhouette Projects?
My Silhouette Challenge buddies and I are all sharing projects on our blogs today, so pursue the projects below for a wealth of Silhouette inspiration! With a heavy emphasis on hearts!
I have confessed to you all how much I love Halloween and now that I have my Silhouette Cameo I love making things for this holiday.
OK, let’s be honest, I love making things for any holiday.
I had started to make these little bags for Ian’s preschool class, but scrapped them and went a different direction. The bags just weren’t the right size for the kids (but it was perfect for his teachers).
I had designed it to say “Happy Halloween, from Ian” on the front with the mummy, but the end product was just too small, so I had him write his name on the back.
I had never cut a mini nugget holder before and didn’t really pay attention to the actual size of it. I just figured I could put a couple of pieces of Halloween candy in there. It was way smaller than I thought it would be.
and that mummy with the tiny wrappings was a b!*ch to put together and ink! I’m lucky I only had to make 10…
The candy I had didn’t fit, so I took one to the store with me (and no they didn’t have any Halloween Hershey Nugget candy) and figured I could put two of the mini-milky-way/snickers candy bars in there.
Next time I will make an actual prototype first, just to see if everything fits.
I still think they turned out super cute! Seriously, that mummy is just so stinkin’ cute!
Now don’t think I stopped there! I was in charge of the snacks for one of Ian’s soccer games sooo….
Come on! It was almost Halloween, what was I supposed to do?
Fall is in the air, and for us, that means it’s Halloween time!
Ian loves Halloween. I mean loves it.
Not just the candy, but the costumes and decorations too. Since this month’s Silhouette Challenge theme was fall I just knew I had to make something for Halloween.
If you remember from last year I made a candy treat folder and popcorn box for the kids at Ian’s school (those are a couple free printables if you want). Well that was pre-Silhouette. Now I can make things a little more intricate.
First I created a little gift bag for the kids at Ian’s school.
I created the bag with a little spider web window, and it is the perfect size for a couple treats and some stickers.
On the back panel is the sentiment and a little pumpkin. Of course I had to make some cute little wrappers for the candy.
I really like how the window turned out, and I glued a plastic sheet inside so the web doesn’t break.
But I didn’t stop there…
I decided to make a little candy dish, perfect for Candy Corn.
I used a hot dog boat file from Oh Happy Day as the base of the dish. I extend the dish up the back so I could create a little spooky Halloween scene.
I used foam dimensional tabs to pop out the letters, the lower ghost and the pumpkin.
I love this little dish, I have visions for a few more.
I used elements from one of Just So Scrappy‘s digital scrapbooking kit as well as from SVG Cuts.
Here is to Spook-tacular Halloween!
Want to Check Out More Silhouette Projects?
My Silhouette Challenge buddies and I are all sharing projects on our blogs today, so peruse the projects below for a wealth of Silhouette inspiration!

 I actually found this bunny slide card and loved the little bunny on it. I used a gift bag file that I have from SVG Cuts (not part of the challenge). I duplicated the grass from the slider card to wrap around the bag.