I Tri and Craft

thoughts from a mother of boys, a marathoner, a triathlete, a crafter, a wife, and a scientist


15 Comments

Why I fell in love with Dyson

This is not a review.  I was not asked to write this post, nor was compensated for it.  I have no affiliations with the Dyson company.  I am just a mom sharing her experience about her vacuum.

When the Dyson company started selling their vacuums I coveted one.  At the time they only had the one model, which you could also get in the ‘animal’ version.

Now there are many models to choose from.  I know, I know, have you seen the price?  Whoa…

I was finally given one as a gift after Baby Sid was born.  I would have chosen a different model, for only one reason.  The handheld hose part.

I have the DC24 Animal, because we are dog people.

DC24 ~ image from Dyson.com


We don’t have a large house, so this vacuum is great for us.  It is compact and light weight.  Because of the dog, I do have to empty the canister before I am done vacuuming the living room, but that is not a big deal.

DC24 ~ image from Dyson.com

My only complaint is that when I want to use the hose I have to take it apart first.

Dyson_manual

Image from Dyson Manual

See.  I can’t just pull up the hose and vacuum the cobwebs in the upper corner.  I have to take it apart and put it back together.

This is the only design flaw I have found.  If I had known about it, I might have looked into exchanging it.


However none of that has anything to do with what made me fall in love with my vacuum company.

While vacuuming one day it starting to make a bad noise.  I noticed that the noise was coming from this white disk.  It still worked, yep no loss of suction.  It just didn’t work as well as before.

vacuum_noise

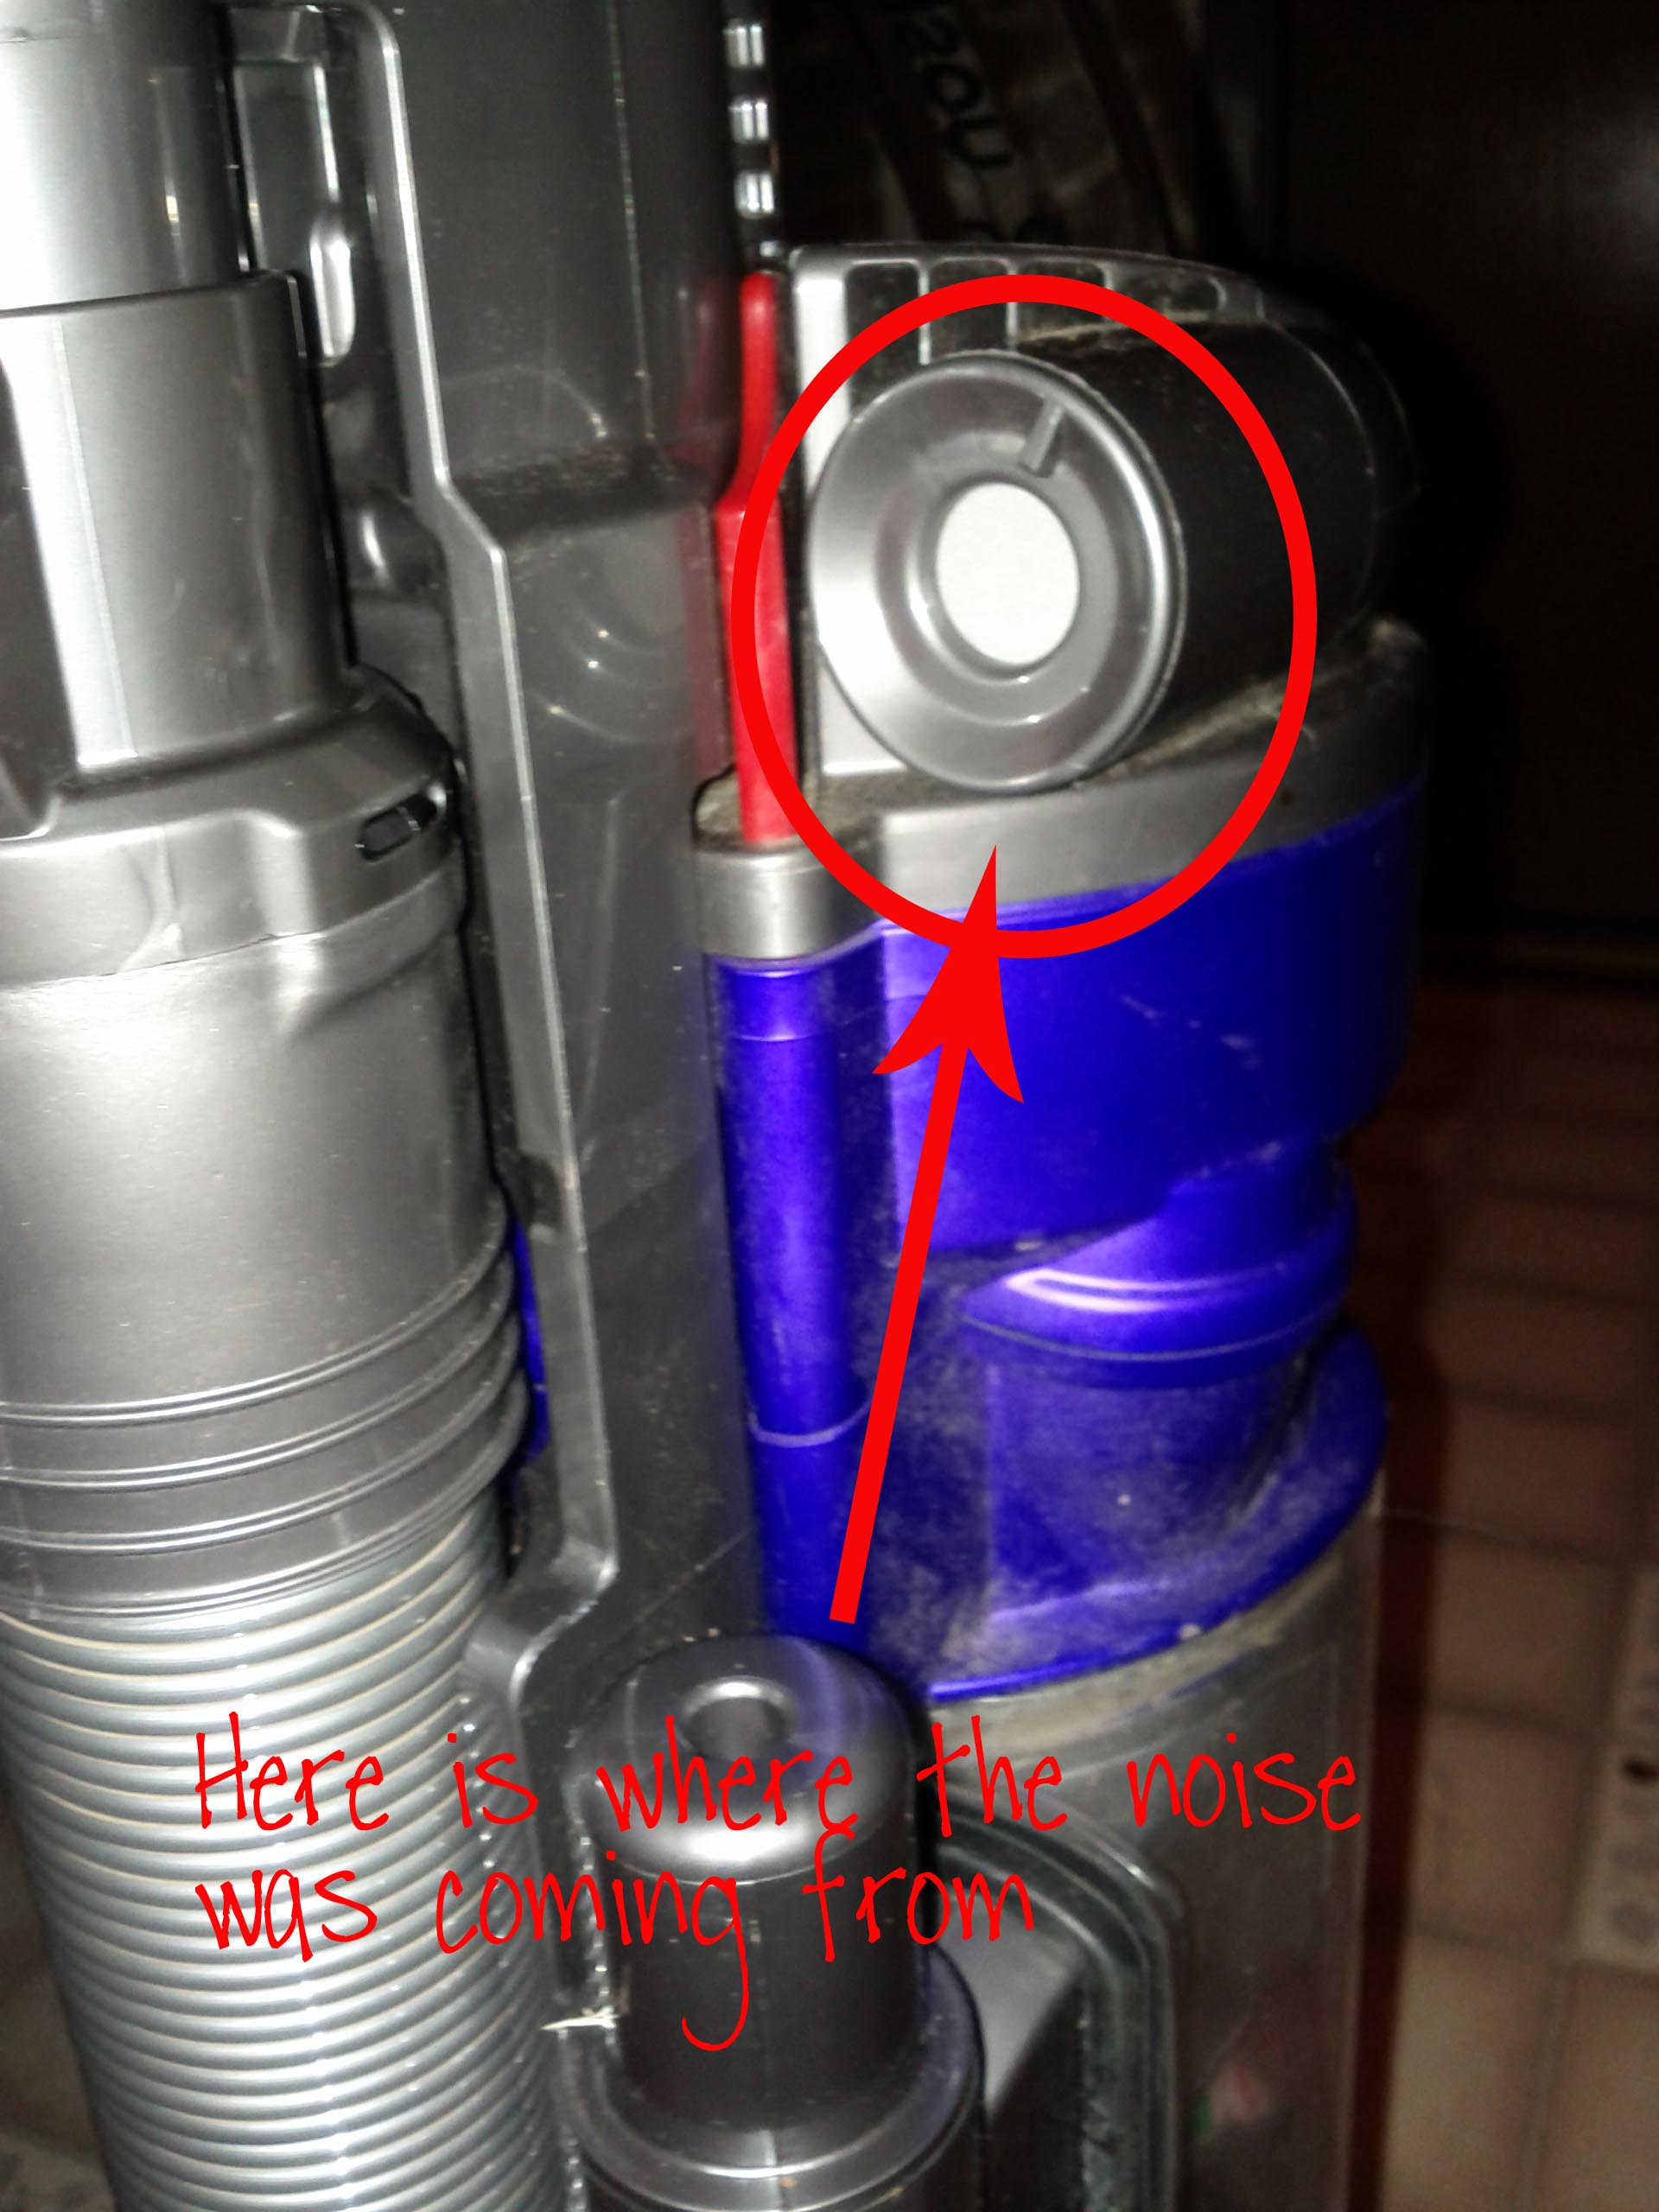
When I covered the circle the sound went away, but then it would come back.  I looked on their support page for help, but couldn’t find an answer.

The support page offers contact information so I decided to write an email as I wanted to send them the above picture explaining what was wrong.


I sent them an email at 11:15 a.m.

They replied at 11:21.  The same day.

Yep.  They responded within SIX minutes.

And it wasn’t one of those, ‘we got your email and we will get back to you’ responses.

They answered my question.  And while I know it was a canned response, it was tailored to my problem.  That means someone read my issue and adapted the response to me.

I can’t tell you how impressed I was at the quick response.

Turns out my vacuum was clogged, but not in a place I could easily see.  The email explained how to remove the clog.


I vacuumed up the stuff that was clogging my vacuum and it filled the canister.  Twice.

Umm.  Gross.


Not only was I impressed with the fact that my vacuumed still worked while clogged, the very quick, very helpful customer service is what really wooed me.

Would I recommend spending that much on a vacuum?  Yes, yes I would.


Happy Cleaning


Update:

Since I had a few people contact me about Dyson’s response I thought I would let you know what they said.

Look for and remove any blockages from the cleaner head or lower duct hose.
To remove the cleanerhead follow the steps:
Recline the handle of the machine and place handle on the floor.
Locate opening for C-clip on the front of the.
Place flathead screw driver into the opening and lift C-clip straight up to unlock cleanerhead from machine.
Remove cleanerhead from the machine.
Once the cleanerhead is removed inspect the pins on the cleanerhead and the outlet on the main body of the machine for damage or debris.
Reattach the cleanerhead and lock it onto the machine using the C-clip and attempt to vacuum
Instructions for removing the Lower Duct Hose:
1) Unplug your machine from the power outlet
2) Position yourself in front of the machine facing the dust canister
3) To the immediate left of the Ball there is an accordion-like hose that measures roughly 3 inches long
4) Grip the hose in center and pull firmly to the left, away from the machine
5) Once the Hose is disconnected, check for obstructions and remove as necessary
6) Reinstall the hose by using a twisting motion

signature-black

Top Mommy Blogs - Mom Blog Directory


Leave a comment

Pinterest Thursday April 4th

On the first Tuesday Thursday of every month I will post about something I found on Pinterest that I actually did!  Sometimes it will be about a craft project, sometimes about food and sometimes about a ‘miracle’ cleaning product.

This months Pinterest Project is a cleaning solution.

(Pinterest has switched to Javascript for embedding pins.  Wordpress doesn’t support Javascript so I can’t embed the orig pin.  I am still trying to figure out a way around this problem.  So  you won’t see my pin, but I do have links to the blog post and my own images.)

I HATE cleaning my tub.

I don’t mind cleaning, I just hate cleaning the tub.

The bending over, it’s back-breaking, the scrubbing….

So I was pleased to see a pin that claimed to be “The Best Shower/Tub Cleaner” with out scrubbing.

Tub Cleaner

Plus it only has two ingredients; dish soap and vinegar.  This post says to use Blue Dawn Dish Soap, which coincidentally, is the kind I have.  It is my favorite dish soap.  Some pins/posts about this mixture say it has to be blue Dawn, I can not attest to that, as I have not tried any other combo.

The science behind it.

Blue Dawn contains surfactants  as cleaning agents; including sodium lauryl sulfate (or sodium dodecyl sulfate), sodium laureth sulfate, and lauramine oxide (lauryldimethylamine oxide).

A surfactant is used to remove oils from the surface of something, like your dishes or tub.  It contains two parts, the hydrophobic tail and the hydrophilic head.  The hydrophobic tails want to hide from the water, so the molecule orients itself by pointing the tails inward forming a sphere, with the hydrophilic heads outwards.  This orientation allows for the oil soluble tails to trap oils and wash them away with water.

Vinegar is made with acetic acid and water making it a moderately strong acid.  As a cleaning solution it is great at dislodging dirt and grim that is basic.

And by basic, I don’t mean simple, but basic in acidity.  Dirt, grim, hard water, mineral build up, soaps and detergents are usually basic.  So chemically vinegar works great on these alkaline stains.

As you could guess the combination of the surfactants in Blue Dawn and the acidity of vinegar should take care of any type of grim lingering in your tub or shower.

But does it work?

Bath Cleaner before


OK, don’t judge me.

Here is my tub before.  For the record, the green stuff is bath tub paints, which if not washed off immediately, is a little difficult to clean.  You should have seen it when we moved in, it was much worse.

Directions

use a 1:1.2 ration of Blue Dawn to vinegar.

Heat the vinegar, do not boil, just heat it enough to enable the soap to dissolve into the vinegar.

Pour hot vinegar into spray bottle and then add the dish soap.

Shake it like a Polaroid picture to mix.  Careful not to shake too hard, it could suds up.

Then spray to your heart’s content.

shower_cleaner_03


Just remember that which goes on, must come off.

Let it sit.  For as long as you can stand it.

But remember it smells like vinegar, lots and lots of vinegar.  If you have a bathroom fan, use it!

Other sites say do not use water, just wipe off with a dry cloth.

That did nothing for me.

I had sprayed it on a dry shower/tub and I had to scrub, which was exactly what I did not want to do.

I had one of those green scouring pads.  I used it with water and lo and behold, my tub came clean!

shower_cleaner_04


Now, I will admit, it was not as miraculous as I had hoped.  But it still worked great, and each time I use it to clean the tub it works better and better.

You don’t have to confine it to the tub/shower.  You can also use it on the sink, you just want to make sure you can rinse whatever you clean really well.


Happy Pinning

signature-black


Leave a comment

Pinterest Tuesday March 5

On the first Tuesday of every month I will post about something I found on Pinterest that I actually did!  Sometimes it will be about a craft project, sometimes about food and sometimes about a ‘miracle’ cleaning product.

Holy CRAP! When did it become March?  Yes, yes I know, five days ago, right?

Before I joined Pinterest I found this post about making homemade laundry soap.  I went back to it after finding similar post all over Pinterest, so I could try it out.

Source: beingcreativetokeepmysanity.blogspot.com via Dawn Marie on Pinterest

Last spring I made this soap but didn’t make a record of it because, well at the time I wasn’t aware I would be sharing these things with you.  So I waited until I need to make more and this time I took some pictures.

Frugal_Soap05

Here is what you will need:

  • 3 bars Fels-naptha soap
  • 1-2 containers oxyclean or store brand oxyclean 3-4 lbs
  • 1 box Borax 4 lb 12 oz box (2.15 kg or 76 oz)
  • 1 box Arm & Hammer Baking Soda 4 lb (1.81 kg)
  • 1 box Arm & Hammer Super Washing Soda 55 oz (3 lb 7 oz)
  • 1 bottle Downy Unstopables 13.2 oz (375 g)

Frugal_Soap01The original post didn’t use the scent booster but I didn’t really like the scent of the Fels-Naptha soap.  You can also use Purex Crystals or Gain Scent Booster, or leave it out.  There is also some debate about which bar soap to use.  It doesn’t really matter as long as it is a laundry soap.  It would not be good to use bath soap as the ingredients are different.

Directions:

Add all the ingredients, excluding the bar soap, in a clean 5 gallon bucket.  It would be ideal if it had a lid, but I just lined mine with a garbage bag, which I can close for storage.  You want to do this part in a well ventilated area, or outside, because you don’t want to inhale the fine dust particles.

Place one bar of soap in a microwave safe dish and microwave on high for 2-3 minutes.

Frugal_Soap02

You want to make sure there are no smooth surfaces, that the whole bar looks like this:

Frugal_Soap03

Let the whole bar cool to room temperature, this might take a little while.  Once it is cooled it breaks apart in to a powder.  If you find hot spots just let it cool a little longer.

If there are still smooth surfaces on the bar or it is not cool, it will not crumble into a powder.  It will break into small pieces, just not a powder.  You can see some of the bigger pieces in my picture.  The larger pieces don’t always dissolve completely in cold water.

Alternatively you can grate the soap or run it through the grating blade on your food processor (not a chopper or blender).  That is too much work for me!

Add the soap to the rest of the ingredients and mix well.  It is advisable to do the mixing in a well ventilated area as well.

I store smaller amounts in one of the oxyclean containers for easy use.

Use 1-2 table spoons per load, if using a front-loading washing machine add to the drum not the detergent basket.  Or just follow your washer’s instructions on using a powdered detergent.

Frugal_Soap04

Now the smell of microwaved soap might not appeal to you.  My husband was not happy about it and neither was I.  Afterwards I microwaved a bowl of baking soda with water and vinegar.  I would run it for a few minutes to heat up the liquid and then let it sit.  I did this three or four times adding more liquid as needed.  I then wiped out my microwave and left the door open to air it out.

This batch will last 9-12 months depending on how much you use.  I probably use more than I should, but my husband works in construction and I have two boys….

Happy Pinning

signature-black


Leave a comment

Pinterest Tuesday 12/4

I love Pinterest, and I am sure you do too.  There are always things I pin that I want to try, but never really find the time.  I especially want to try the homemade cleaning supplies, and see if they are miraculous as claimed.

I decided to that if I force myself to write about the projects I will actually attempt them.  So here is my first post about Pinterest Tuesdays, I will start by posting the first Tuesday of the month.  I will only do it once a month at first to give me some time to try the project and write about it.

I saw this pin:

Source: onegoodthingbyjillee.com via Dawn Marie on Pinterest

It said the “miracle of baking soda” and the blog it was linked to calls it a “Kitchen Miracle Cleaner” so I thought it would be perfect for my crockpot.  After cooking some higher fatty roasts it gets a ring around it from where the top of the liquid was.

Pinterest_scrubing_paste

I added enough peroxide to the baking soda to make a paste.  The mixture is watery at first but the baking soda will absorb it if you let it sit and thicken up.

The reaction of hydrogen peroxide with sodium bicarbonate (baking soda) produces carbon dioxide, sodium hydroxide and carboinc acid.

Sodium hydroxide (a.k.a. lye) is a caustic soda (and is basic) and is commonly used as a detergent because it can dissolve fats, grease, oil and proteins.  So it worked great on my yucky ring around my crockpot.

Can’t wait till I find something else to clean with this cleaning paste.

Happy Pinning!

signature-black