I Tri and Craft

thoughts from a mother of boys, a marathoner, a triathlete, a crafter, a wife, and a scientist


Leave a comment

Ian’s First Valentine Exchange

This is Ian’s first year at pre-school.  I am having such a wonderful time.  Oh, he is enjoying it as well.

My favorite thing about him being in school is the stuff he gets to make.  I LOVE it!  But I also love the stuff I get to make for class room parties and stuff.

As you may know today is Valentine’s Day.

I don’t like Valentine’s Day.  Seriously, it is my least favorite holiday.

You don’t get time off from work/school.  You don’t get ‘real’ presents.  If you are a girl you may get flowers or candy, and every once in a while some jewelry.  But those are anniversary gifts.  Plus if you want to go out to dinner or away somewhere, good luck!  Everything is always booked or you have some ridiculous wait time.

But you know why I really don’t like Valentine’s day?

The hearts.

Yep, that’s right.  I can’t stand hearts.
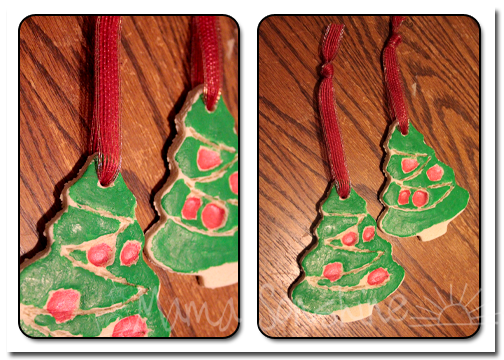
Except these kind.

Seriously, these are great.

I was trying to figure out some kind of valentine for Ian to give to his school friends that did not include “Be Mine” or “Love” or some other gross mushy heart filled sentiment.

Come on people! they are 4-year olds!  They can’t even read the cards!

Ok, so I found I found these:

Smarties Valentine Valentines

They are cute and use Smarties, which we all love.

So I tried to make something like that with my Silhouette Cameo.  Tip Junkie does offer a free printable for these cards, but I wanted to make my own.

This is as far as I got:

MSS_SmartiePants Valentine
I didn’t really like how they looked. The pants never looked right (that’s why they are not pictured) they were too big, the smarties didn’t sit in the right. I just wasn’t happy with the outcome. Plus there are hearts on it! yuck!

So I decided to try something else.  I wanted to give little gift bags, that way I could more than just one piece of candy in it.  I could add little sticker or an eraser or something like that.

Since I got my Silhouette Cameo I joined a Facebook group and someone posted this super cute card with glasses and a pun-ny little saying “In my Eyes…something or other.”  Using that as inspiration I made these:

MSS_EyeThinkYou'reSpectacular Valentine

I made my own cut files using a bag template and png file (for the glasses) that I already had.  I cut the word “Eye” out of black glitter card-stock, and the bag is just regular 65lb card-stock.

Of course my Cameo did all the cutting & writing for me, I just had to glue and fill.  I know, I know, there is a heart on the glasses.  What’s a girl to do?  It is Valentine’s day after all.

MSS_EyeThink_valentine

I had thought about letting Ian write his own name.  But he just wasn’t game.

Happy Crafting

signature-black

facebook instagram pinterest parties by mamasonshine etsy bloglovin google+ email twitter Image Map
Enhanced by Zemanta

I linked this project up to

Silhouette Challenges


Leave a comment

12 Days of Christmas Tradition ~ Day 11

One of the reasons I love the Christmas holiday is the traditions.

I love reviving old family traditions, and making new ones.  I love remembering fondly the things that I did as a child at Christmas time and the things I couldn’t wait to do again.

As an adult, I get to make sure our family participates in our traditions and make new ones.

Christmas Crafts!  Part Two

It is no secret I love hand and foot print art.  Last year we made these Mistletoes plates.  We gave them to some family as gifts.  I had thought we might make them again, but decided I wanted to do something different.

We made salt dough ornaments with the kids fingerprints to give to family.

12DaysofXmas2013_craft06

OK, admittedly, I am not as pleased with them as I was with the plates.  Mostly because you can’t tell the difference between Ian’s & Sid’s thumb prints.

They are really easy, and I could make  a lot of them all at once.  Ian is much more cooperative with these projects than Sid is.  So I needed something that I could quickly make a lot.

To make these Christmas Tree Fingerprint Ornaments you will need:

  • 2 cups flour
  • 1 cup salt
  • 1 cup water (+/-)
  • rolling-pin
  • cookie sheet
  • paint (or food coloring)
  • ribbon
  • thumbs belonging to your favorite kids

Preheat oven to 250°.

Mix salt and flour together, add water a little at a time until a dough if formed.  If using food coloring to color ornaments add to water prior to mixing with four & salt.  Knead until dough becomes elastic, smooth and stickiness is gone, adding little bits of flour as needed.

Roll out dough to 1/4″ thick on a greased surface.  Use Christmas tree cookie cutter to cut out ornaments, I was able to make about 15.  Poke a hole for the ribbon at the top of the tree.

12DaysofXmas2013_craft01

Have kids use finger/thumb prints to make ornaments on the cut out trees.

12DaysofXmas2013_craft03

This is a good assembly line project.  Ian just went through and put two prints on each one.  I did have to tell him not to put them on the edge.

12DaysofXmas2013_craft02

Little guys might need some help or persuading to get their thumbs on there.  Sid was not very enthusiastic about this.

12DaysofXmas2013_craft04

Place on a greased cookie sheet and bake for 2 hours.  Remove from oven and allow to completely cool before painting.  I used whatever craft paint I had on hand.  One was acrylic and one was enamel, both worked fine.

12DaysofXmas2013_craft05

Thread a length of ribbon through the hole and tie in order to hang up.

There is no ornament on a tree better than the ones your children make.  At least, according to me.


signature-black

facebook instagram pinterest parties by mamasonshine etsy bloglovin google+ email twitter Image Map

What are your Christmas Traditions?


2 Comments

12 Days of Christmas Tradition ~ Day 10

One of the reasons I love the Christmas holiday is the traditions.

I love reviving old family traditions, and making new ones.  I love remembering fondly the things that I did as a child at Christmas time and the things I couldn’t wait to do again.

As an adult, I get to make sure our family participates in our traditions and make new ones.

Christmas Crafts!

It is so much fun to make things with the kids, but this craft is made by me with the use of the kids hands.

On Christmas Eve I realized I didn’t have a plate for Santa’s Cookies!  I tried to find on at the store and couldn’t find one I liked, and decided to make my own.

12DaysofXmas2013_plate07

I know, make a plate on Christmas Eve, was I crazy?

I had seen this post around thanksgiving and thought it was great and knew I wanted to make something in that style.

Decorating with Sharpies are so easy! As long as you don’t make a mistake…

You will need:

  • ceramic plate
  • sharpies, at least two colors
  • rubbing alcohol
  • pattern, as a sticker

12DaysofXmas2013_plate01

Clean your plate with rubbing alcohol before use.

Trace you child(ren)’s hand on the sticker, then cut out.  I used large address labels, but they didn’t work that well, contact paper would be better.  The address labels have too much adhesive and were really hard to remove.

Place the pattern on the plate and using the sharpies, start your dots.

12DaysofXmas2013_plate02

Dot heavily around the pattern, and tapering out as you go towards the plate edge.  Since I had two hands, I kept the heavy pattern in between the hands.

On the first plate I did, I dotted around the pattern, which took a long time.  I thought if I could remove the address label quickly it would be easier, so I traced around the hands before dotting.  I was able to cleanly remove the address label, but I didn’t like the look as much.

12DaysofXmas2013_plate06

It is also better if you don’t use a brand new sharpie, you want the point to be blunt for better dots.

When you get the look you want you need to cure it.  If there is a mistake you can probably clean it up with some rubbing alcohol and a cotton swab.

12DaysofXmas2013_plate03

See the residue of the address label…

Place your plate in a cold oven and turn it on to 350°.  Bake for 30 minutes, turn off oven and let the plate cool while still in the oven.  You can spray with a clear sealing spray if you want, but I can’t guarantee it would be food safe.  I would recommend hand washing only.

12DaysofXmas2013_plate04

I used vinyl stickers for the “Cookies for Santa” on the plate.  I had planned on writing “from our hands to your” but didn’t think there was room.

12DaysofXmas2013_plate07

signature-black

facebook instagram pinterest parties by mamasonshine etsy bloglovin google+ email twitter Image Map

What are your Christmas Traditions?


Leave a comment

12 Days of Christmas Tradition ~ Day 2

One of the reasons I love the Christmas holiday is the traditions.

I love reviving old family traditions, and making new ones.  I love remembering fondly the things that I did as a child at Christmas time and the things I couldn’t wait to do again.

As an adult, I get to make sure our family participates in our traditions and make new ones.

A new tradition, well hopefully it will be one, is to ride The Holiday Express.

12DaysofXmas2013_train01

Every year The Oregon Rail Heritage Foundation operates a steam engine train pulling/pushing passenger cars along the Oaks Bottom Wildlife Refuge.  It is a short 30-40 minute train ride, that is relatively slow.  For preteens that are not train lovers, this might be a slightly boring event.

12DaysofXmas2013_train07

The steam engine that pushed/pulled our train is the SP&S 700.  Now I don’t really know anything about trains, but the 700 belonged to the Spokane, Portland and Seattle Railway and is the only surviving example of a E-1 class 4-8-4 Northern type steam locomotive.  Yeah, I don’t know what the means,  but it is a beautiful train.  There is something mystical and enchanting about steam locomotives.

12DaysofXmas2013_train02

The SP&S 700 was built in 1938 and was used to pull the Empire Builder until 1947.  The 700 continued as a passenger train engine traveling up the Columbia River Gorge from Portland to Spokane until 1956.  After being on display for over 30 years it was restored to operation in 1990.  The operation and maintenance is provide entirely by volunteers.

12DaysofXmas2013_train10

Santa comes through the train handing out candy canes, and parents can take some pictures.  My two-year old nephew loves trains, and thought this trip was absolutely wonderful.  Ian and Sid both had a great time too, although Sid wasn’t impressed with Santa.

12DaysofXmas2013_train08 12DaysofXmas2013_train09

The cars are all decorated for Christmas and heated.

12DaysofXmas2013_train03

Unfortunately the weather had warmed up and there was no snow, but it was still overcast and a little foggy, adding a little something to the scenery.

12DaysofXmas2013_train06 12DaysofXmas2013_train04

Happy Riding


signature-black

facebook instagram pinterest parties by mamasonshine etsy bloglovin google+ email twitter Image Map

What are your Christmas Traditions?